I’ve had a love obsession with classic vintage tile for as long as I can remember. In fact, I’m pretty sure I spent most of my last trip to Paris staring at the ground, drooling over the intricate mosaic tile floors from bygone eras.
So when we decided to renovate our guest bathroom, I was eager to try and inject a bit of that inspiration into the space!
However, that dream was quickly smashed as soon as I realized how difficult installing that type of intricate floor design in a room as unsquare as ours would be. (Especially since I’d describe our skill level with tiling intermediate at best). So, in the end, we tiled the floor a solid black mini hex mosaic tile throughout the entire space. (which turned out so beautifully!)
However my heart still longed for that classic vintage tile border!
That’s when I turned my eyes upwards and thought…. well why not? Why can’t I *paint* the design I was hoping to put on the floor on the ceiling instead?
After a quick look around the internet, I found next to nothing that was similar to what I was thinking of doing. Which then makes you stop and think, “Either I’m a genius, OR this is incredibly stupid and that’s why lots of other people aren’t already doing the same thing“.
So I told myself, “IT’S JUST PAINT KADIE, if it’s horrible you can just paint over it.”
The Design:
I researched a lot of classic mosaic floor tile border patterns, but ultimately I decided on a more simplistic design that I felt not only complimented the rest of the space, but would actually be feasible for me to “easily” map out in painters tape on my ceiling.
Next, I went about making some quick digital mockups of my design by photographing the existing ceiling with my phone and overlaying a rough sketch of each of my ideas on top of it.

This helped me figure out the last few tweaks I needed to make in order to come up with my final pattern. (For example: I really liked the 2nd design, but it felt just a bit too busy, so I combined it with elements of the first design to simplify it just a tad!)
Creating A Blueprint
It might just be me, but there is no way I can hold a design like this in my head. I need to have it written down so I can reference the picture 8 million times as I’m working to make sure that I’m doing what I’m supposed to as I go along.
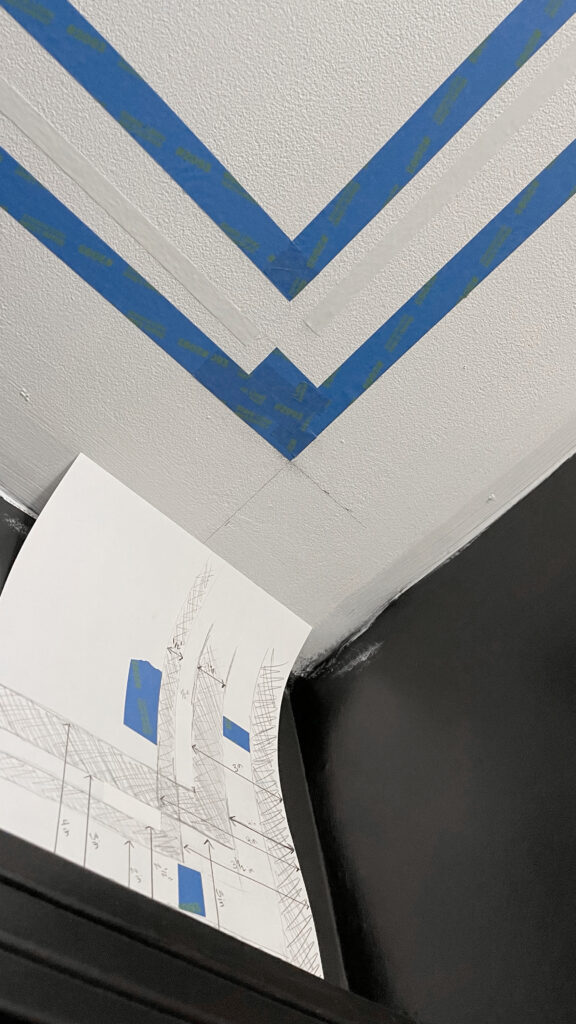
To create a scale blueprint for this design, I only really needed to map out one corner of the design. Those measurements would give me everything I needed for the rest of the space.

I found it helpful to place the masking tape I would be using on the ceiling directly onto the blueprint where it would go. This again just helped me to keep straight what areas would be getting taped and what areas would be getting painting.
I also found it helpful to add lots of measurements to the blueprint so I had as many reference points as possible to know how far away different parts of the design should land from one another so I could spot check myself with a ruler as I went along.
Don’t want to create your own template? In that case you can use one I recreated that will help you replicate my ceiling exactly. As a note, when you go to print it, make sure your printer doesn’t try to “fit to page”. You want it to just chop off whatever doesn’t fit on you 8.5×11 sheet of paper. Then when it’s printed out I’d measure everything and make sure it is all correct. For the 5″ you’ll be measuring from the edge of your paper, and not the edge of the printed design since most printers can’t print all the way to the edge.
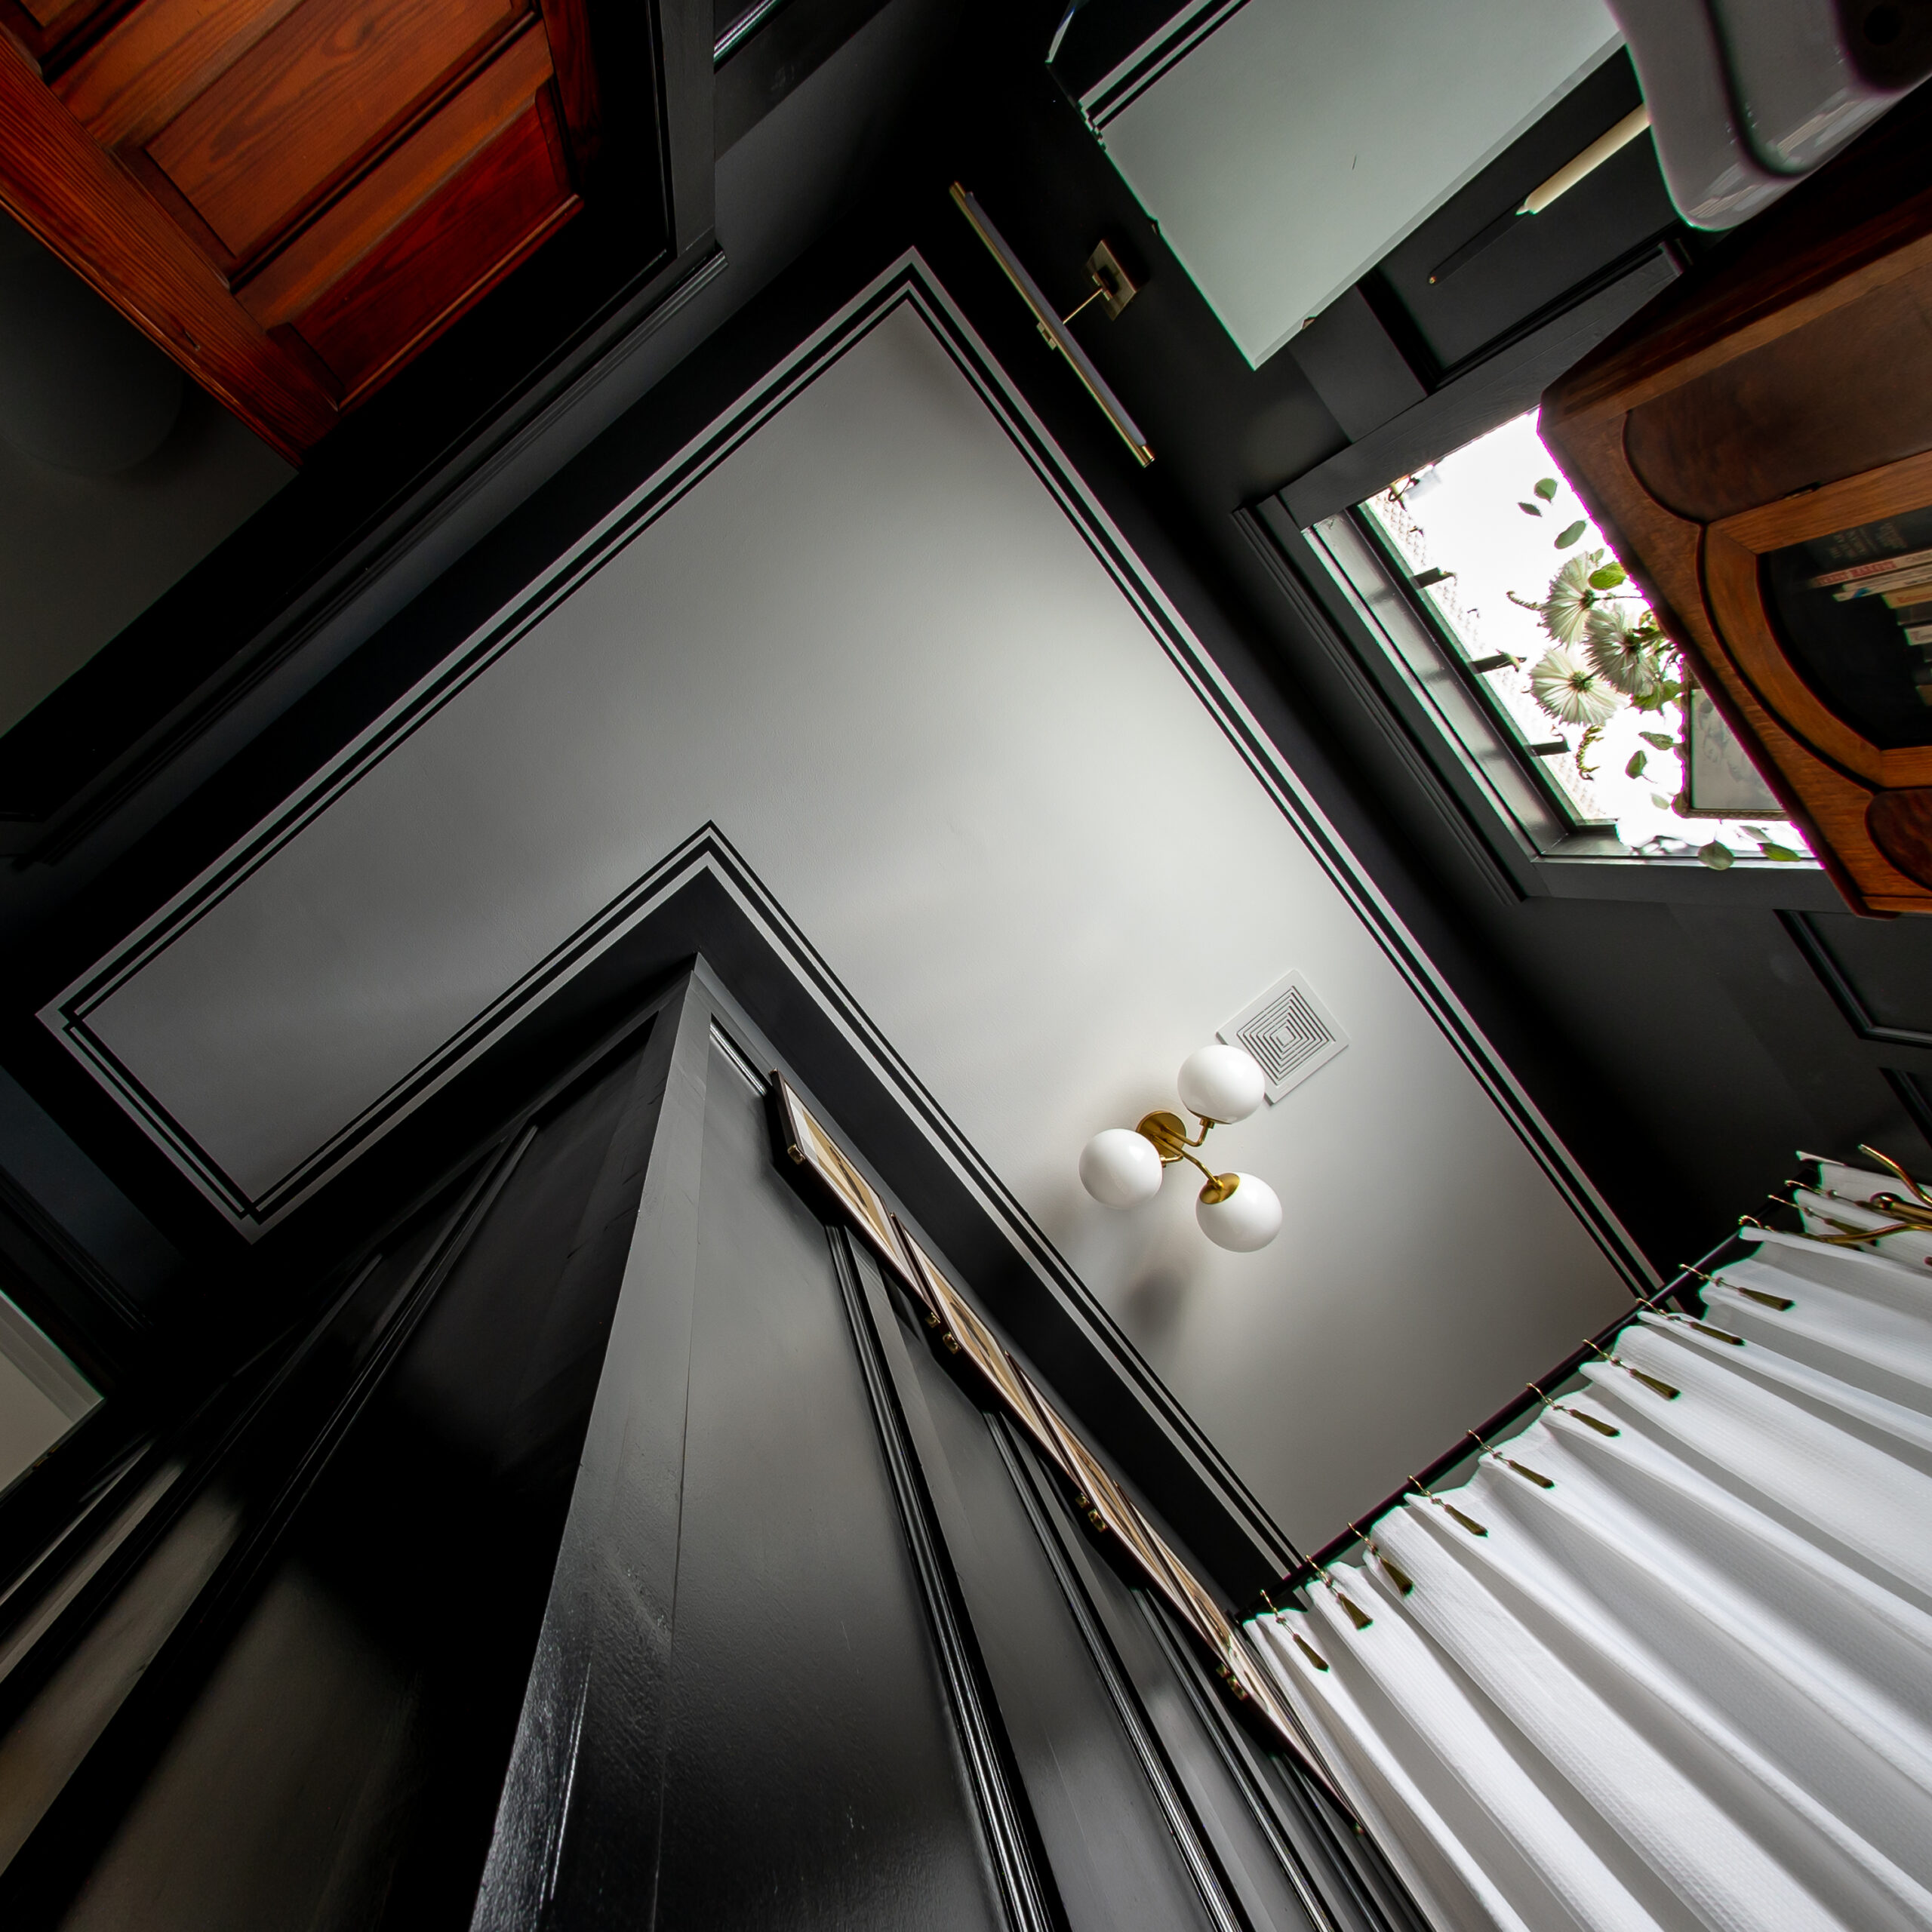
As an additional note, if you are trying to replicate the pattern I used on my ceiling exactly, you’ll notice that I didn’t use this corner design on EVERY CORNER. Since my room was L shaped, I decided to only use it on the end corners of my L but not on the middle ones (That should make sense if you reference the final picture). If you are doing this pattern in a normal square shaped room, you likely won’t have to worry about this though.
Taping Off The Design
The hardest part of this DIY is getting the silly tape straight and level and as evenly spaced as possible on the ceiling. (Especially if you are doing a high contrast design like I did). If you are blessed with straight walls, then this will be a *far easier* task for you than it was for me.
Because my walls are old and wavy, this was a challenge. Here’s a few ways I tackled this problem:
- I decided to let the wall color wrap up onto the ceiling for 5″ before starting the border pattern. This was important because I could essentially visually square off the room this way and create a straight line. So instead of following the line of the wavy wall, this paint line would instead follow a straight path from point A to B regardless of what the wall was doing.
- To get my straight path on my very wavy wall, I measured a set distance (in my case 5″ off the wall) from two spots on opposite ends of the wall. Then I firmly tacked my painters tape to the mark I made at the one end, unspooled enough tape to get me to the other end, pulled the tape as tight as possible (without popping the tape off the ceiling where I had tacked it originally) and then tacked down the other end of the tape. (To get this to work you need to make sure you only have point A tacked to the ceiling and nothing tacked in the middle so when you pull tight and tack to point B it gets you a straight line from A to B) The gave me a much straighter line to measure off of for the rest of my design than trying to base measurements for straight lines off a wavy wall.
- After my two end points were tacked down I would gently tack down the middle of the tape as well, periodically double checking the tape was in fact straight and level as I went using a clear quilting ruler that would show me if my line veered off straight at all.
For the rest of your pattern you’ll now be able to measure off your new straight line you just created. I found it best to work in a similar way though tacking the tape at the two end points first and then as you to go along tacking down the middle afterwards doing quick measurement checks along the way to ensure everything stays evenly spaced, square and straight to each other.
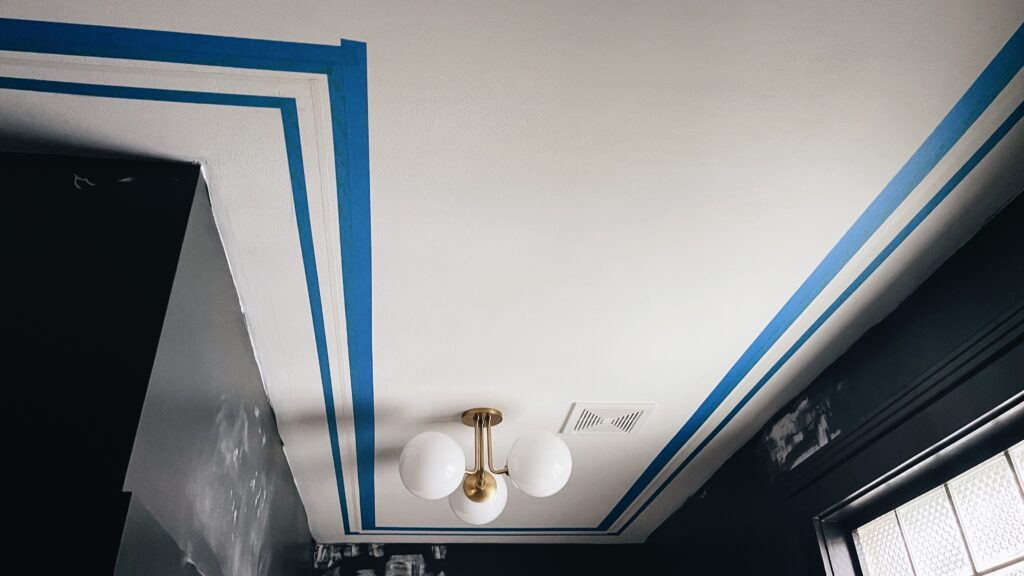
After a lot of swearing and frustration and rolls of tape, I eventually got all the tape up on the ceiling and it looked something like this:
Sealing Your Tape To Prevent Bleed
Second to making sure all your lines are all as straight and even as possible, this is the next most important part of this process, because it will ensure your paint doesn’t bleed under your tape you just painstaking applied to the ceiling and require massive amounts of tedious touch ups later.
- The first step to properly sealing your tape is to firmly slide your finger along all of the tape in your design, ensuring there is good adhesion between you ceiling and your tape on all the edges where it matters.
- The second and most counter intuitive step in this process is that next you are going to apply a coat of your background color over all the tape. In my case that was the white color already on the ceiling. So yes, I put up all the tape and then painted over all of it with the white paint. Why? Because not all tape is created equal and even the best tape on the market won’t be able to perfectly ahere to every bump in the texture of the surface you are painting. So this hack will let the background color paint seal any gaps you may still have in your tape and then if a bleed does happen, you won’t be able to see it because it’s the same color as the background!


Lastly Apply Your Paint, Peel & Enjoy
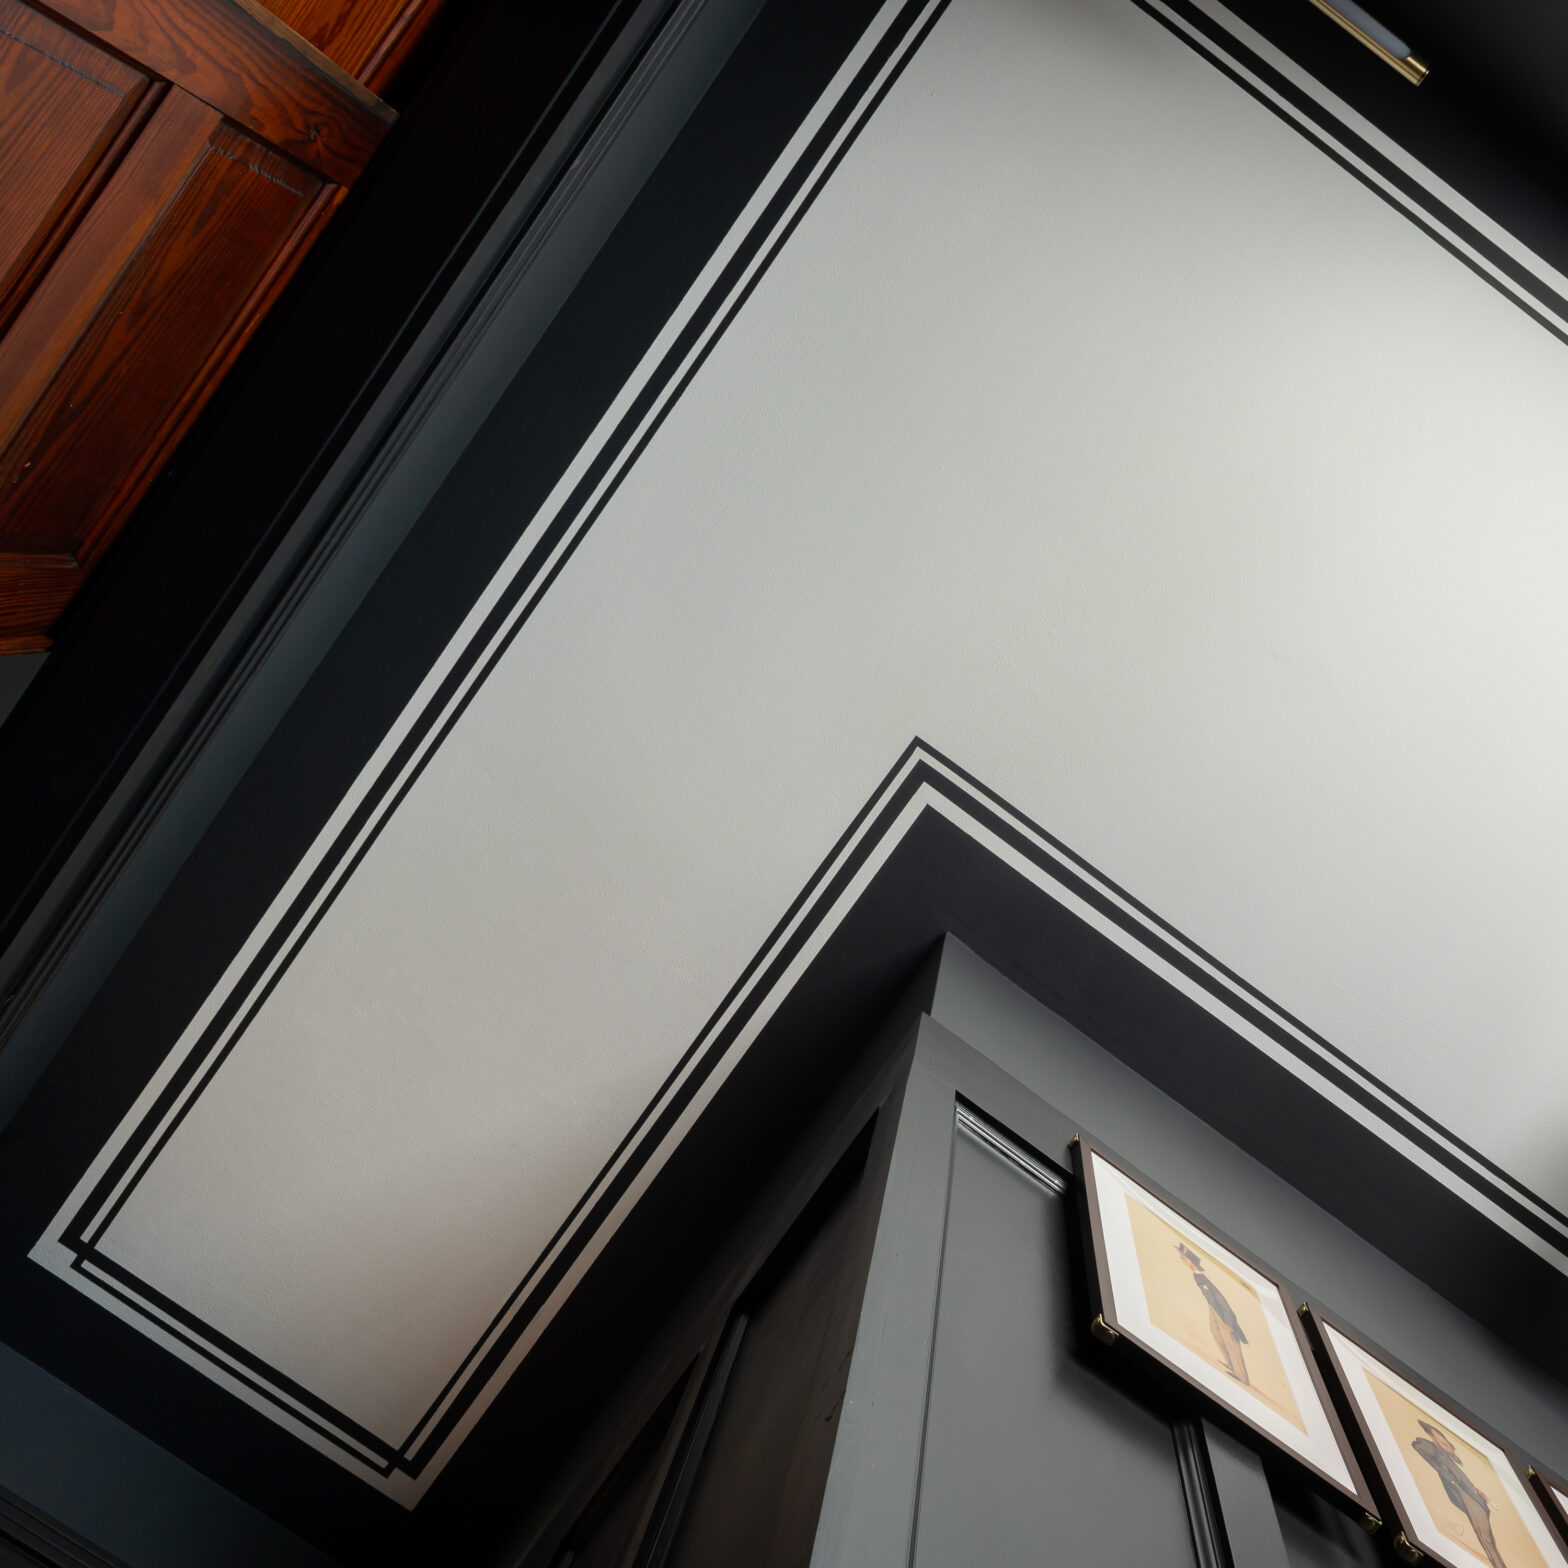
After you’ve sealed your tape and it’s completely dry, you can then apply your top coat color of paint to your ceiling! When you’ve acheived the coverage you want, peel off all your tape and watch your pattern magically immerge! To see more images from our Guest Bathroom Renovation click here!
Materials Used For This DIY
- .94″ Painters Tape
- Ok so I know that my template says 1″, but I promise this .94″ tape will work just fine. It’s the same thing I used on this project.
- 1/2″ Painters Tape
- A Ruler
- I found using a seam measurer like this one helpful for quickly checking the distance between the tape stayed even as I went along.
- I found a long clear ruler like this one helpful to hold up over my tape to see if it was staying straight or bowing away from the line at all.
- A Level
- A Small Roller
- Behr Flat White Ceiling Paint
- Sherwin Williams: Iron Ore (Flat) Paint
- A good ladder lol…

Don’t Forget To Pin This Post & Subscribe!
Want to keep getting more DIY home decor inspiration, thrifting tips & tricks, free art downloads, reading recommendations, and home renovation tutorials? Then don’t forget to pin this post for later so you can follow me on Pinterest and then subscribe to my blog so you can get links to my newest content as soon as it hits the blog!