
Making fresh DIY Christmas Wreaths for my home and friends has become one of my favorite holiday traditions. Especially since each evergreen wreath typically only costs me less than $3 in supplies to make! (Versus the $30+ you’d likely spend on a fresh evergreen Christmas wreath from the store)!
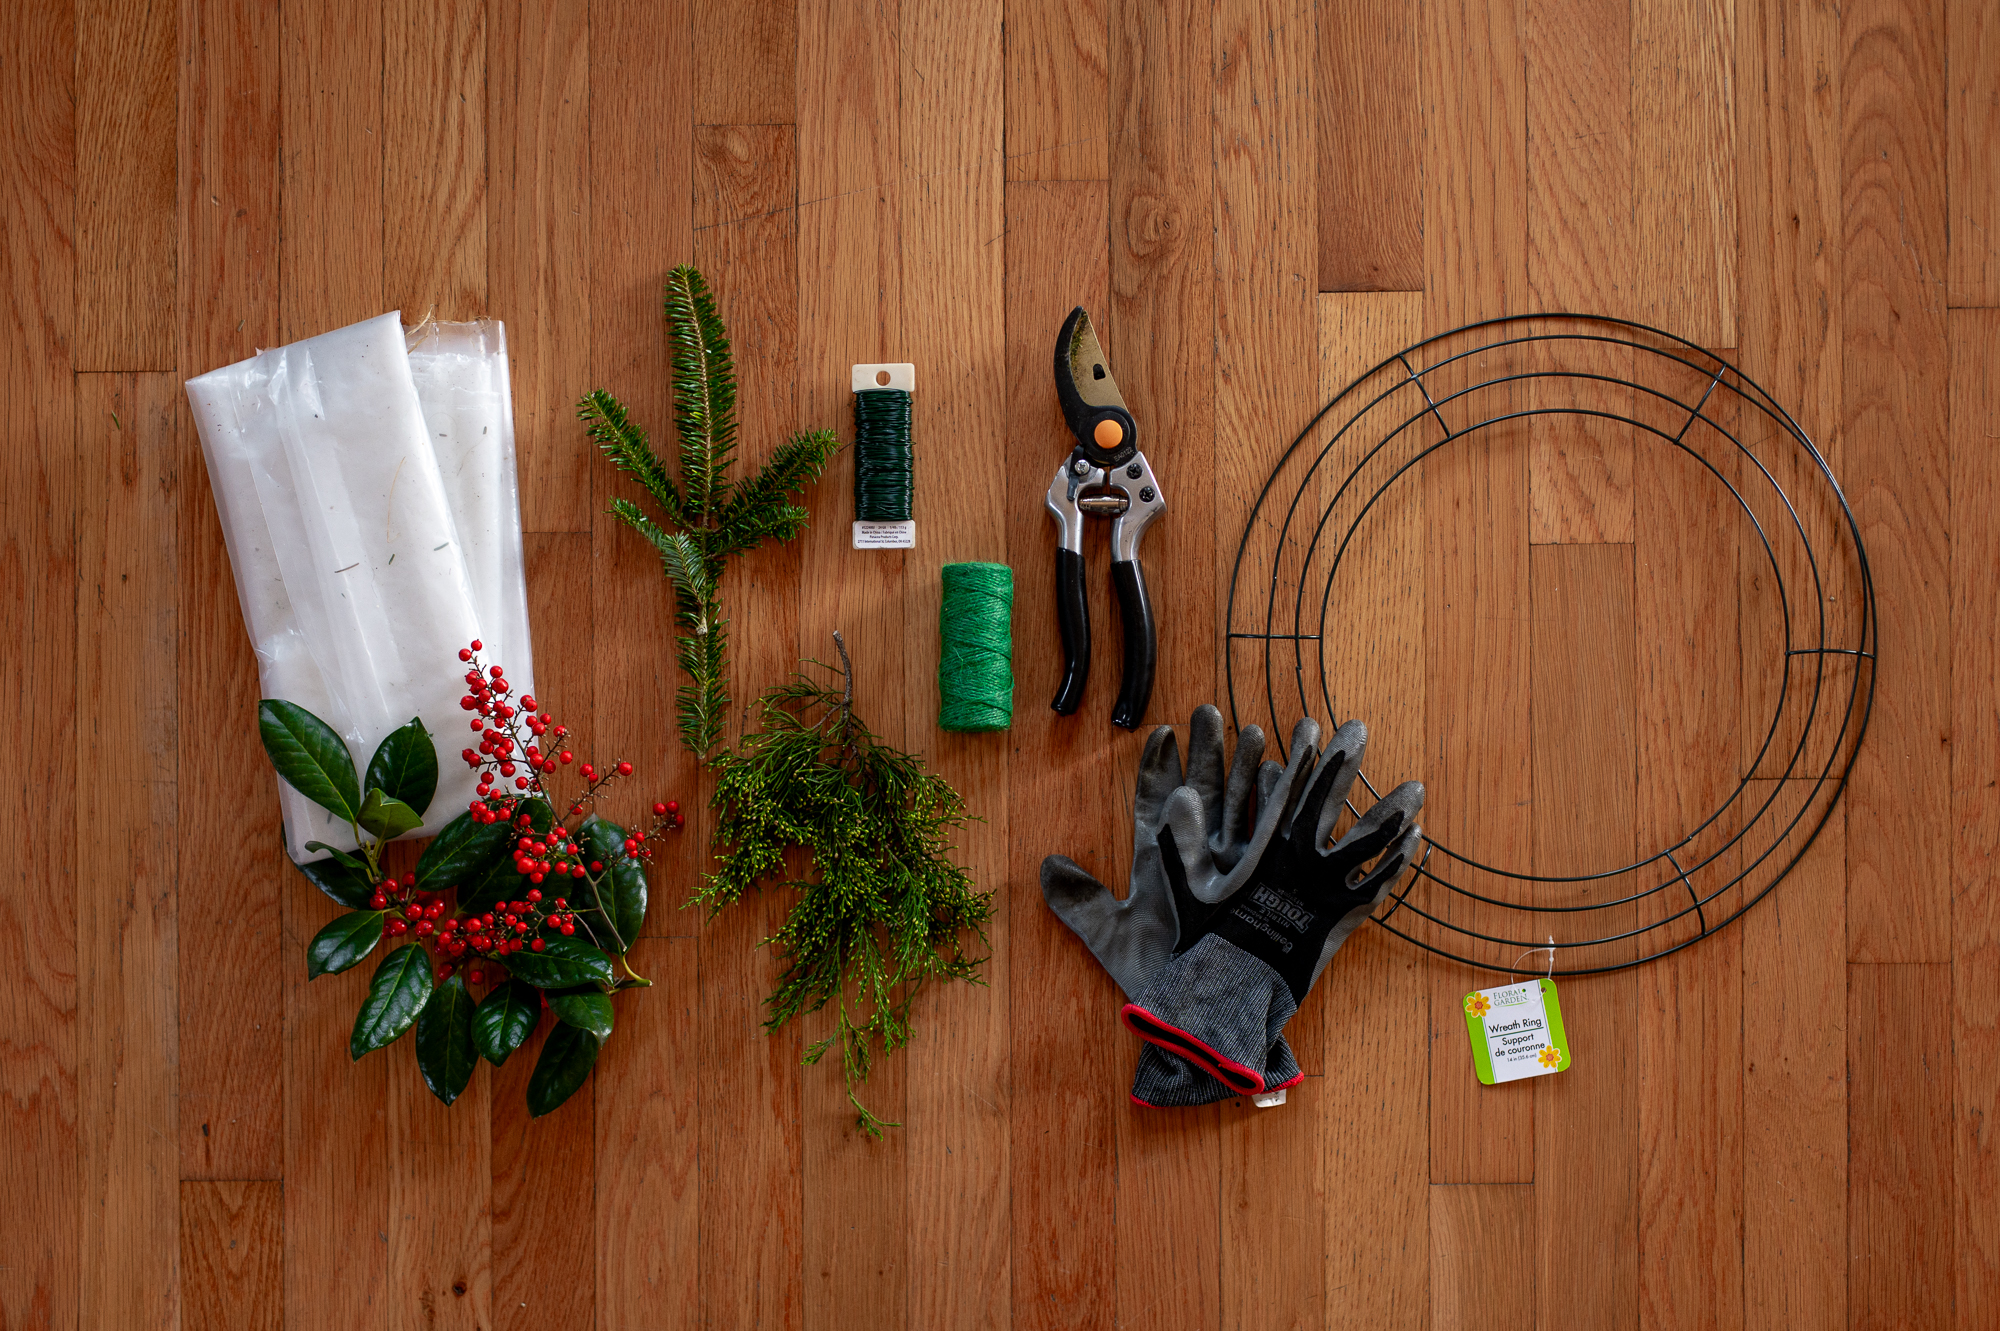
Supplies & Tools You’ll Need
*This blog post contains affiliate links, meaning that if you purchase any of the items using the links I provide I, as the author of this website, will receive a very very small commission from that sale. This is a great way to help support your favorite bloggers at no cost to you. Think of it like a tip jar that costs you nothing!
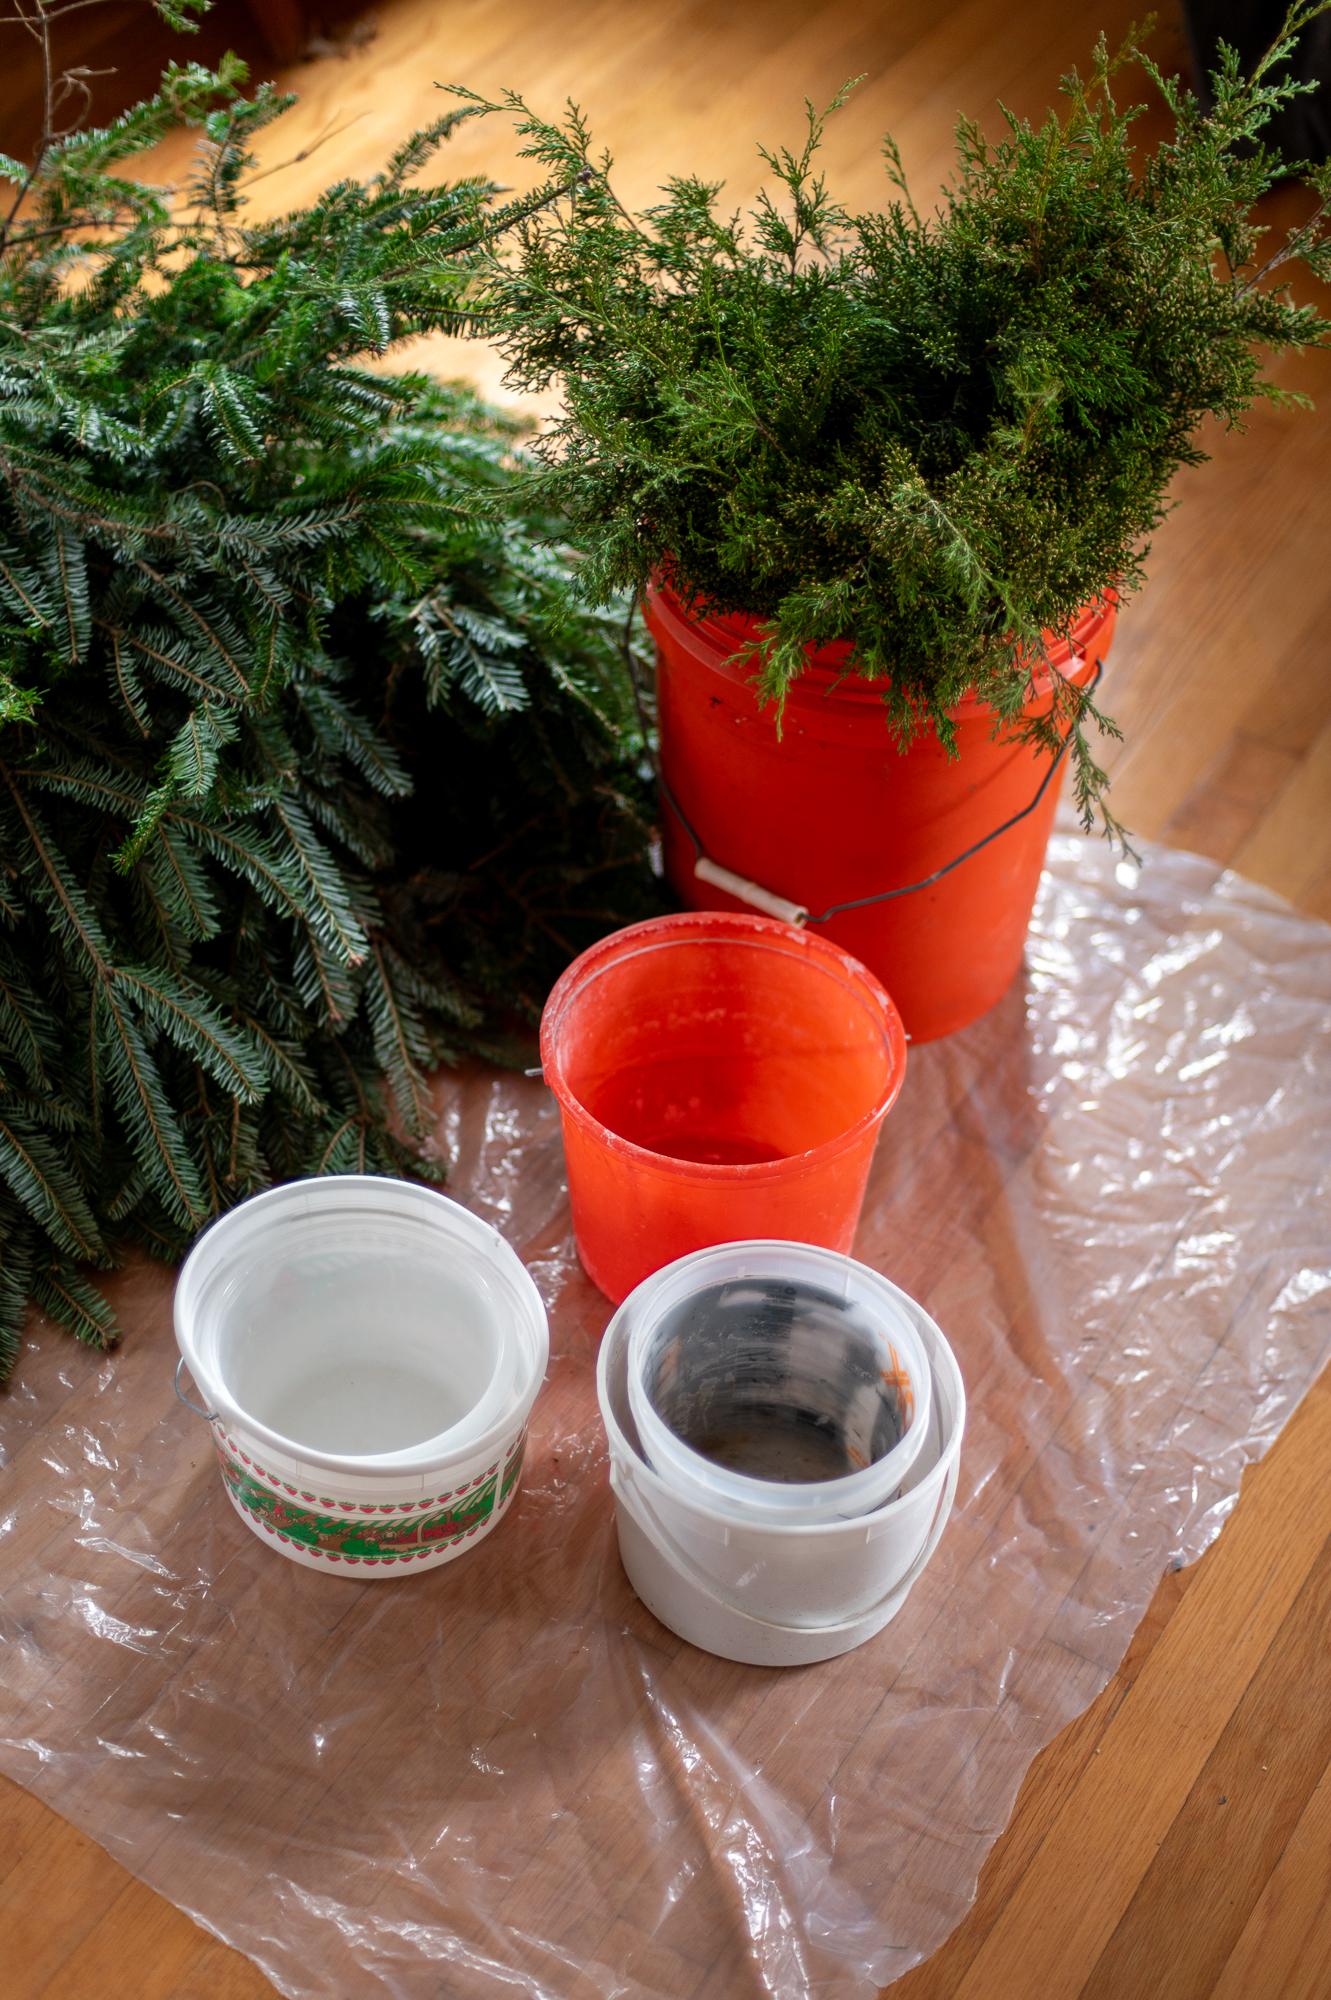
- Fresh Evergreen Branches (we’ll discuss where to get these for free!)
- I like to have at least two types of evergreens I’m using together. But you can get by with just one if that’s all you can find! For this tutorial I’ll be using fir Christmas tree trimmings, juniper, and a few sprigs of holly & nandina berries. (Note: Both holly berries and nandina berries are considered toxic to some degree. Use and gift wreaths made using these berries with caution)
- Garden Pruning Shears
- You’ll want to make sure they are nice and sharp and can cut through small branches.
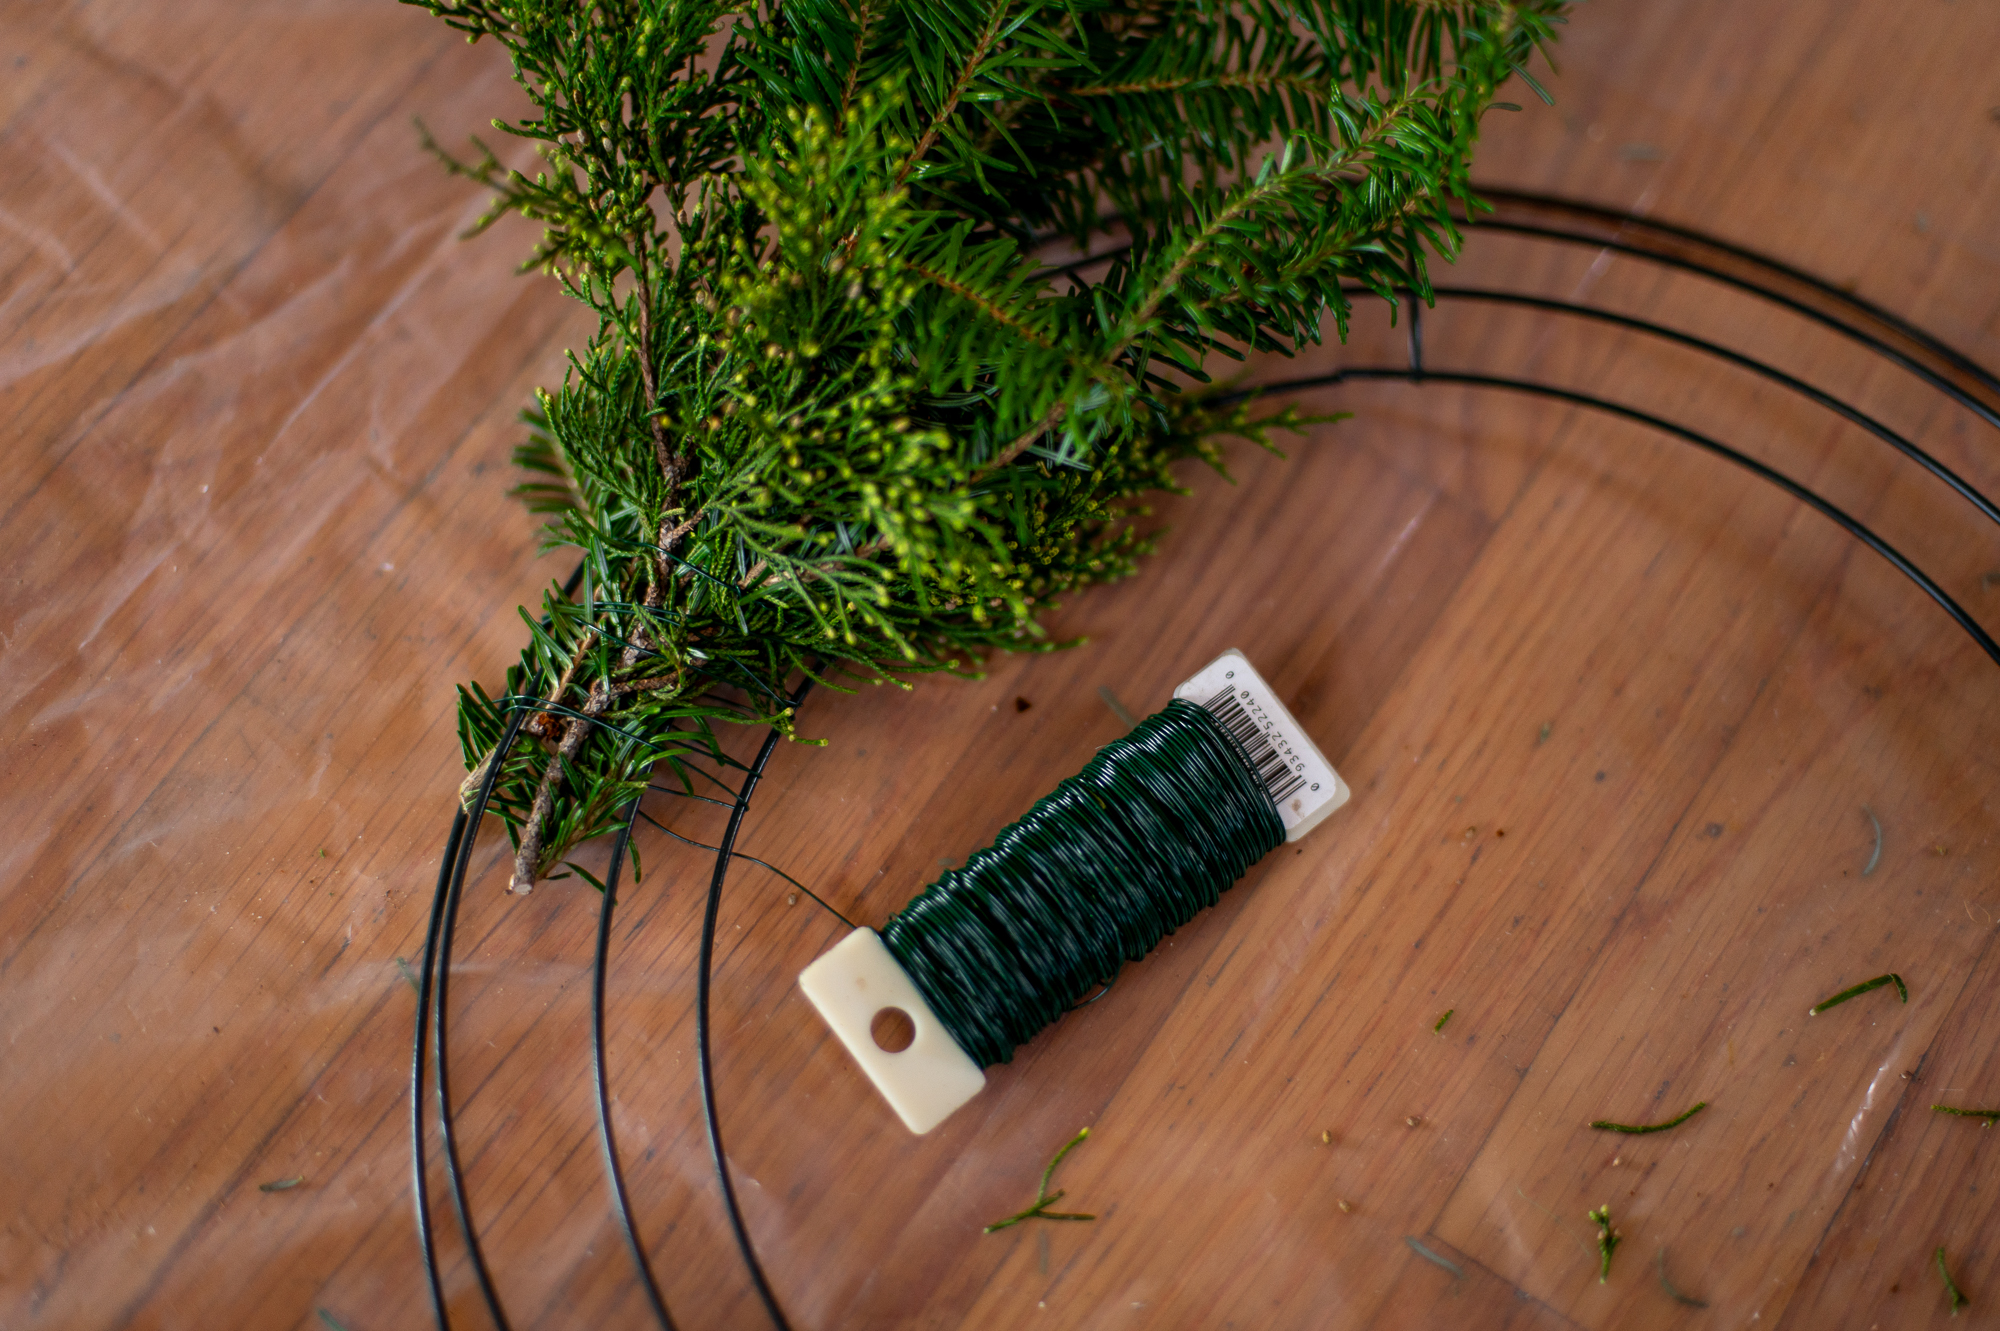
- Floral Wire
- This is widely available at any craft store, but you can also snag some for $1.25 at the Dollar Tree. However, it’s actually cheaper per foot to grab it from Amazon here.
- You can also use twine, but I find it much more difficult to work with than the floral wire.
- Wire Snips
- Anything that will cut thin floral wire works. If possible, I prefer needle nose pliers with wire snips for the job. I just find these come in handy when working with wire.
- A Wreath Form
- You can snag a wire wreath form from just about any craft supply store. HOWEVER, my favorite place to pick them up is from The Dollar Tree (because you can’t beat $1.25). I’ll be using their 14.25″ form for the tutorial, and also show a wreath made using their smaller 8″ wreath form. Scroll down to the bottom of this post for pictures that shows a size comparison between the two.
Pro Tip: They carry these in store all year, so pick them up in the summertime because they will sell out during the holiday season. If you can’t find any near you, there is always Amazon. - FREE OPTION: You can also *MAKE* a wreath form yourself out of basically anything you can twist and secure into a sturdy circle shape. Thick vines, or bendable branches often work great for this. You could also cut a wreath form out of thick cardboard. (If you go that route I’d be sure to keep the wreath inside so the cardboard doesn’t deteriorate).
- You can snag a wire wreath form from just about any craft supply store. HOWEVER, my favorite place to pick them up is from The Dollar Tree (because you can’t beat $1.25). I’ll be using their 14.25″ form for the tutorial, and also show a wreath made using their smaller 8″ wreath form. Scroll down to the bottom of this post for pictures that shows a size comparison between the two.
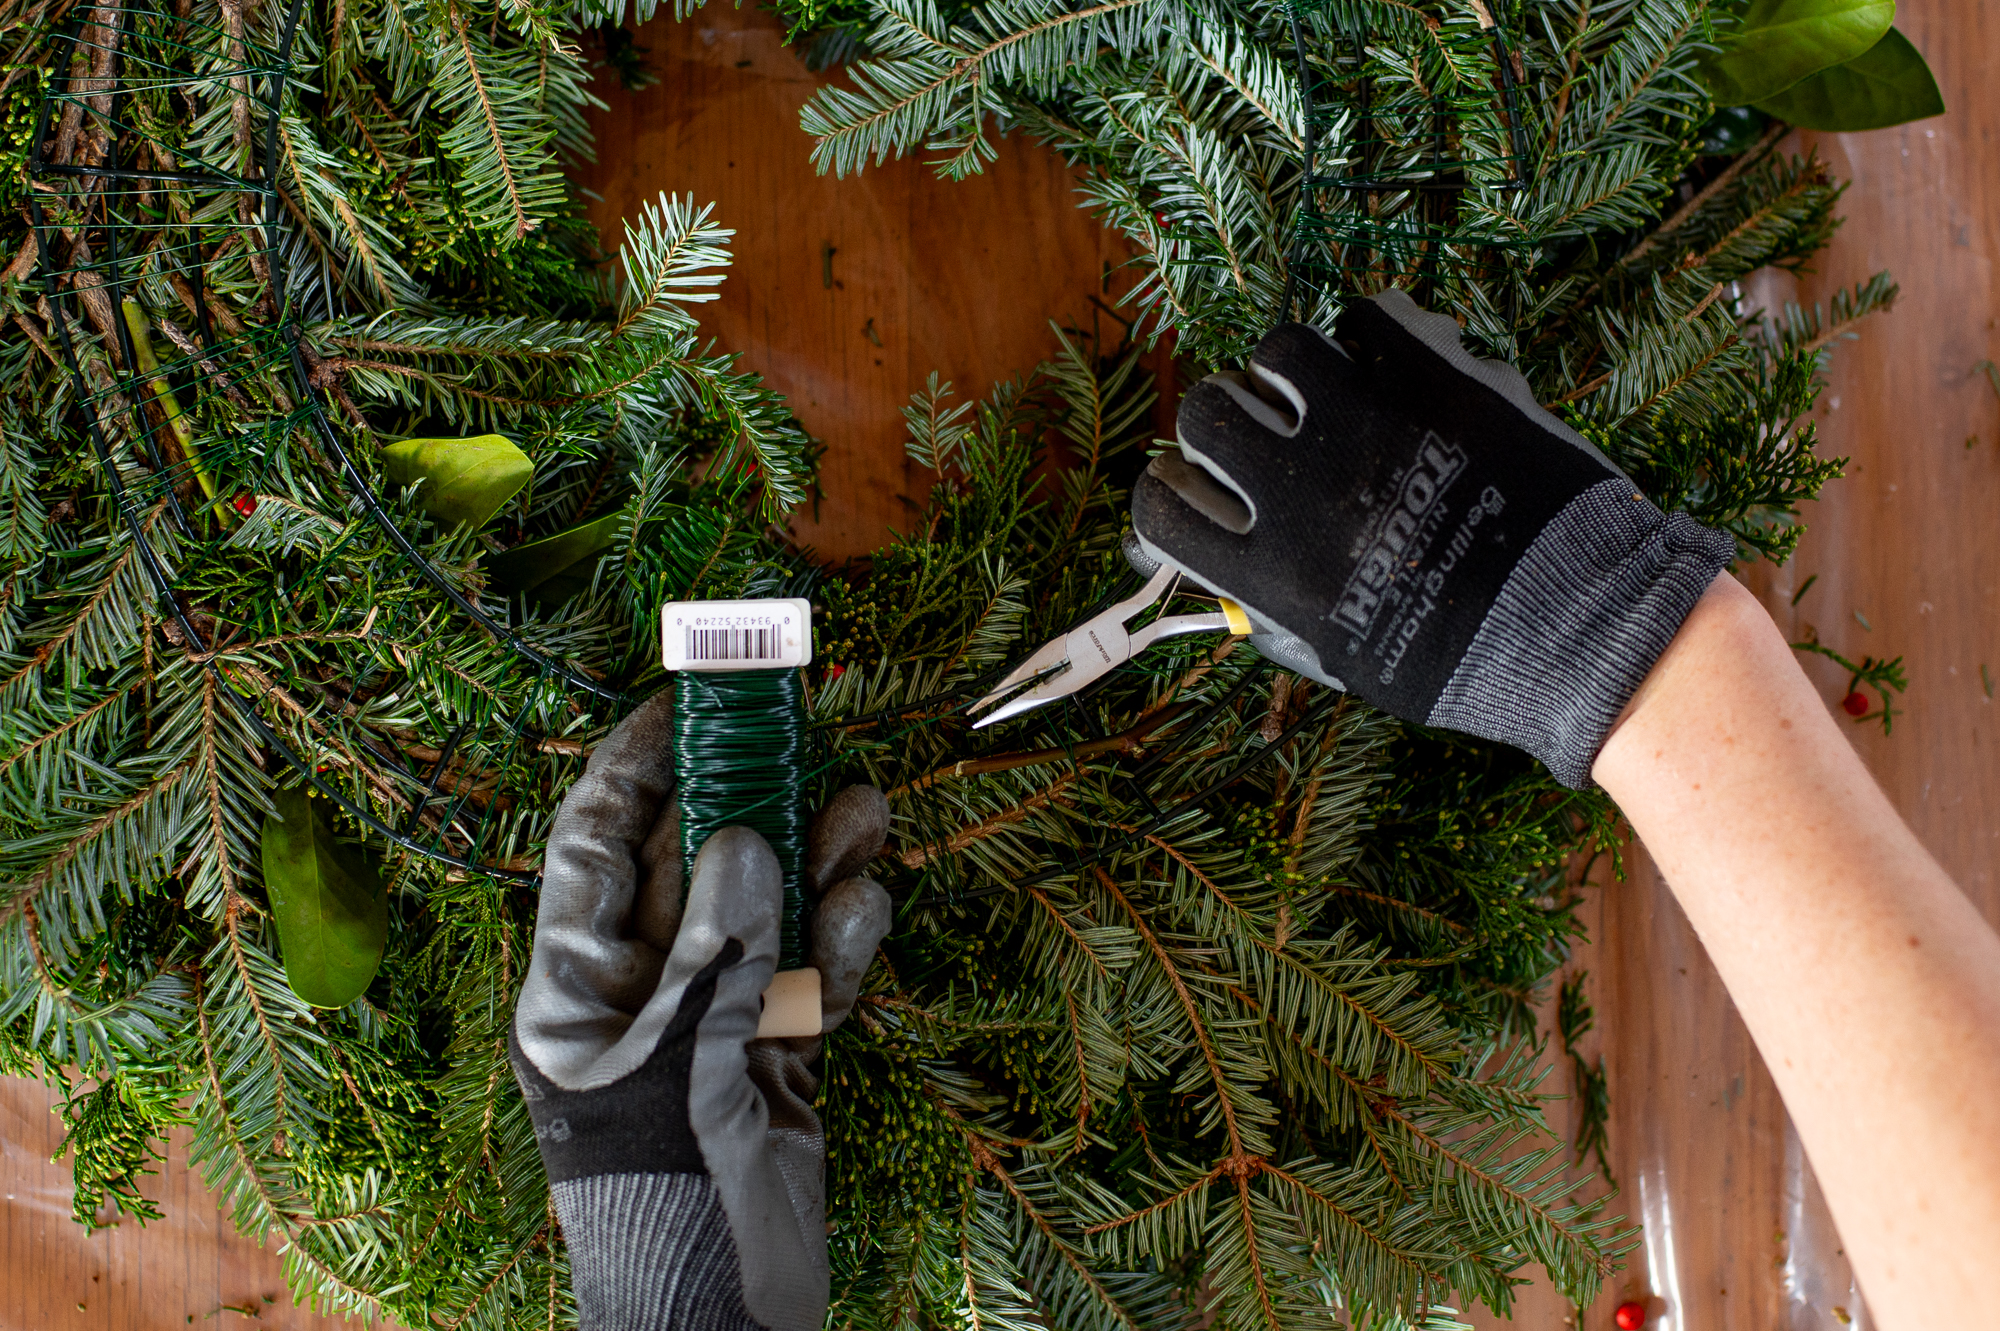
- Gloves
- You are going to want to protect your hands somehow during this project both from the wire and from tree sap. I personally prefer this kind of nitrile gardening glove for craft projects like this because they let me retain more dexterity than other types of work gloves do. (Also these come in size X-Small to X-Large so you can get a pair that actually FIT your hands.)
- A Plastic Tarp
- This project is MESSY. So if you’re working inside, or you just want to save yourself some time on clean up (and protect your surface from tree sap), pick up a cheap plastic tarp or table cloth (or even just some old newspapers) to throw down before you start.
Where To Collect FREE Foraged Evergreen Branches (As An Urban City Dweller)
When most people hear the word “foraged” they think wilderness, farm, forest, etc. So when you live in a more urban environment it’s easy to think “foraging isn’t an option for me”. But that my fellow city slickers is where you are wrong.
Here are a few places I collect FREE foraged evergreen branches every year just a few blocks from my house in a historic downtown neighborhood.
Home Depot & Lowes (AKA Christmas Tree Lots)
If you’ve ever purchased a fresh cut Christmas tree, you know that after selecting your tree for purchase, it is prepped for sale by trimming the trunk with a fresh cut and also removing any of the lowest branches that would prevent your tree trunk from properly resting in your tree holder when you get it home. Typically people don’t want these trimmed branches so the tree lot workers just throw them off to the side in a big pile.
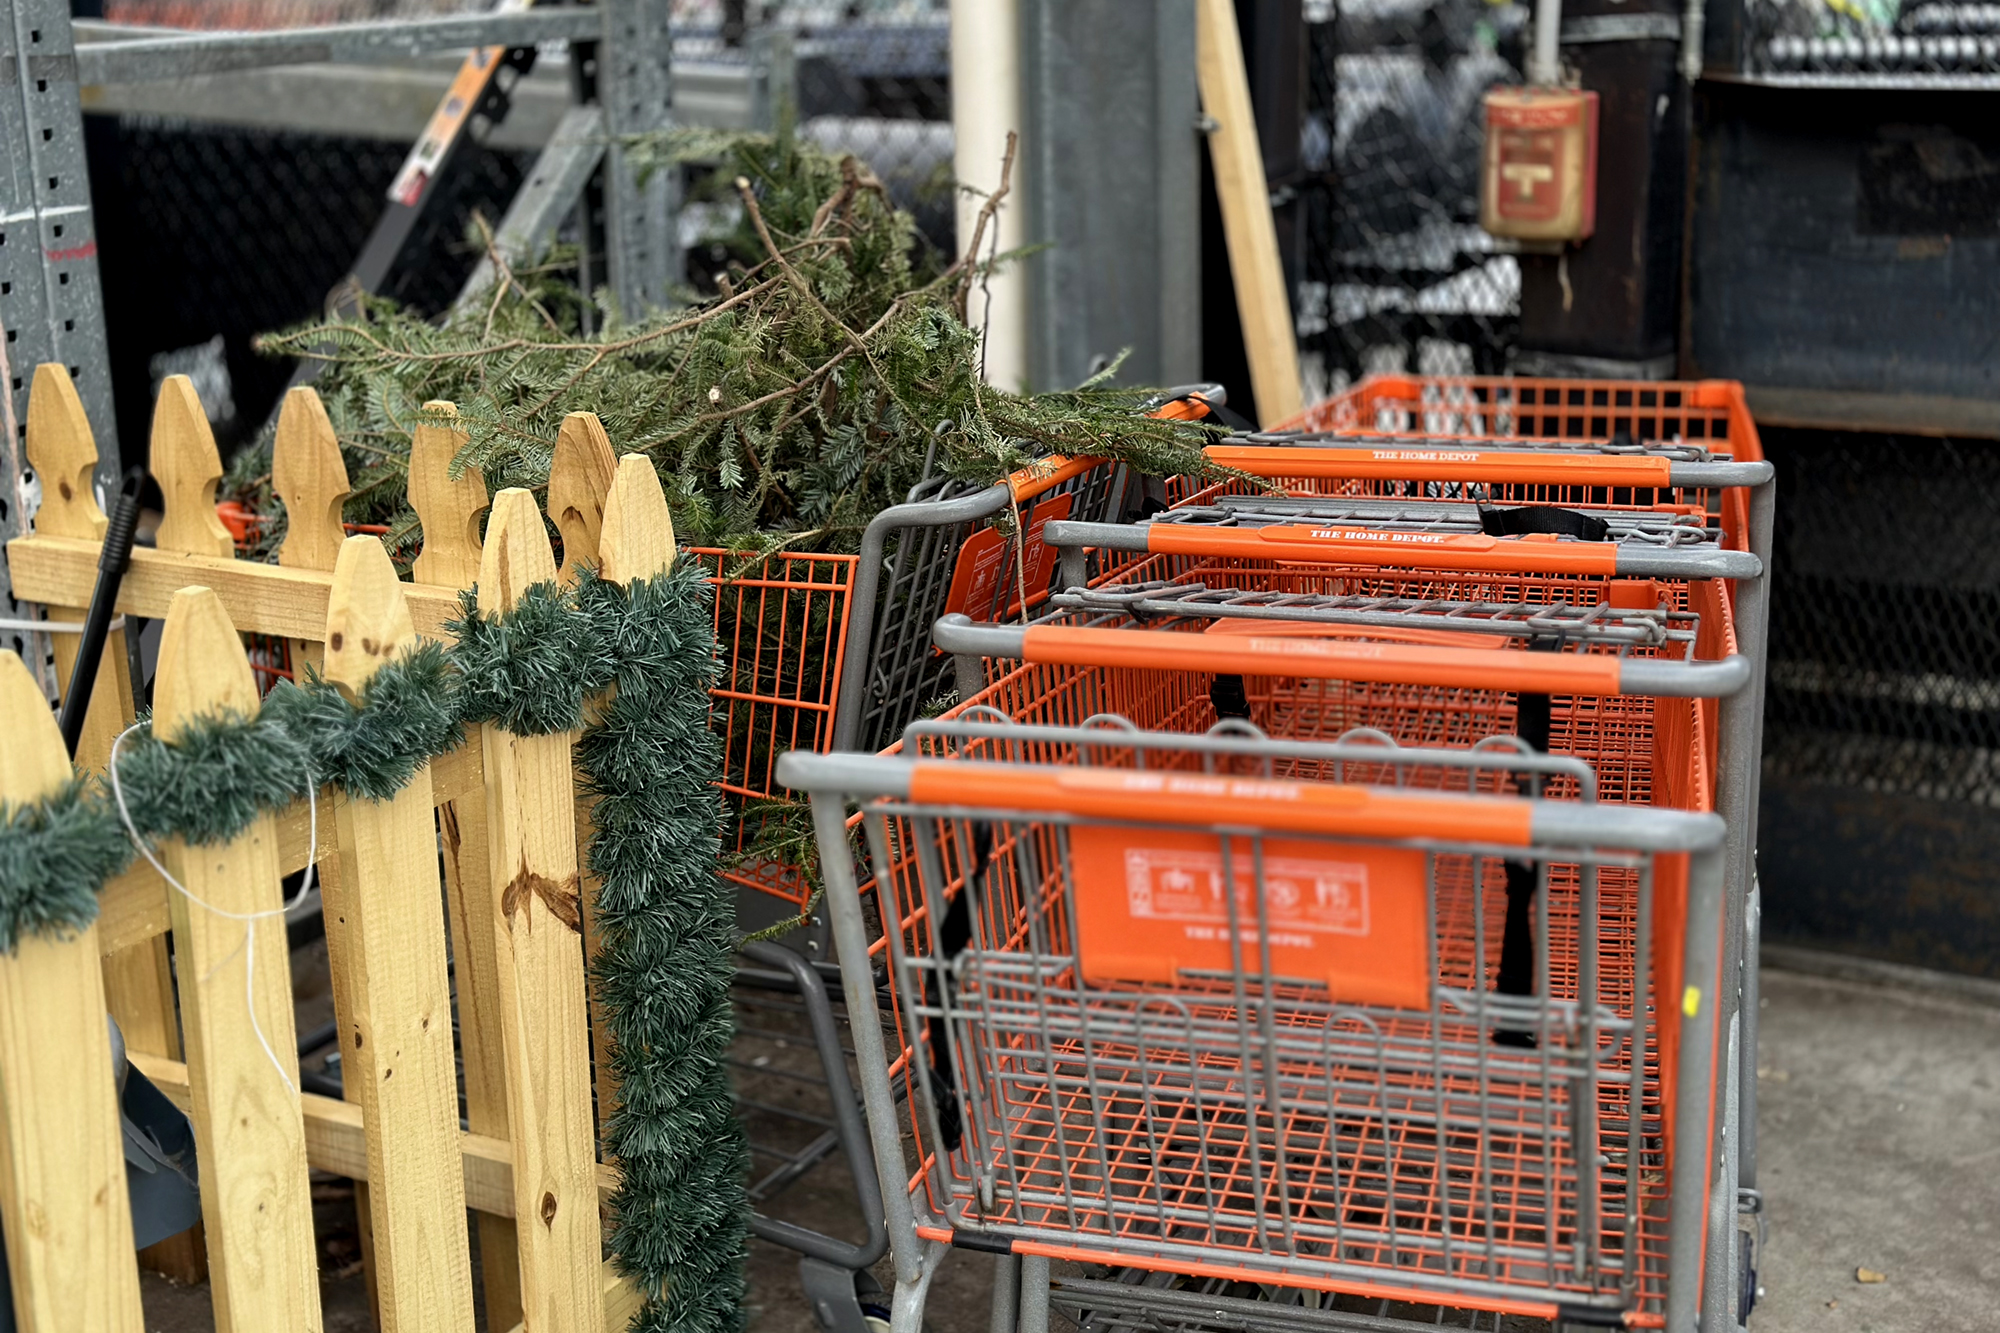
You my friend want these branches. And Home Depot and Lowes WANT YOU TO TAKE THEIR CHRISTMAS TREE TRIMMINGS FOR FREE. Typically they will be in a cart or a bin near the tree lot. If you’re unsure if you can just walk off with them, ask any employee if you can have them and they will more than happily let you take away as much as you want.
Most of the time at these locations you’ll be getting some variety of fir Christmas tree trimmings, although occasionally I’ve scored cedar trimmings as well from their discard bins!
NOTE: PROFESSIONAL TREE LOT SELLERS (the kind that pop up in parking lots) don’t always give away their cuttings for free since they themselves are often using the cuttings to create wreaths they can sell their customers. One caveat to this is if you buy a tree from the tree lot they often will let you have as many cuttings as you want for free. So just check before you walk off with tree cuttings from a professional lot.
Commercial Trash & Dumpster Areas

That sounds fairly unhinged to write, but often areas behind commercial buildings will have some sort of evergreen trees attempting to hide/beautify their trash collection area. These are not trees people care about. They are there to help make the trash look less horrible. I personally try to find a spot that looks truly derelict. The more trash strewn about the better. You want it to look like no one cares. If it looks like someone even *remotely* puts time and energy into making it looks nice, move on.

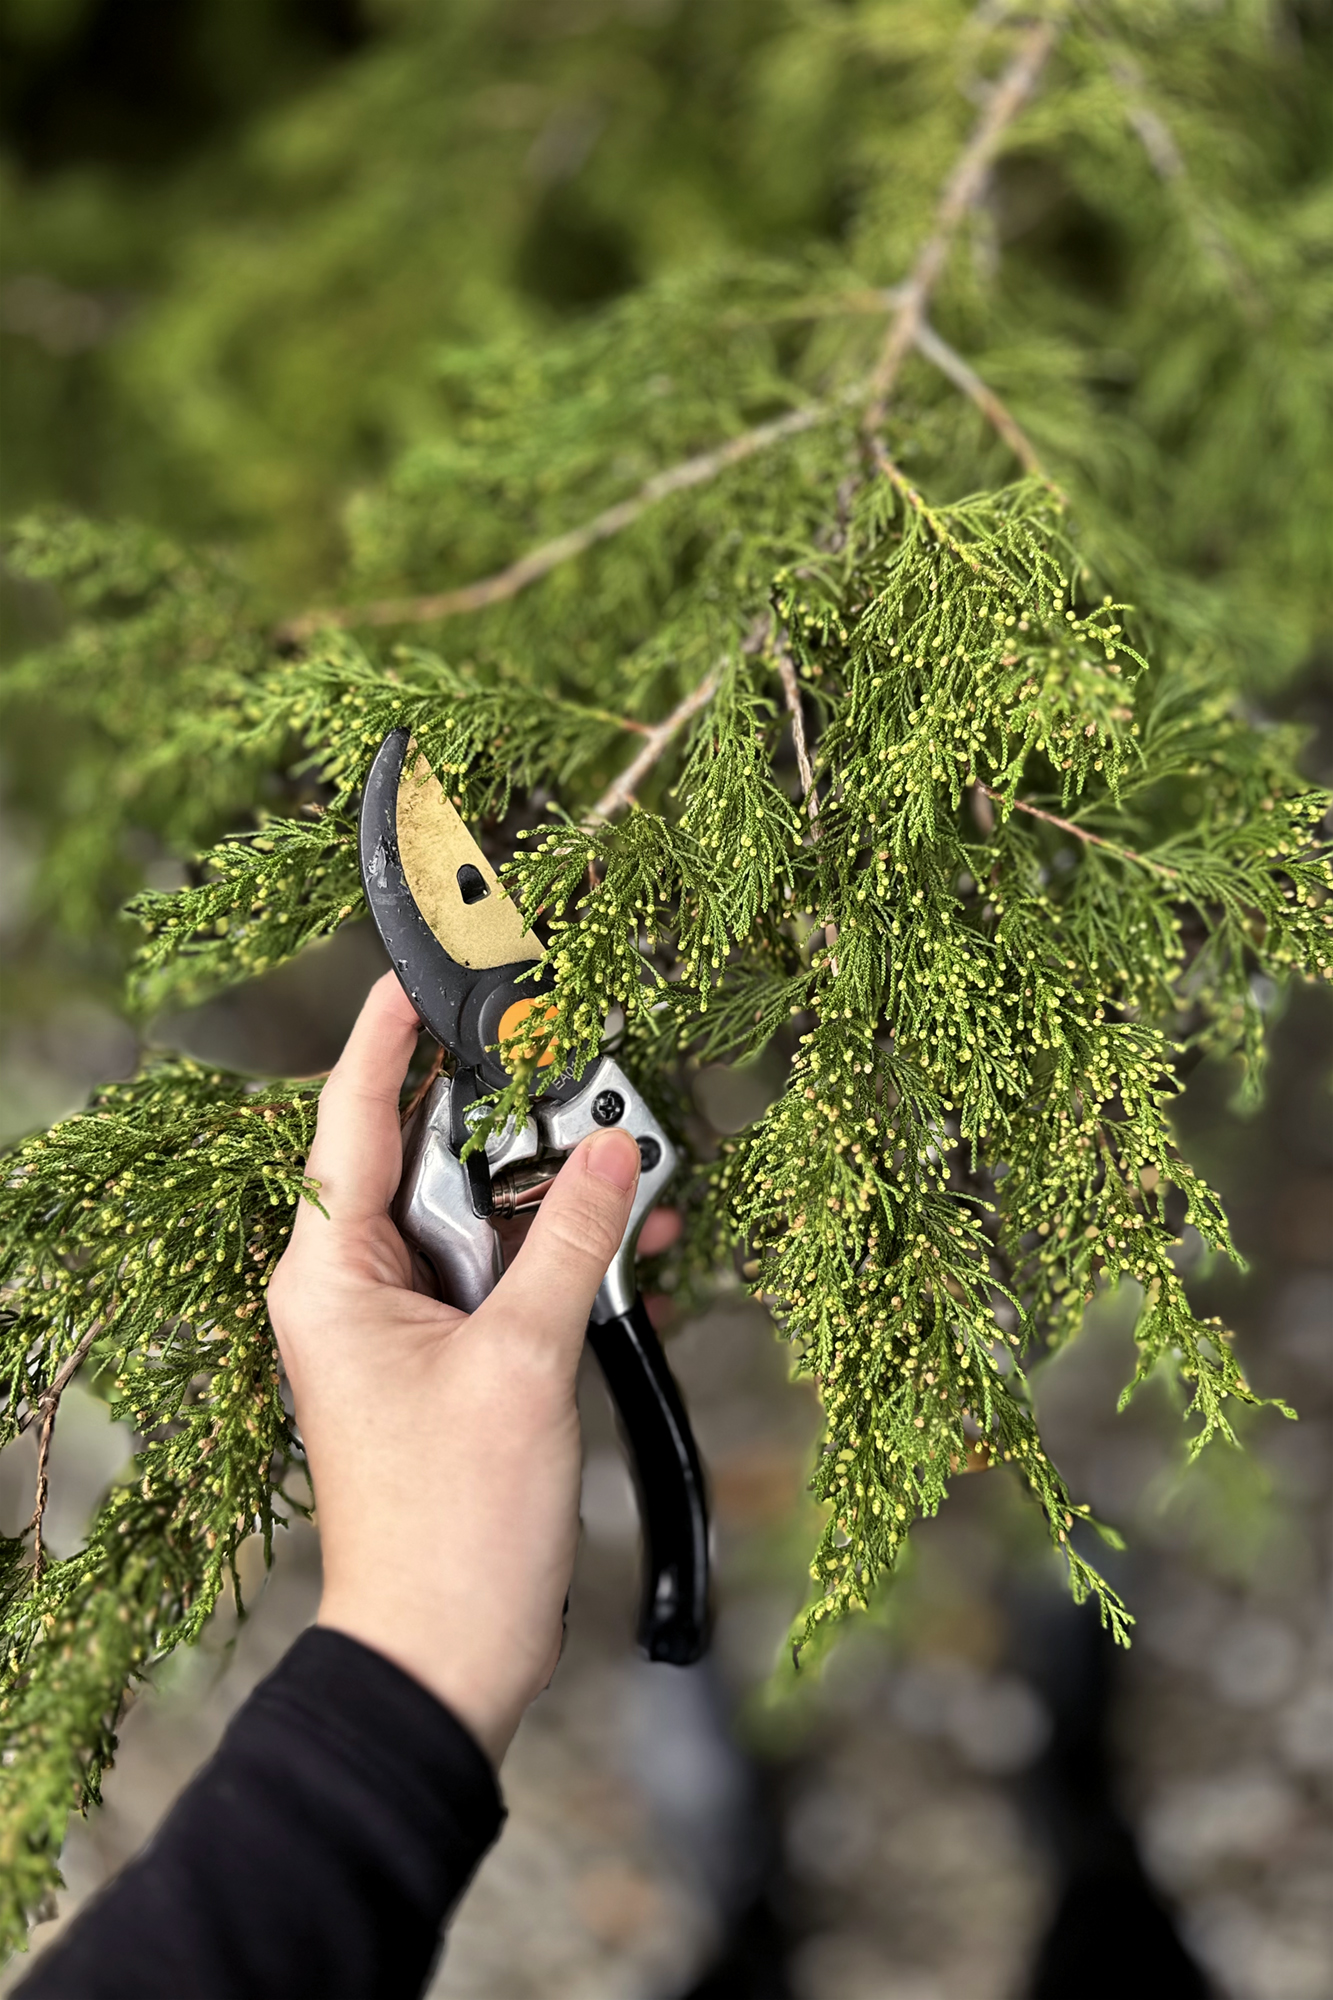
Once you have identified a spot with an evergreen tree you like the foliage of (around here Juniper and holly trees are pretty easy to find in these sorts of areas and make great fresh evergreen Christmas wreaths) in a spot that looks truly derelict, it’s time to pull out your pruning shears.
Derelict Lots
Much like the commercial dumpster areas, we’re looking for derelict lots that look like the person who owned that property has forgotten it even exists. Chances are homeless people camp out there from time to time. You get the picture. You my friend are doing them a service by pruning a few trees back and helping to clean up the overgrowth. (AVOID ANY AREA WITH A NO TRESPASSING SIGN LIKE THE PLAGUE).
Here’s my personal code of conduct for urban foraging
- Alway take trimmings from a tree that nobody cares about in a spot that looks like a trash heap OR take your trimmings from the side of a tree no one will ever see (ie against a cinder block wall)
- Always trim just a few branches from one area. You don’t want to take EVERYTHING from one spot on the tree, be a kind human and take a branch from here and there so the tree still looks nice when you leave.
- Be sure to treat the tree with respect and take care to properly prune the tree so your cuttings don’t damage it. This means you need to:
- Prioritize taking all the damaged branches first.
- Always prune above a node at a 45 degree angle so you promote wound healing. (Here’s a visual example of that)
- Be mindful of the age and health of the tree and avoid pruning young trees.
- Use sharp tools so you make clean cuts and minimize damage to the tree.
- Don’t take more than you need.
- In general just don’t be a terrible person and treat the trees with kindness.
How To Make Your DIY Fresh Evergreen Christmas Wreath
Now that we’ve gathered our supplies and foraged for all our greenery, it’s time to turn on your favorite holiday Hallmark movie, don your gloves, lay down your protective sheeting and get started on our Christmas crafting.
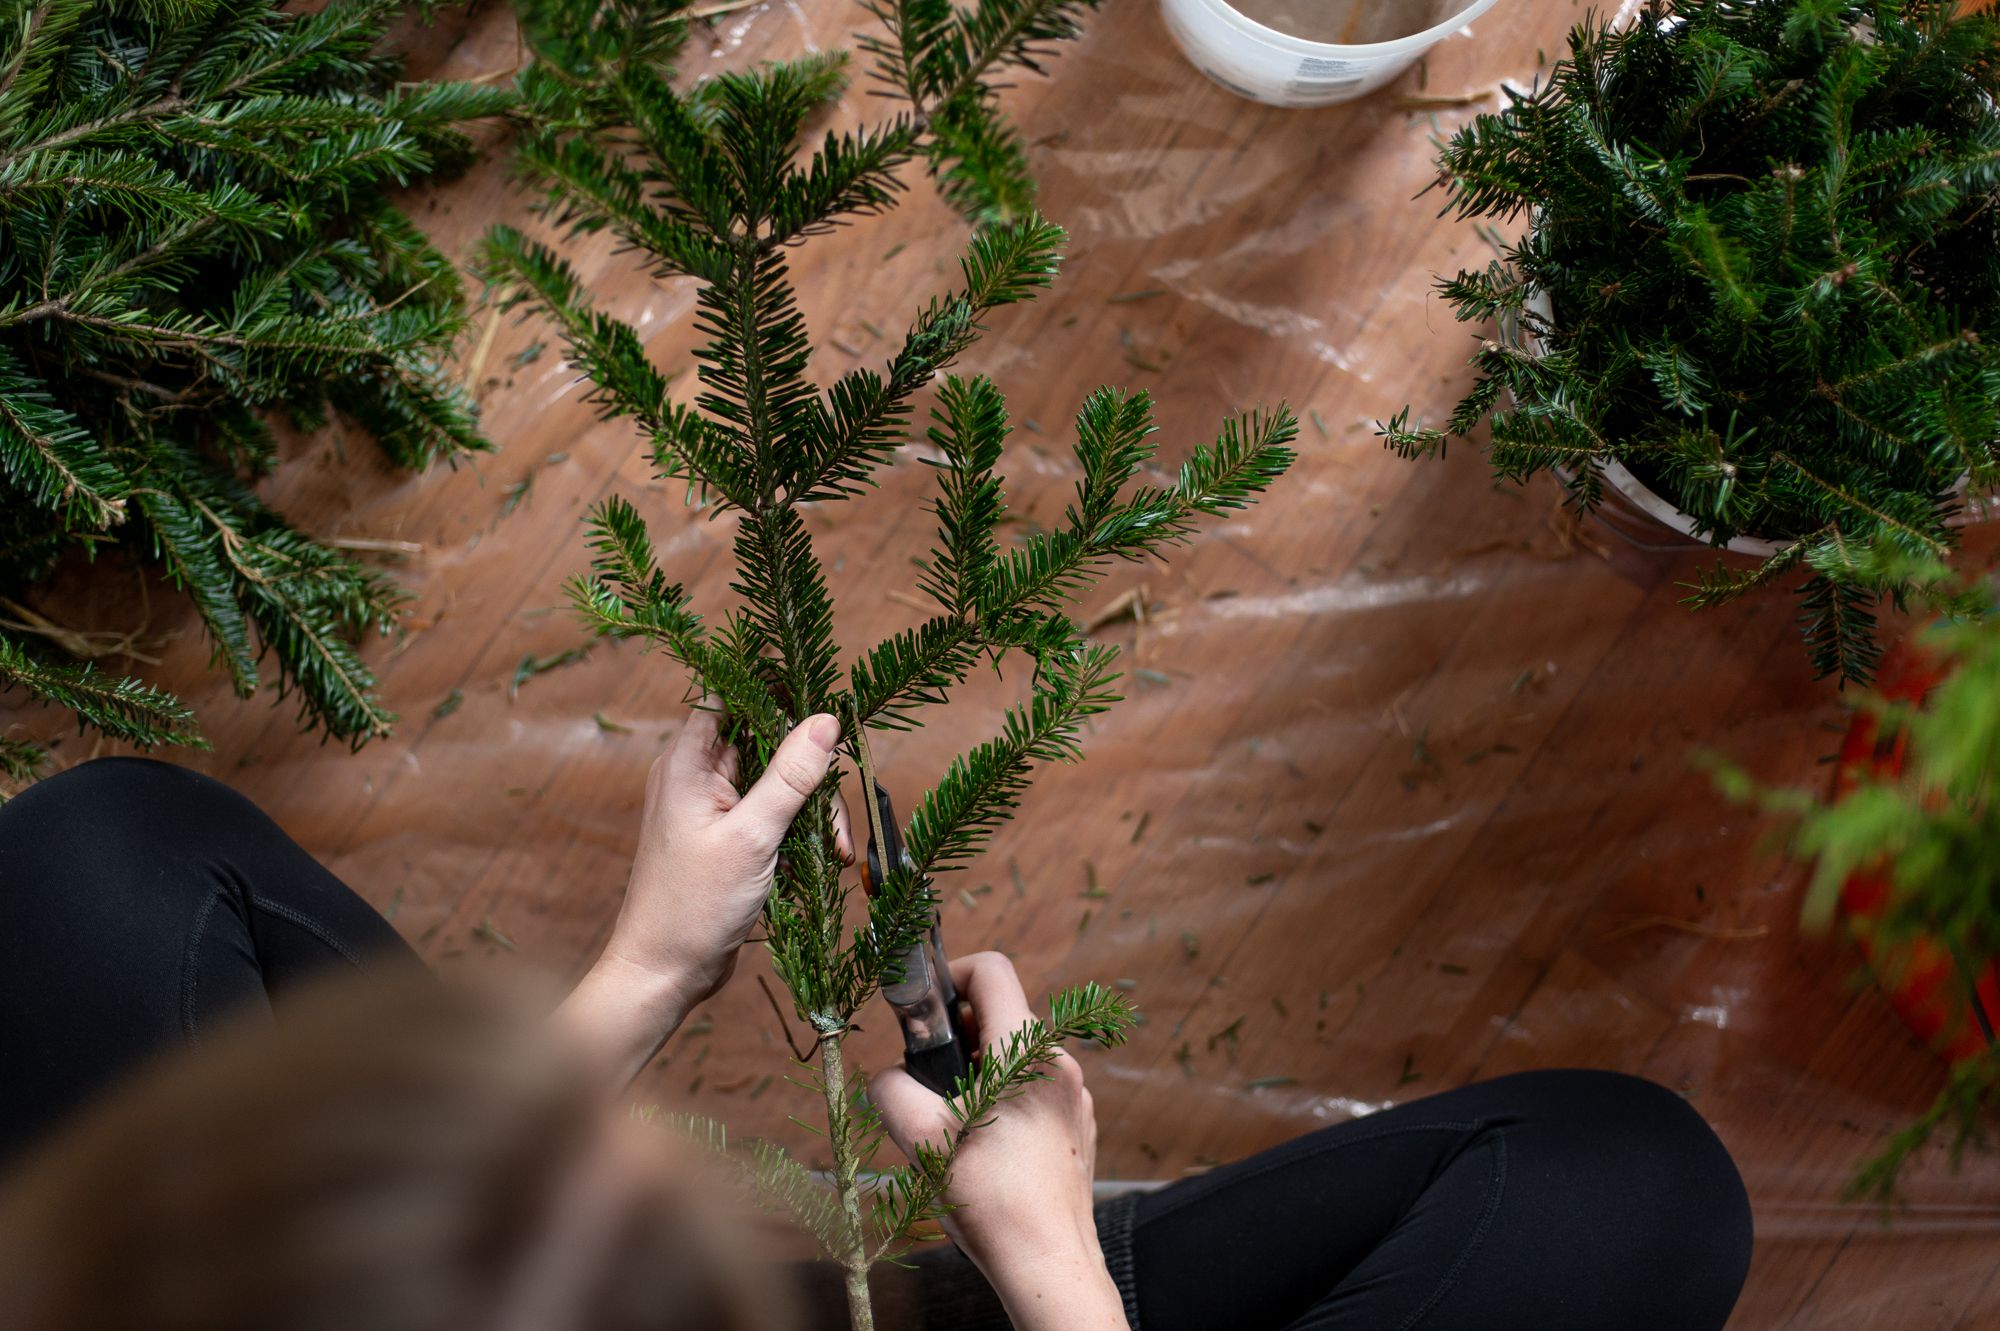
Step One: Cut & Process All Your Trimmings
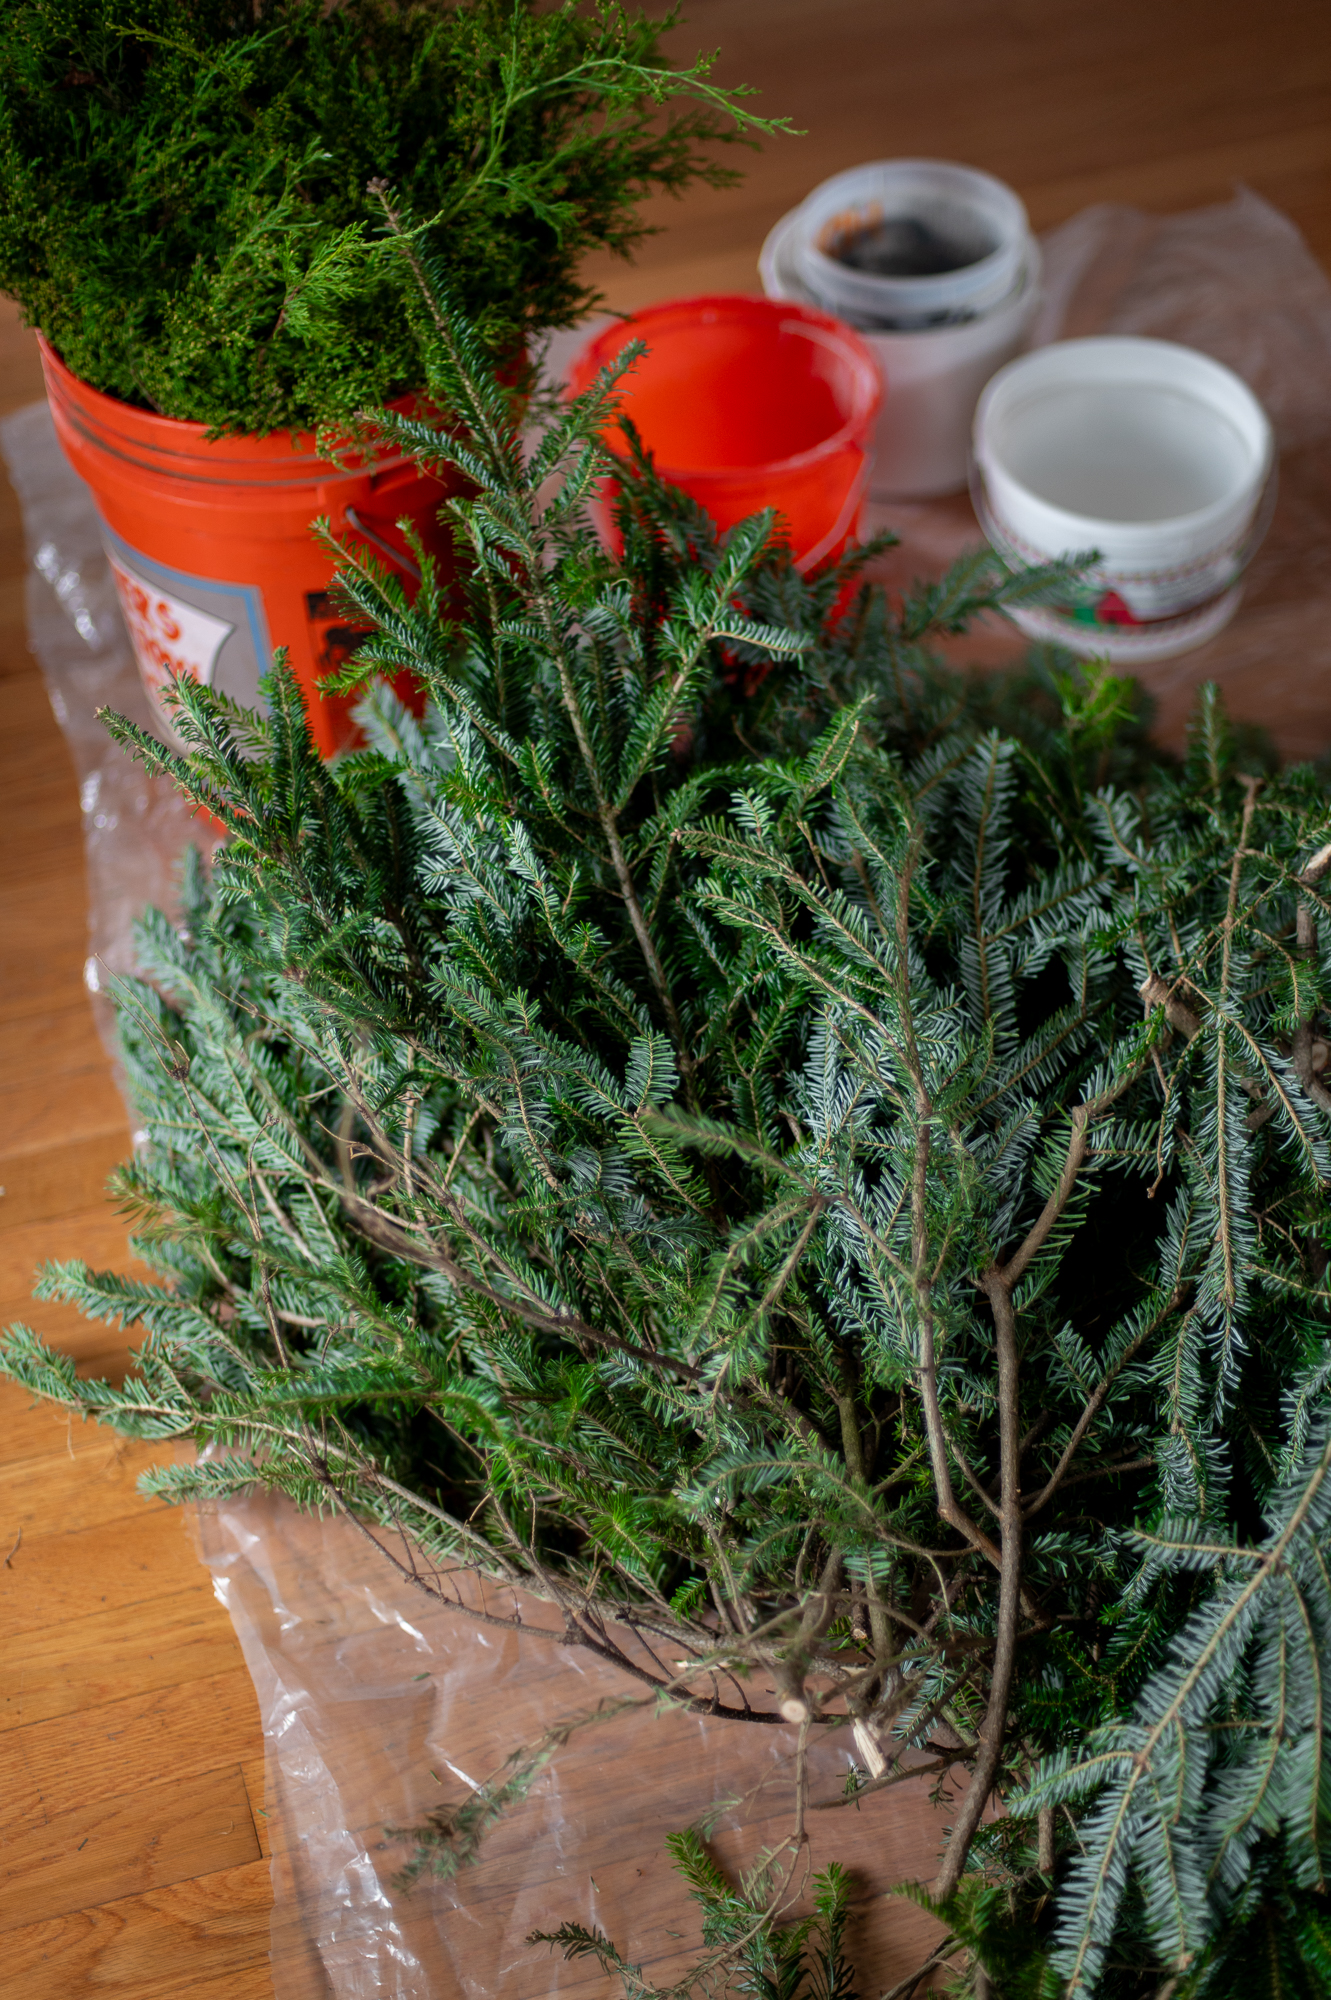
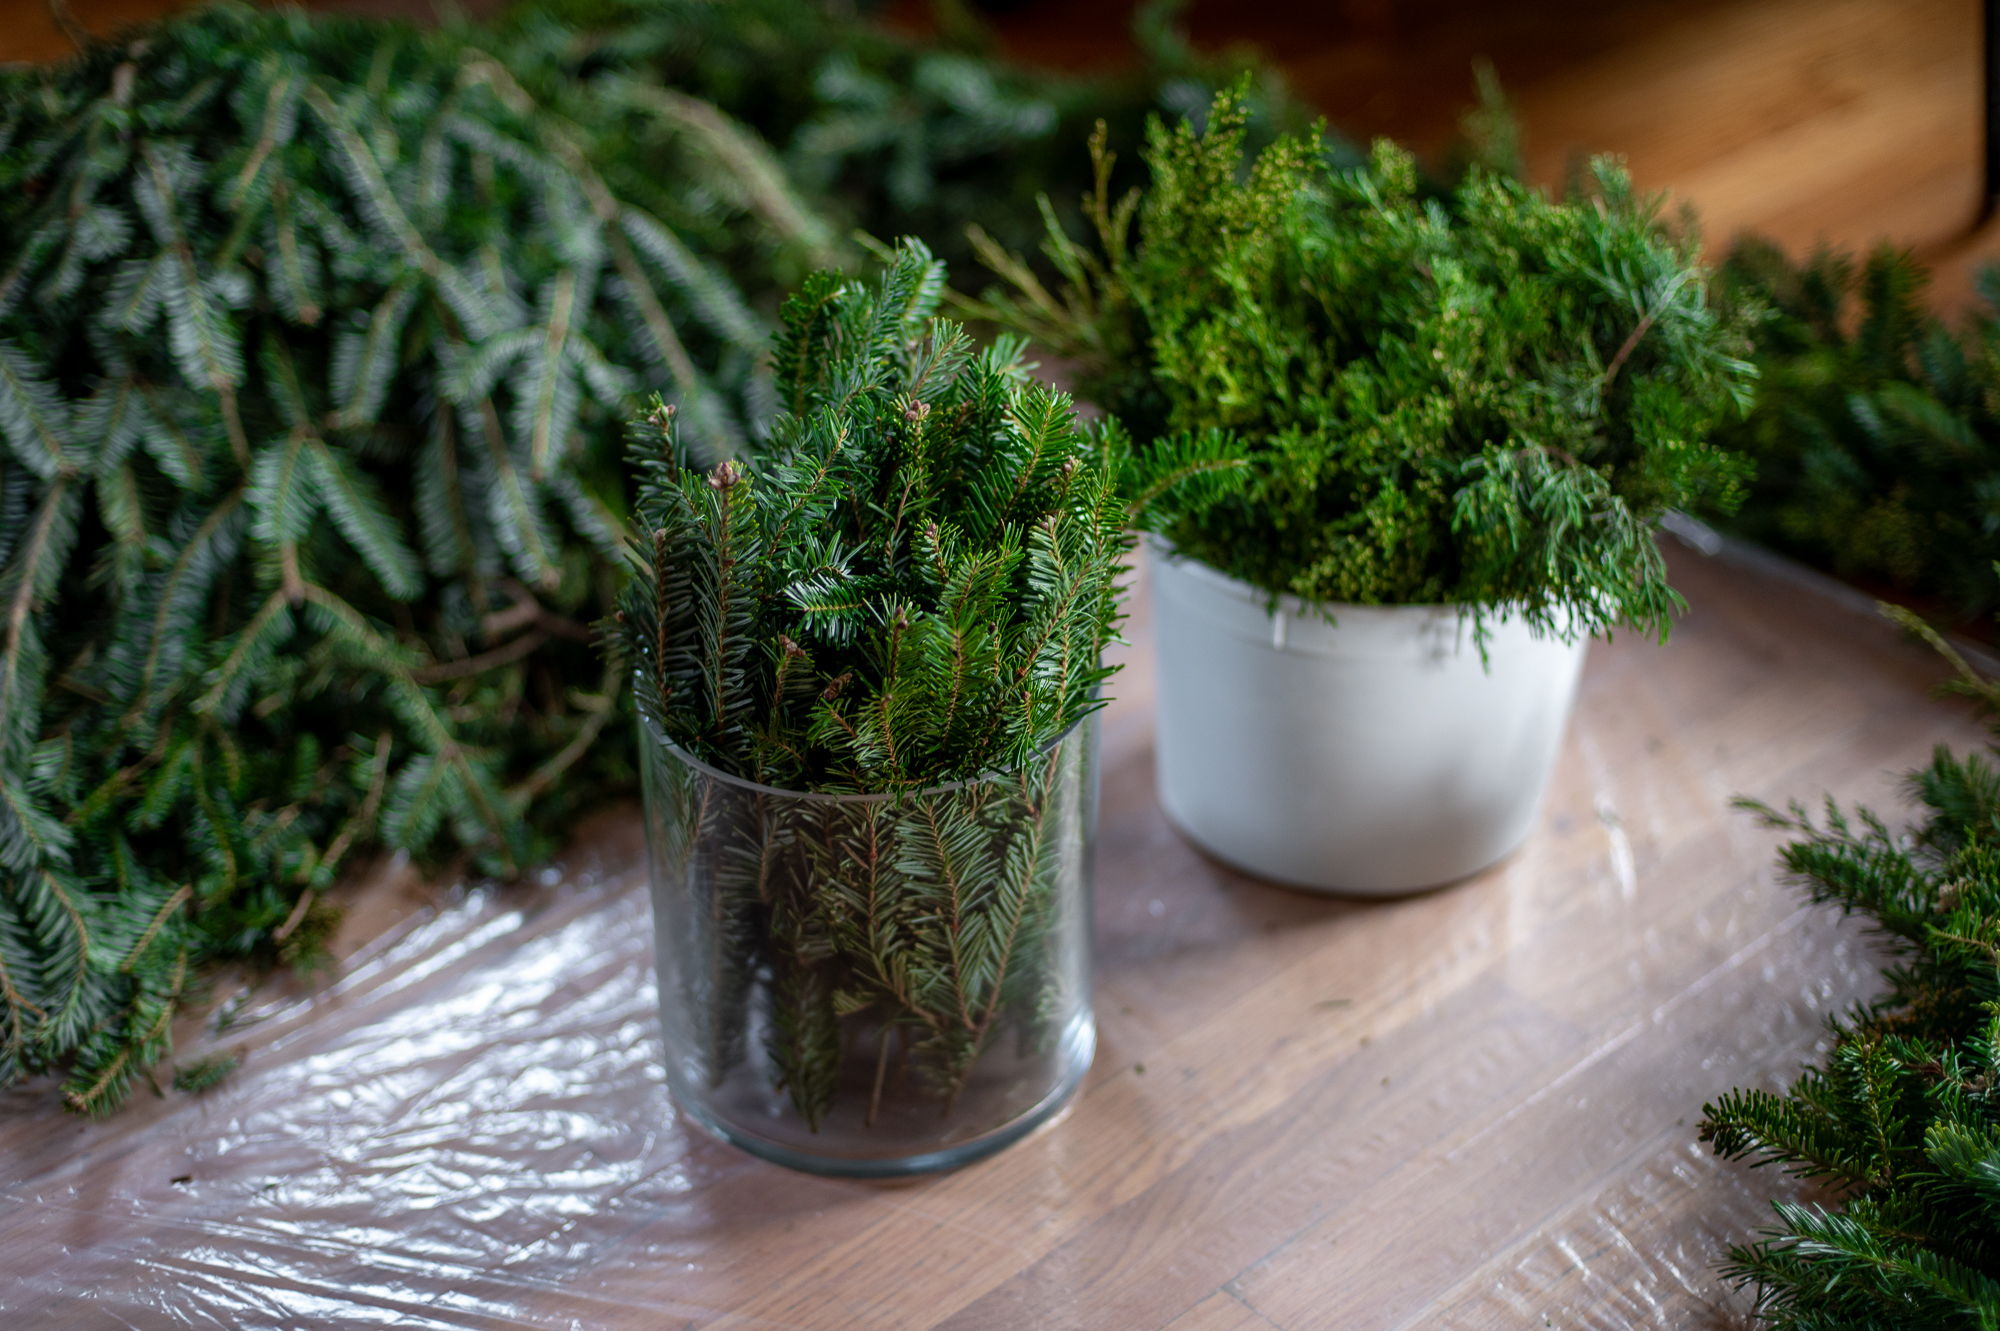
Before we can begin making our Christmas wreath, we need to get our trimmings cut down into a size and shape we can use. For wreaths, I like to cut my foraged evergreen tree trimmings down into 6-8 inch cuttings.
Then I take all my cuttings and pop them into buckets with fresh water so I can hydrate them a bit as I work on my project.
Step Two: Attach Your Wire To Your Wreath Form

After you’ve got all your trimmings cut down, you’re ready to start making your wreath! The very first step in that process it to attach the end of your floral wire to your wreath form. I like to do this next to one of the cross bars so the floral wire can’t slide up and down the form.
We will be leaving the wire attached to the spool for this ENTIRE PROCESS. I repeat, at no point will we detach the wire from the spool until the very very end.
Step Three: Create a Small Bundle Of Evergreen Cuttings
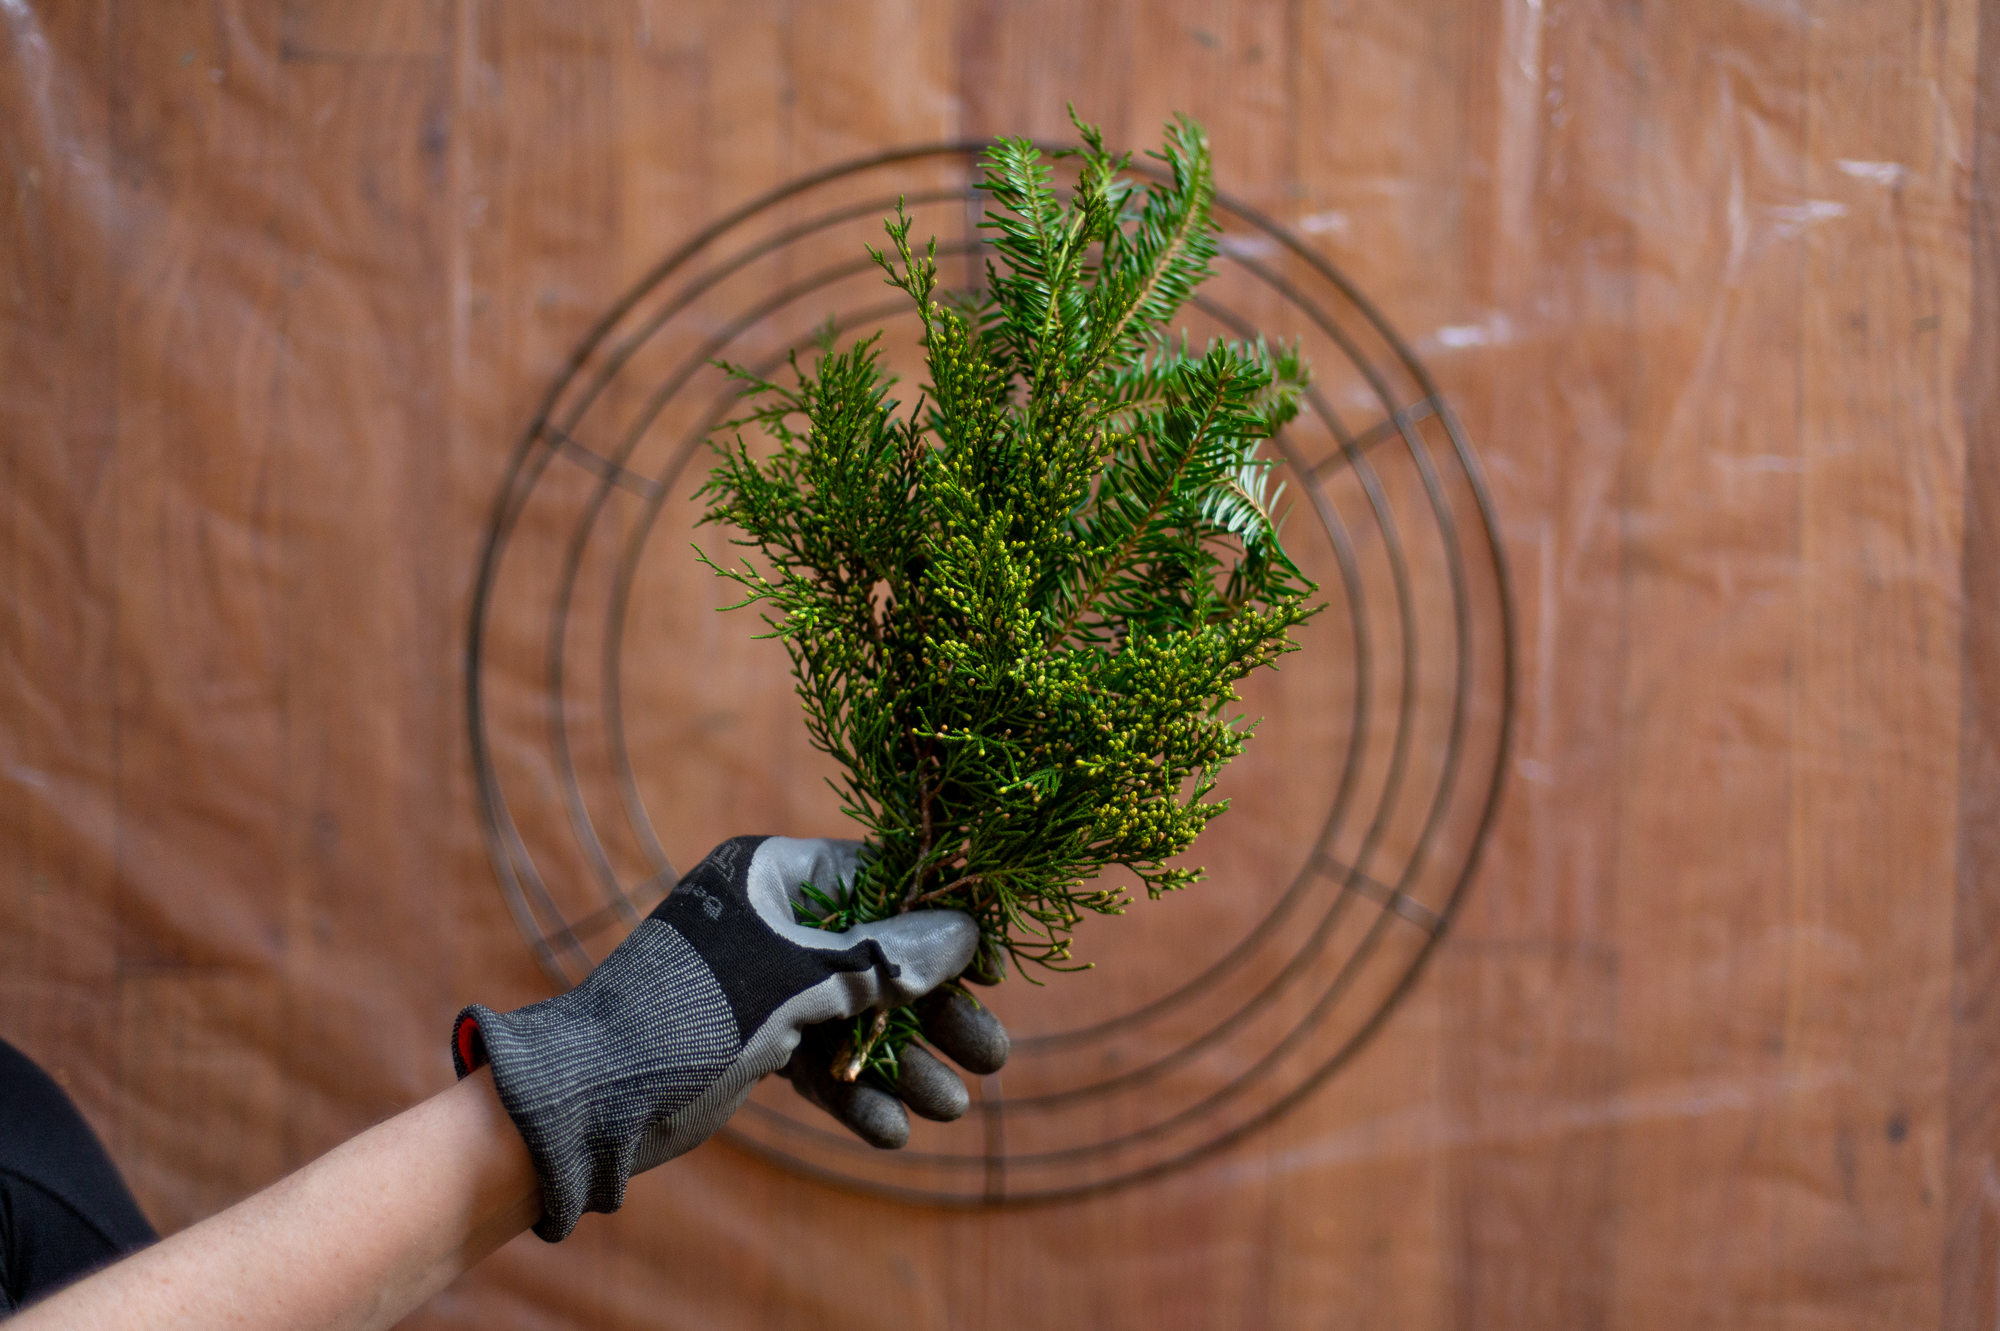
If using all one type of greenery, I typically will grab 3-4 six inch cuttings to create each little bundle. If I’m using a variety of greenery, like in this example, I will grab two of whatever I have most of (usually fir tree trimmings) and then one of my alternate greens, in this case Juniper to create my bundle.
Step Four: Attach Your Bundle To The Wreath Form

To do this you’ll lay your fresh evergreen bundle on top of the Christmas wreath form and then repeatedly wrap your floral wire around the bundle and the form pulling it as tight as possible with each pass.
Step Five: Create Another Bundle & Attach It Slightly Lower Down

For your second and proceeding bundles, you’ll want to lay your bundle on your wreath form about an inch or two lower than your previous bundle. You want enough overlap that when you go to wrap the floral wire around your next bundle of greens you’ll also catch just a bit of the bottom of the previous bundle.
PRO TIP: To make your wreath look more full, I like to alternate where on my wreath form I’m placing each bundle. I set the first one centered, the next one to the left and the next to the right and so on. I find this gives me a much fuller looking wreath.
Optional Step: Add In Specialty Greenery Every So Often

If you have special greenery (like the holly & nandina berries I’m using in this example), I like to mix those in every three or so regular bundles to space them out and add a bit more texture and visual interest to my wreath.
Step Six: Finishing Your DIY Fresh Evergreen Christmas Wreath

When you’ve made it all the way around your Christmas wreath with your foraged evergreen bundles, you’ll need to gently lift up the very first bundle you attached so you can add in your final few bundles of greenery and complete your wreath.
Once you have completely filled your wreath form, you’ll turn your wreath over, snip the floral wire from the spool and tie it off onto the back of your wire wreath form.
Optional Step: Decorate Your Wreath

Once your wreath is completed, it’s up to you if you want it to stay as is or decorate it with ribbons, bows, or other ornamentation! I opted for a simple bow made out of red flocked ribbon I thrifted earlier this year!


As I mentioned at the beginning of this blog post, The Dollar Tree sells two sizes of circular wreath form, a 14.25″ wreath form and an 8″ wreath form. The above left image visually shows the size difference between the two on a completed fresh evergreen christmas wreath.
I personally think the 14.25″ wreath form is the perfect classic size for a front door, whereas the 8″ wreath form would make a great Christmas wreath for somewhere like a stovehood, kitchen backsplash, or over a mirror.


I mentioned that I like to use more than one type of evergreen in my wreath making to give them a bit more visual interest. However, using only one type of fresh evergreen can look just fine! I made the smaller 8″ wreath pictured above using only fir Christmas tree trimmings!

Next up, how I use this very same process to create my own DIY fresh evergreen garland for over my fireplace too!

Don’t Forget To Pin This Post & Subscribe!
Want to keep getting more DIY home decor inspiration, thrifting tip & tricks, free art downloads, reading recommendations, and home renovation tutorials? Then don’t forget to pin this post for later so you can follow me on Pinterest and then subscribe to my blog so you can get links to my newest content as soon as it hits the blog!
Wow! I can’t believe Home Depot & Lowes just give these tree cuttings away for free!
Me han gustado mucho tus creaciones y, sobre todo, las explicaciones que das. Son completas, comprensibles y ¡divertidas!
Muchas gracias desde Sevilla, al sur de España