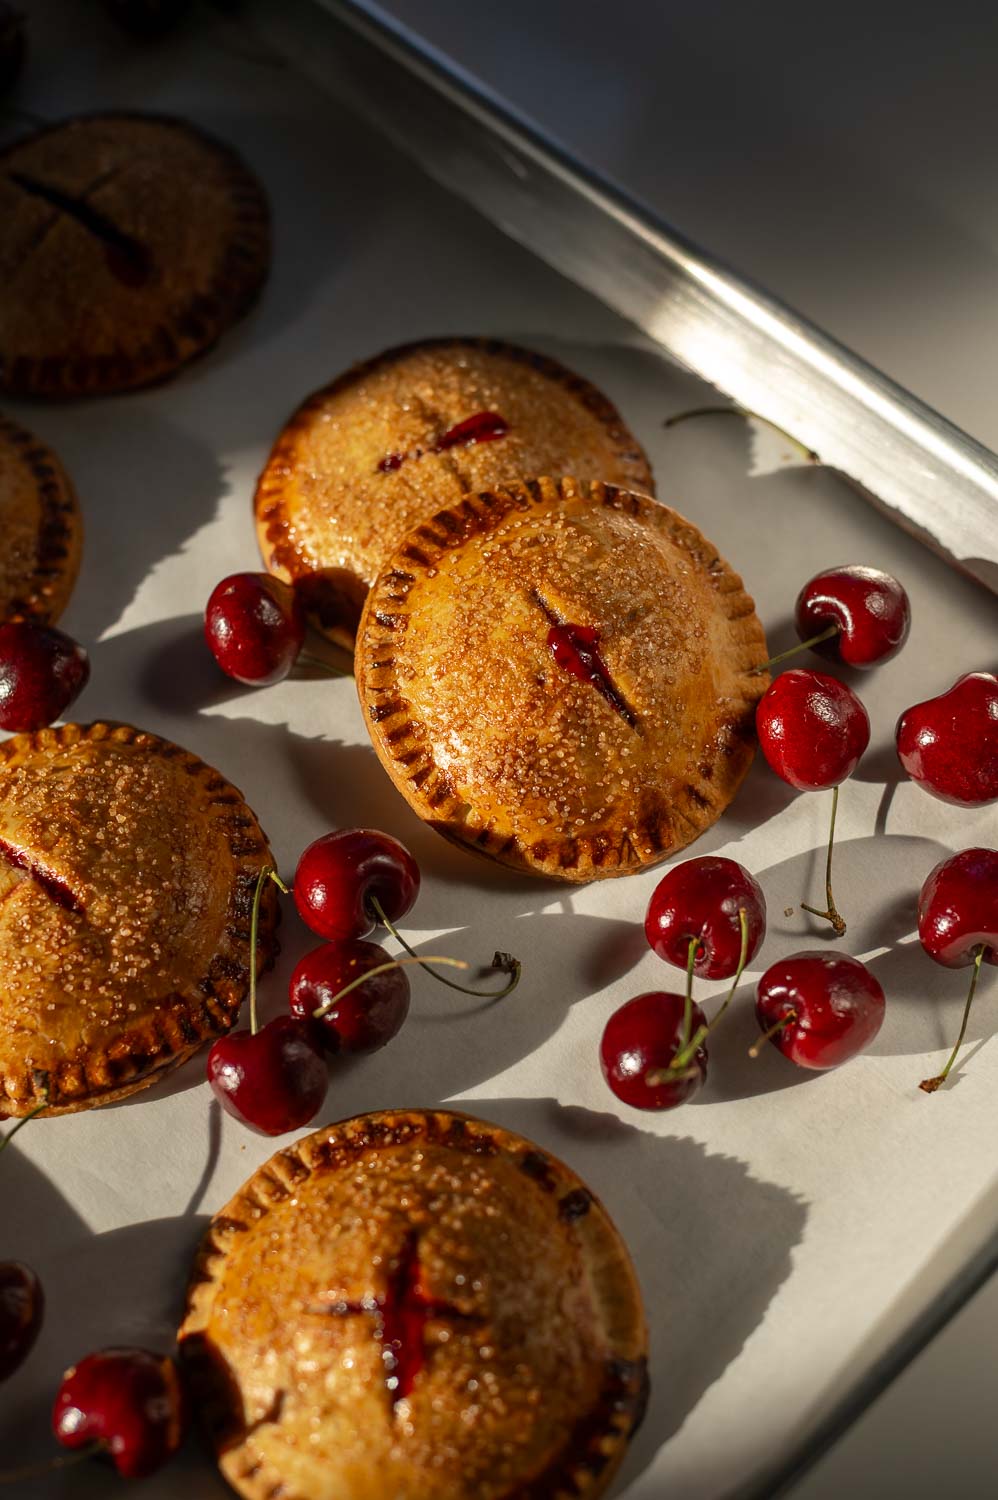
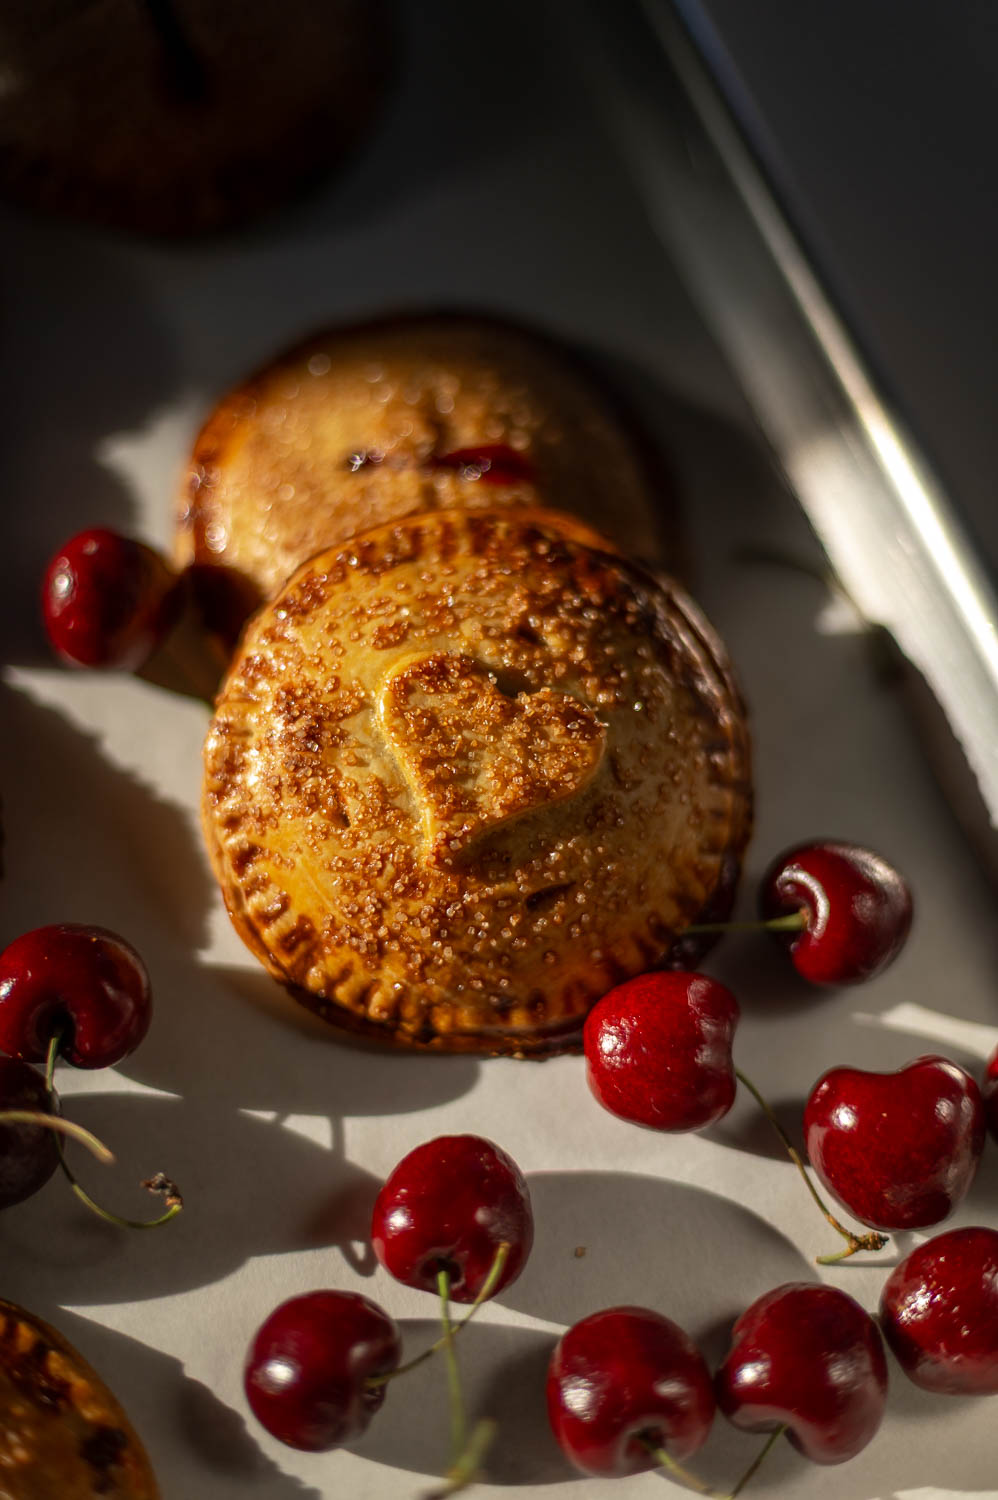
Portable, handheld pie has to be up there with some of the greatest food inventions ever created, and these semi-homemade cherry hand pies make baking up a batch way too easy. Using canned cherry pie filling and store-bought pie crust helps simplify the process, which makes these hand pies especially beginner-friendly and ideal for baking with kids. They come together quickly, don’t require any advanced techniques, and yet will probably fool all your friends into thinking you picked them up from an artisanal bakery.
That said, we are going to give that canned filling a major flavor upgrade. Because while canned cherry pie filling is convenient, we can make it taste oh so much better with a few well chosen additions and a little simmer time on the stove.
*This blog post contains affiliate links, meaning that if you purchase any of the items using the links I provide I, as the author of this website, will receive a very very small commission from that sale. This is a great way to help support your favorite bloggers at no cost to you. Think of it like a tip jar that costs you nothing!
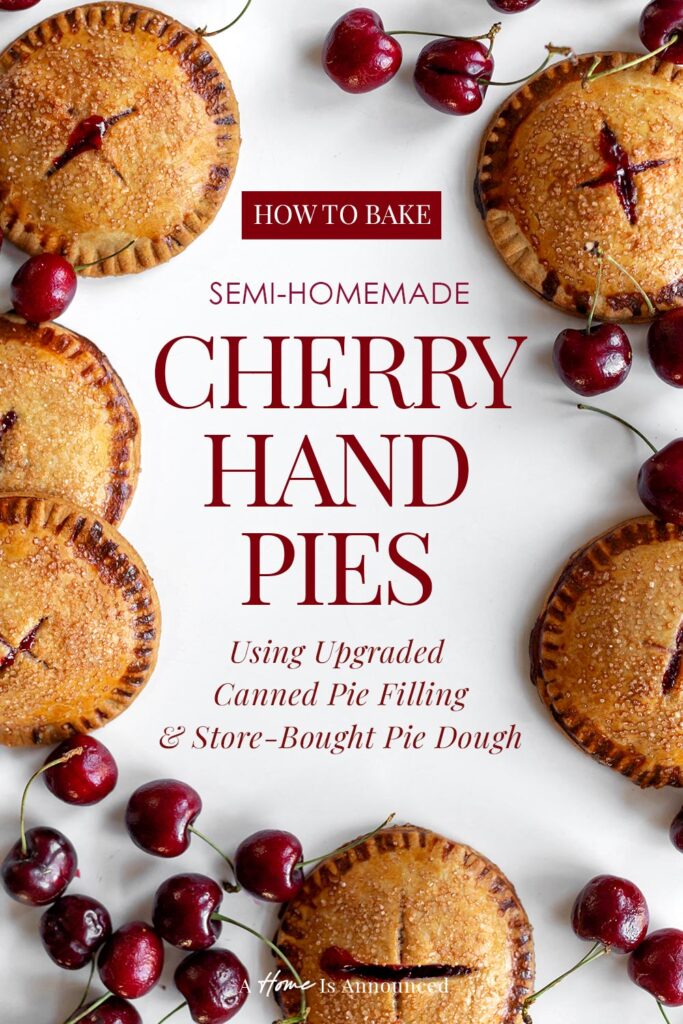
The Semi-Homemade Cherry Hand Pie Ingredients
These semi-homemade cherry hand pies use upgraded canned filling and store-bought pie crust to create a bakery-style dessert with minimal effort. They’re beginner-friendly, kid-approved, and perfect for gifting.
Prep time: 10 minutes (More if assisted by a toddler like I was)
Cook time: 45 Total: (30 minutes stovetop + 15 minutes oven)
Total time: 55 minutes
Yield: 9 Cherry Hand Pies (Using a 3″ biscuit cutter)
Skill level: Beginner
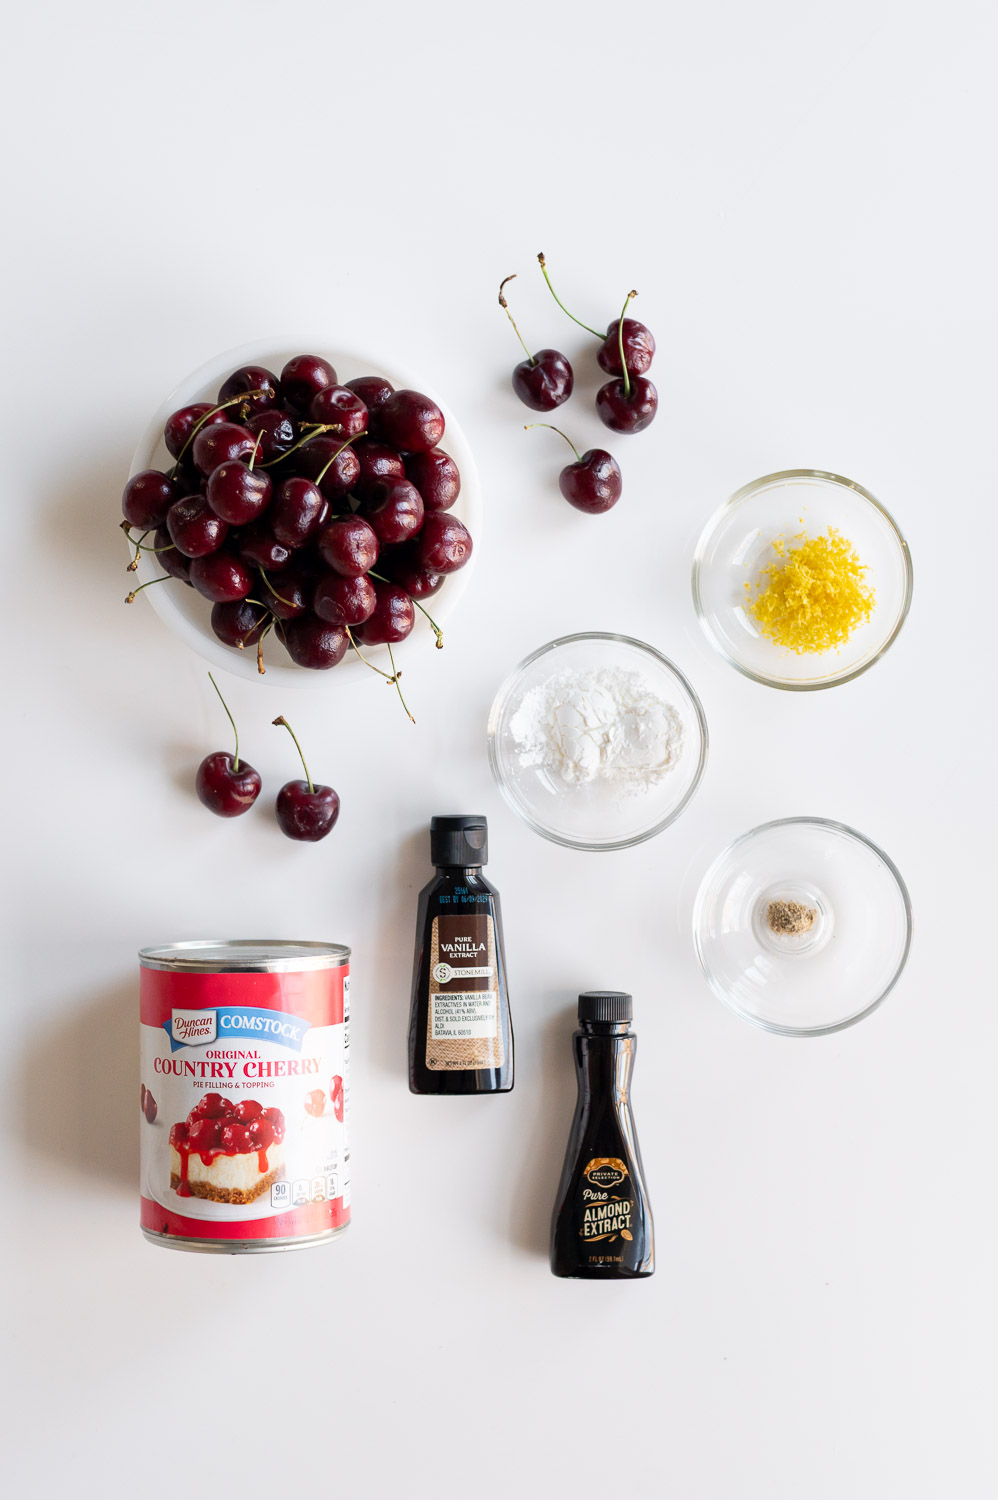
For The Semi-Homemade Pie Filling:
- 1 Can Cherry Pie Filling
- 1/4 tsp Almond Extract
- 1/2 tsp Vanilla Extract
- 1/2 tsp Ground Cardamom
- 1/2 tsp Salt
- 1 cup Chopped Fresh (Or Frozen) Cherries
- Juice Of 1 Lemon
- Zest Of 1 Lemon
- 2 tsp Cornstarch
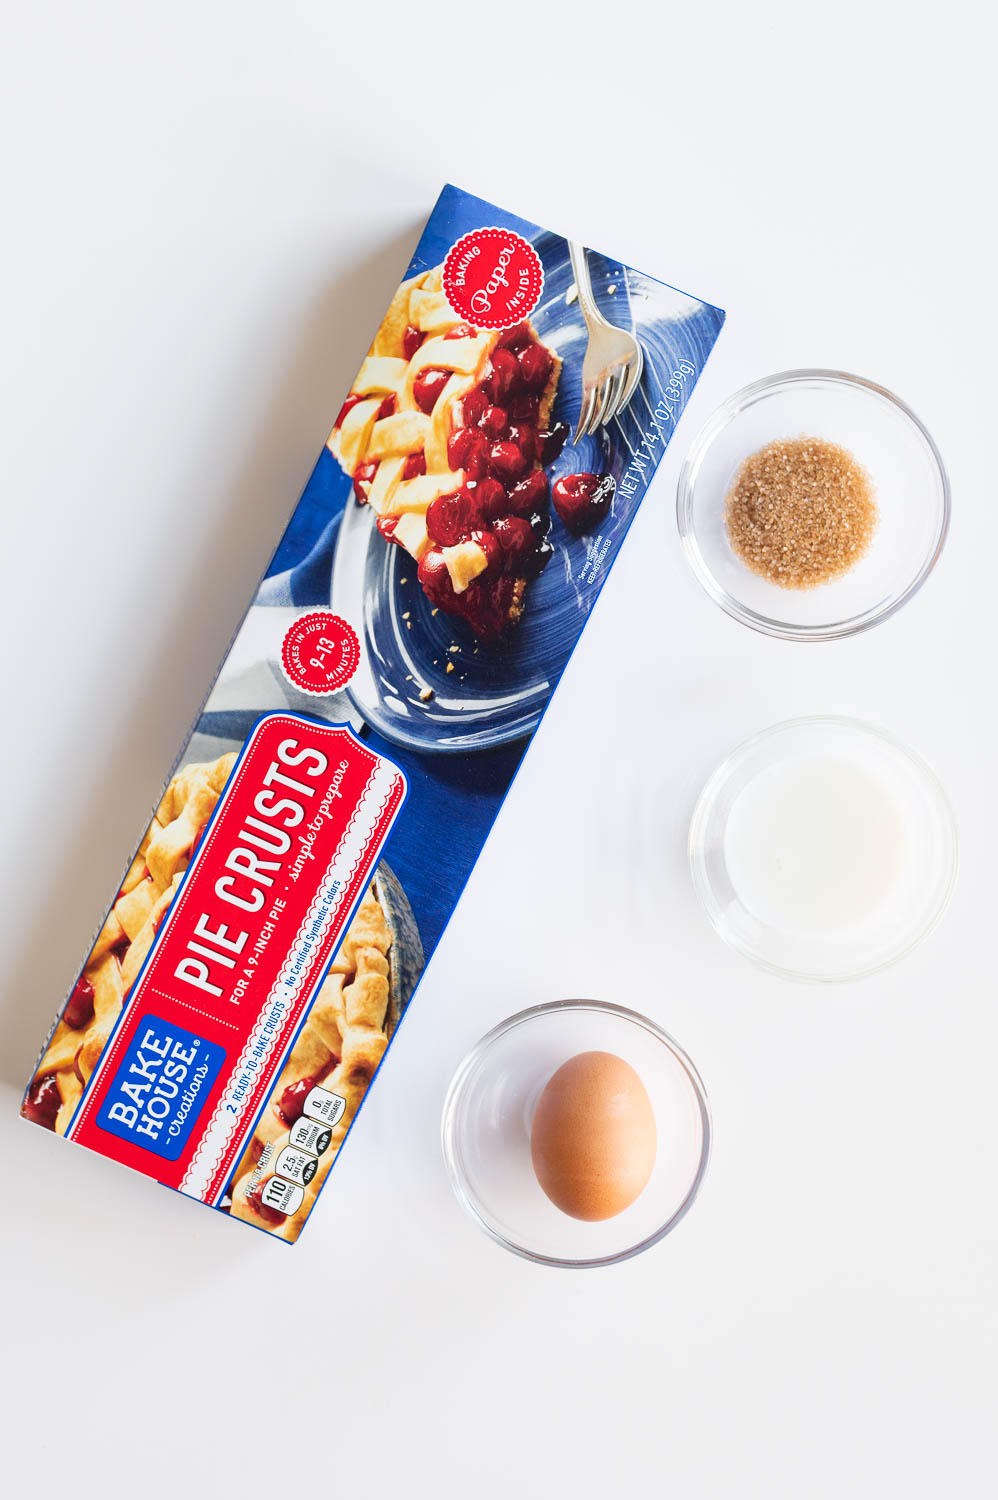
For The Pie Crust
- 1 Package Of Store-Bought Pie Crusts
- 1 Egg
- 1 tbsp Milk
- Turbinado Sugar
How To Upgrade Canned Cherry Pie Filling
Let’s face facts here, canned cherry pie filling doesn’t remotely taste like cherry pie filling that has been made from scratch. It’s usually overly sweet, syrupy and just flat tasting. That said, you can easily upgrade any can of cherry pie filling and make it pretty dang close to tasting like it came from scratch!
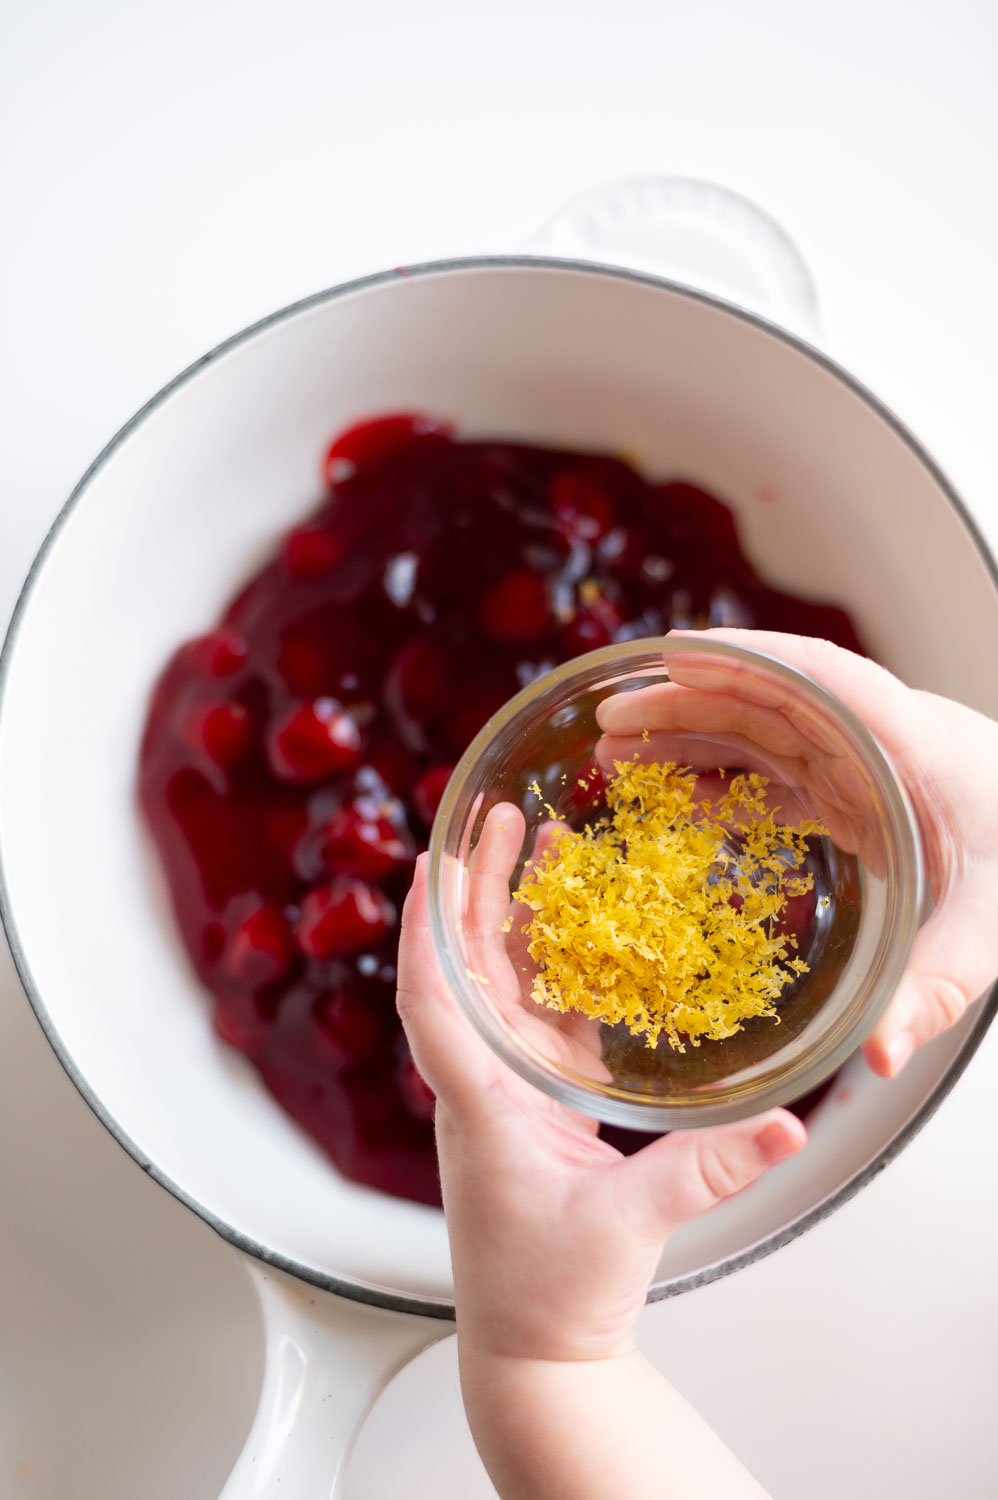
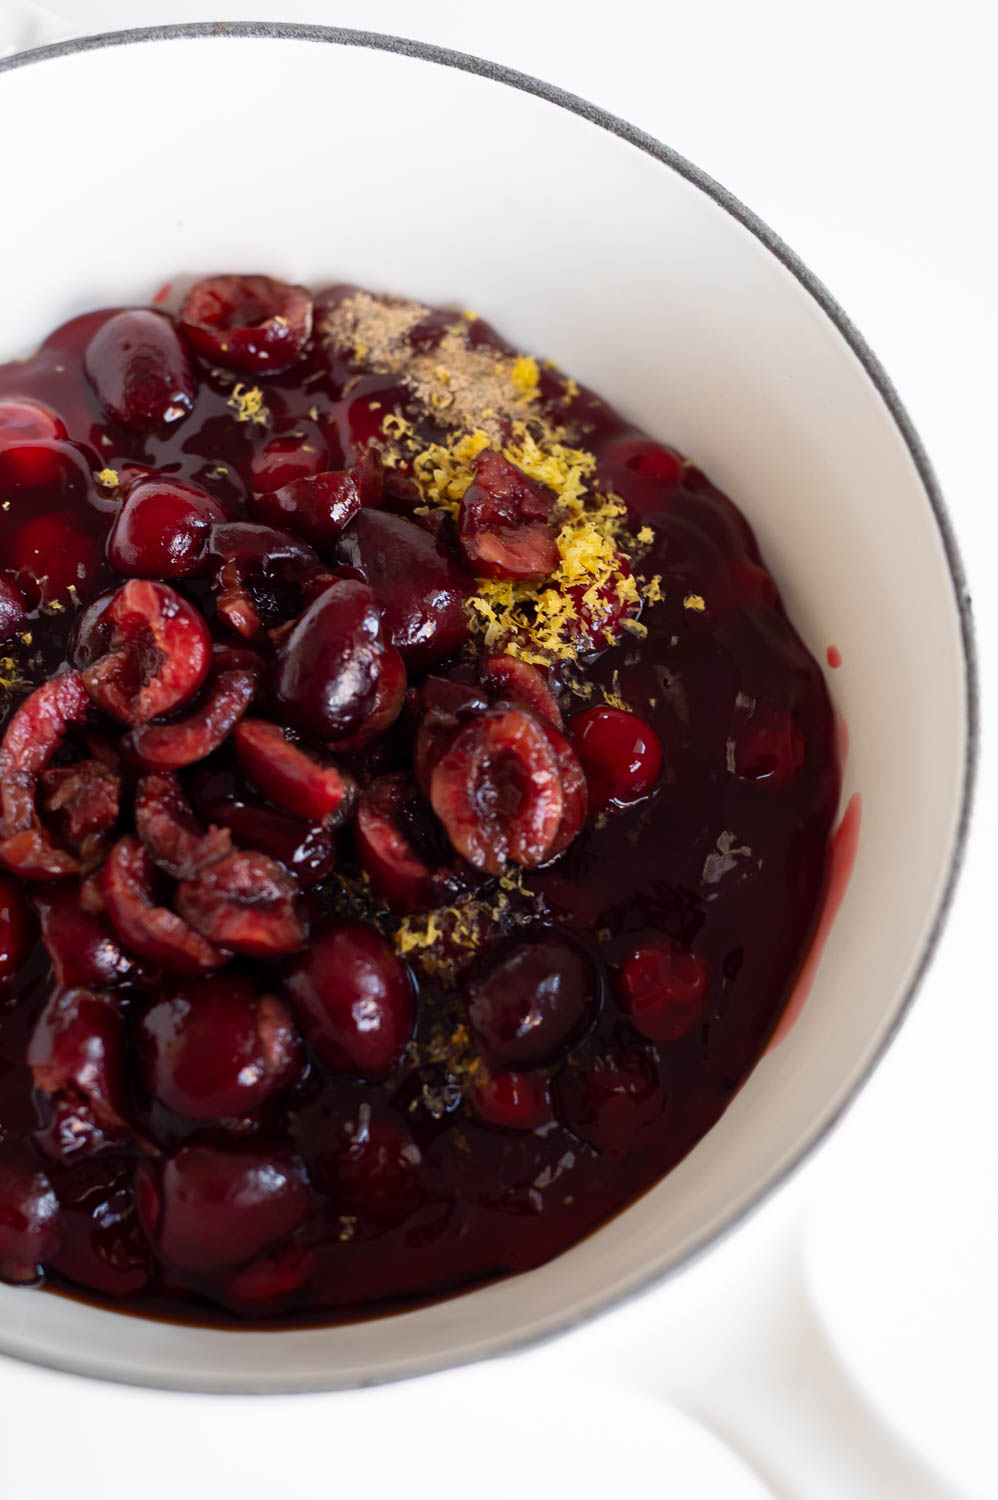
Step 1. Combine Cherry Pie Filling With Lemon Zest, Lemon Juice & Salt In A Saucepan
All three of these additions are going to help cut some of the syrupy sweetness from the canned cherry pie filling and brighten up the flavor profile a bit.
Step 4. Add In Your Fresh (Or Frozen) Chopped Cherries
These are going to bring back some actual real fruit texture and color to our cherry pie filling.
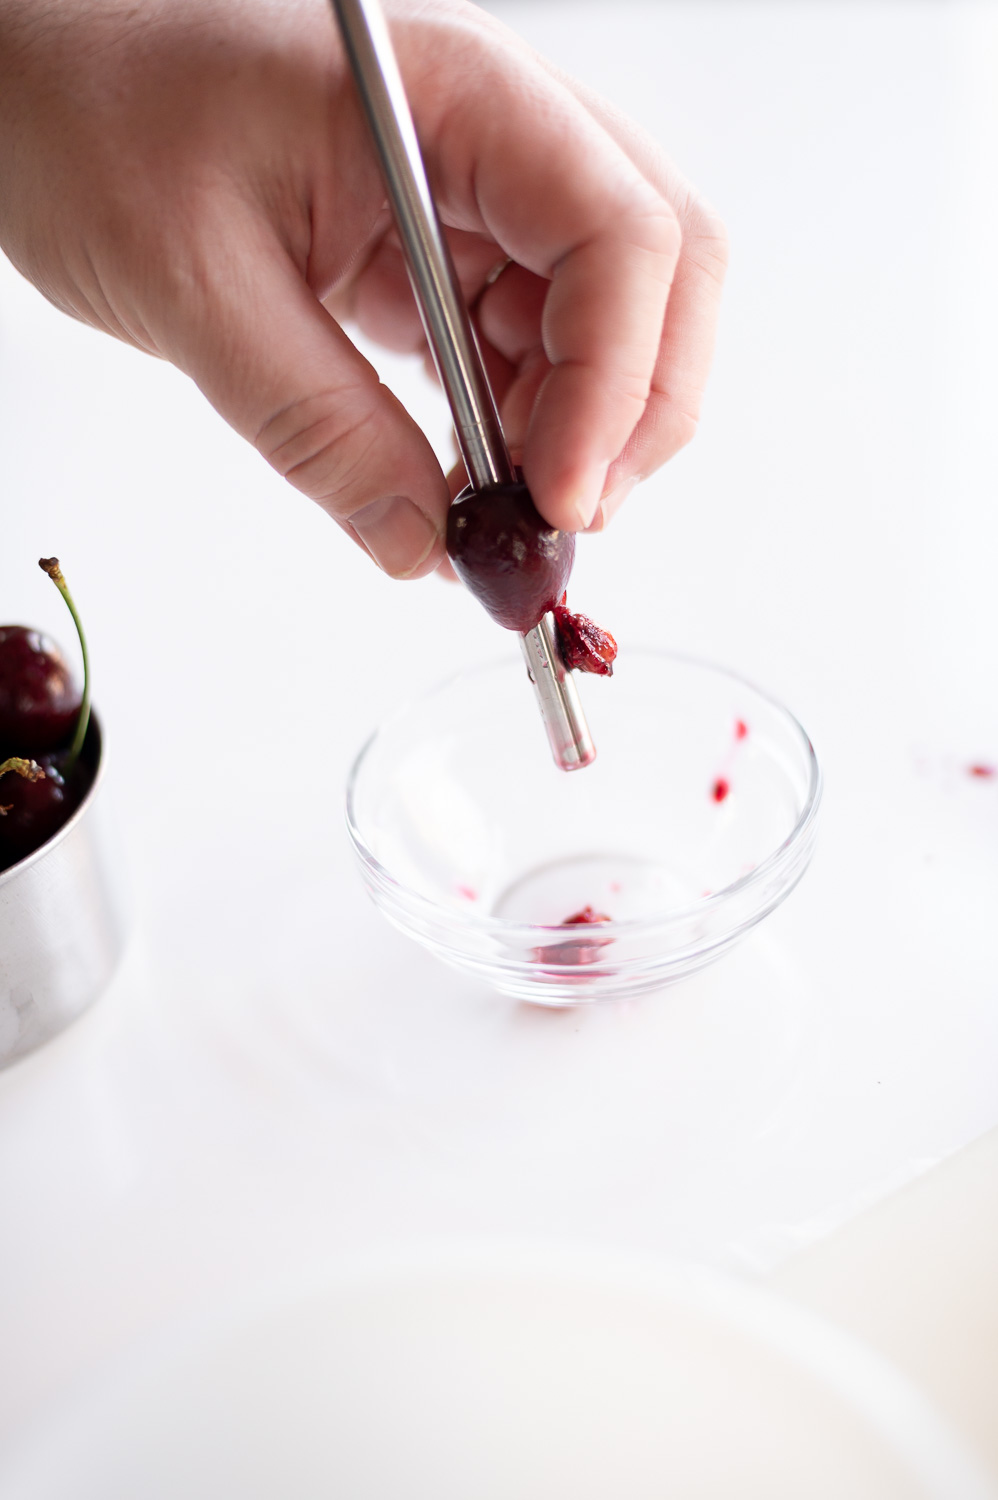
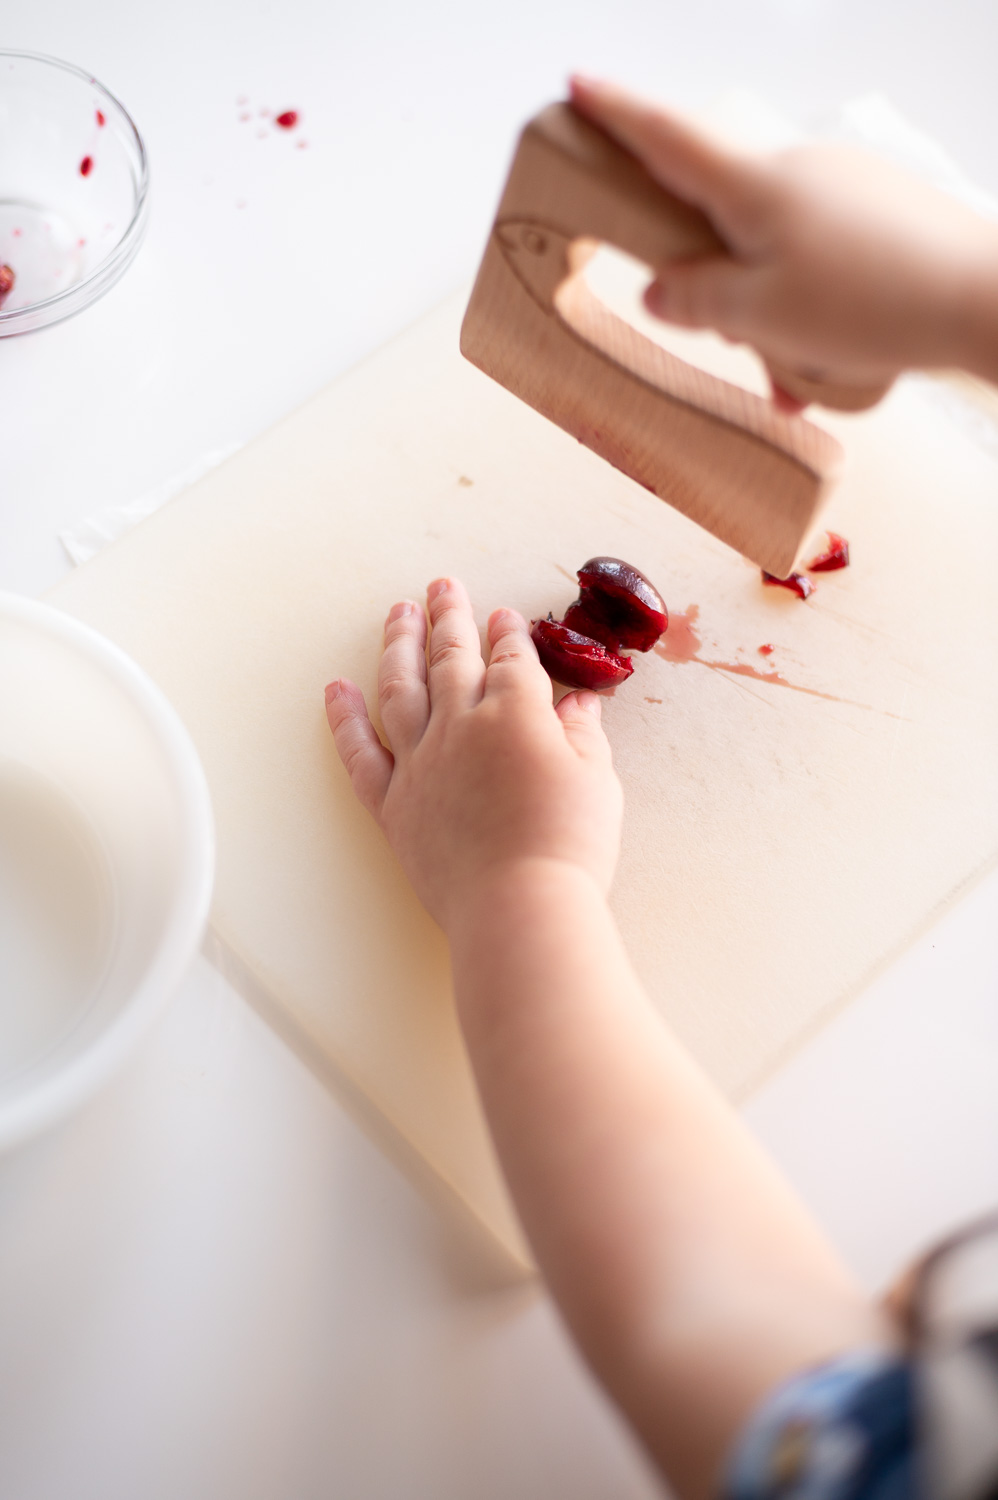
Pro Tip: If you’re going to be using fresh cherries, I like to use a metal straw to easily pit them! Then all you’ll need to do is give the cherries a rough chop. (My toddler joined in for this bit and had a blast practicing her budding knife skills).
Step 2. Add The Vanilla, Almond Extract & Cardamom Spice To The Pan
The vanilla and almond extract are going to help deepen the cherry flavor, and the Cardamom is going to add some warmth and more complex flavor to this recipe.
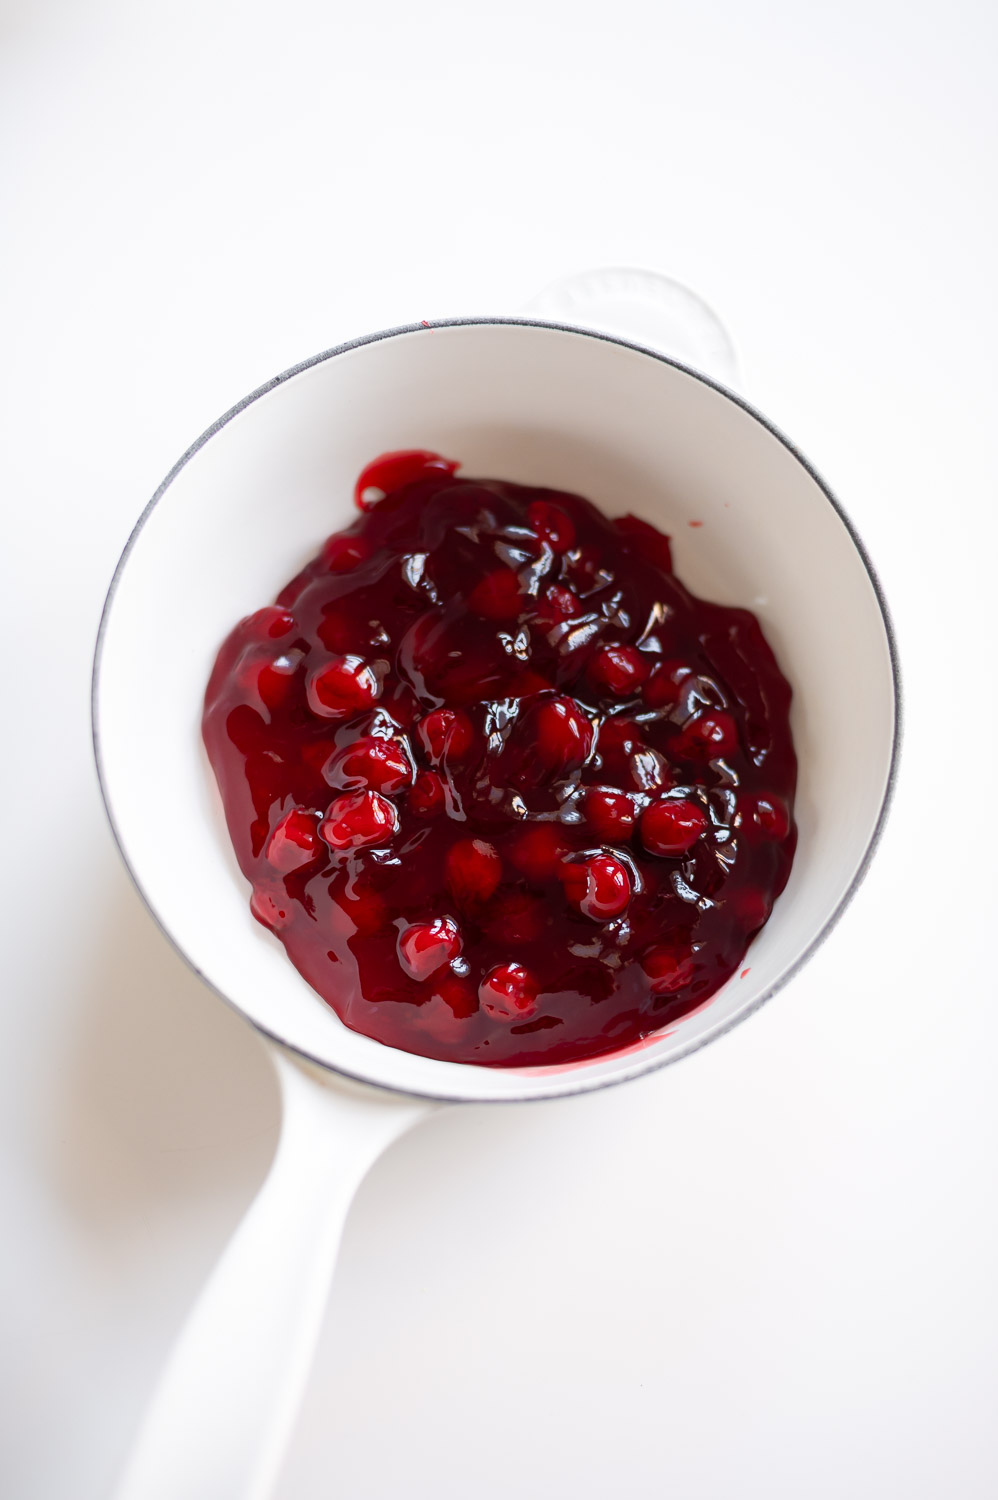
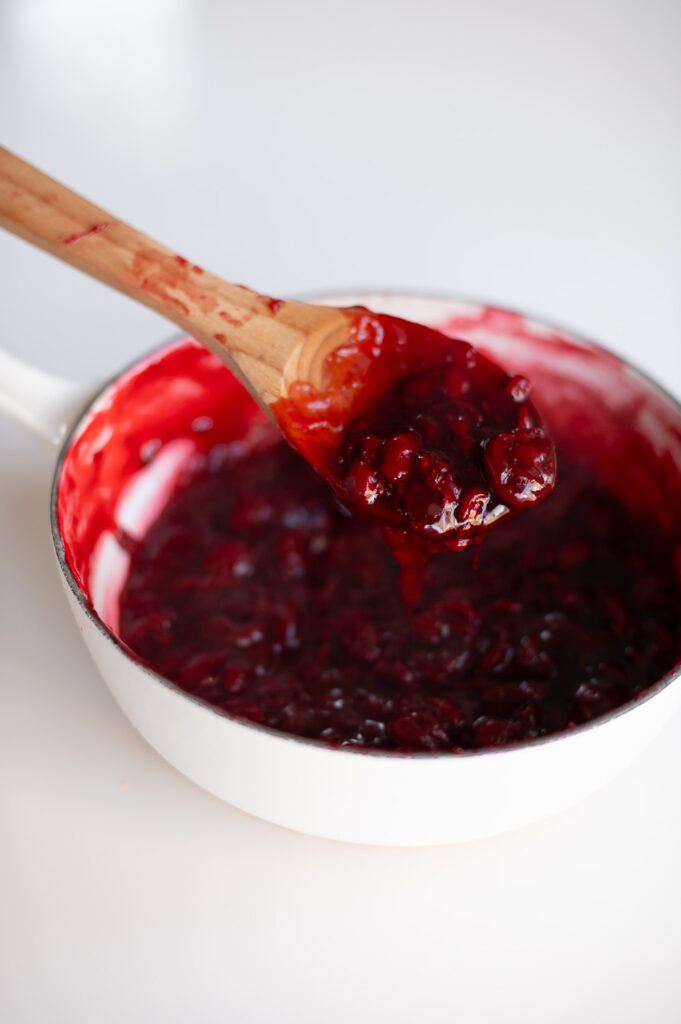
Step 5. Simmer On The Stove For Up To 30 Minutes
Once you’ve gotten all your ingredients in your saucepan, we’re going to move it over to the stove and simmer our mixture, stirring constantly, for approximately 30 minutes (or until the gel texture of the canned filling has relaxed and the mixture has visibly reduced).
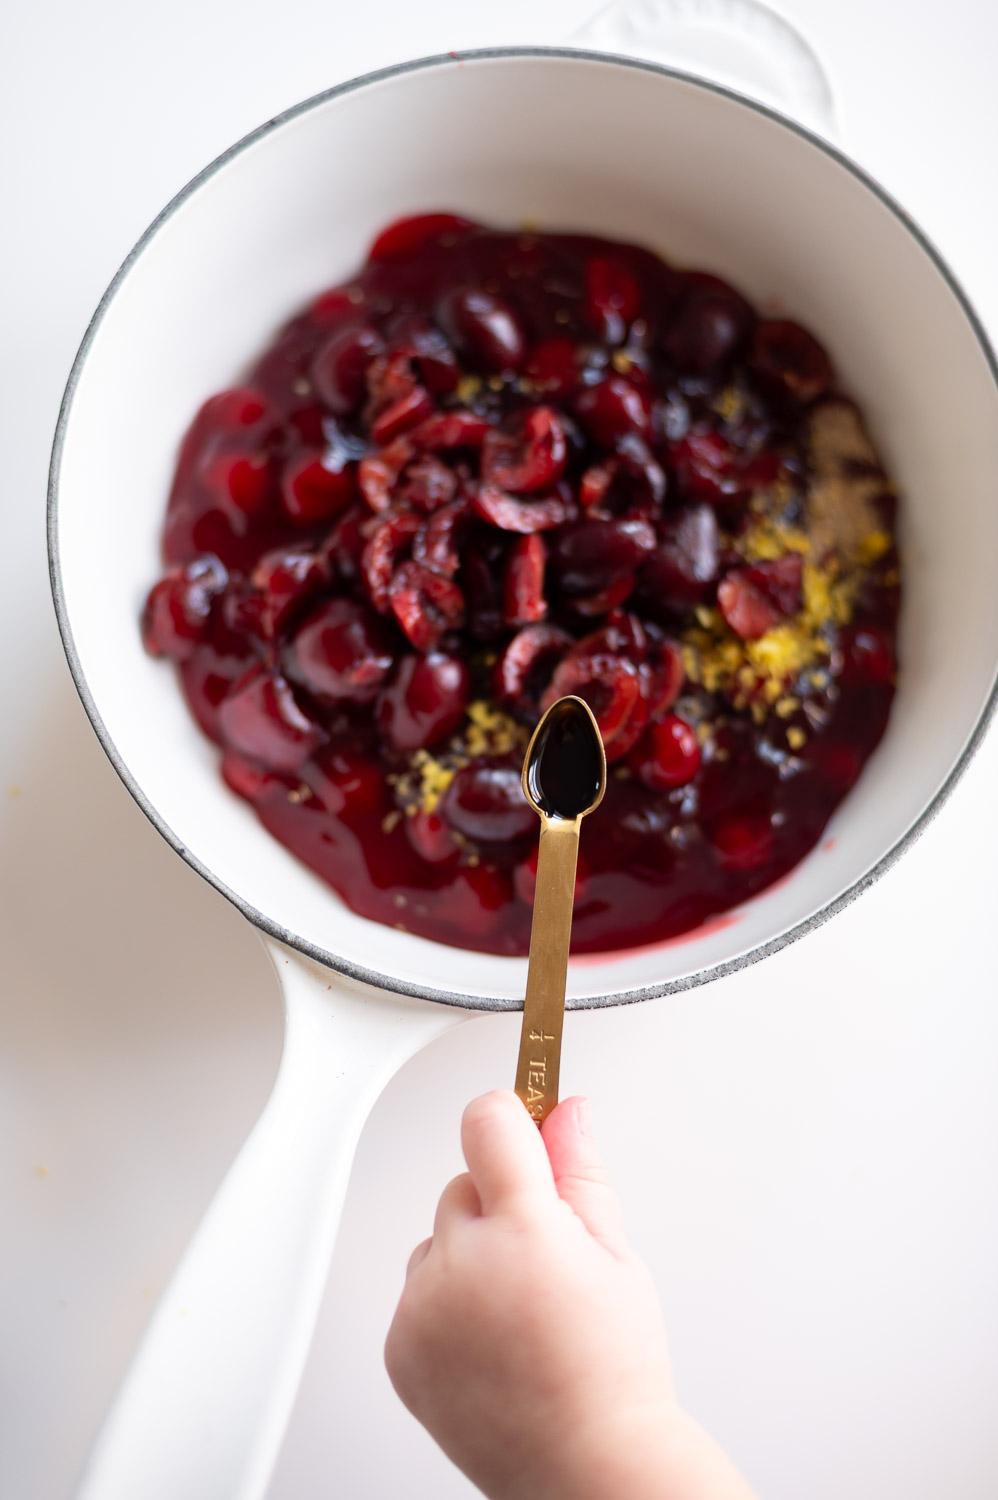
Step 6. Stir In Your Cornstarch Slurry For 30 Seconds & Remove From Heat To Cool
Finally once the texture of the filling has changed and visibly reduced you’re going to mix together your 2 teaspoons of cornstarch with a tablespoon of water and then add that “slurry” mixture to your upgraded pie filling.
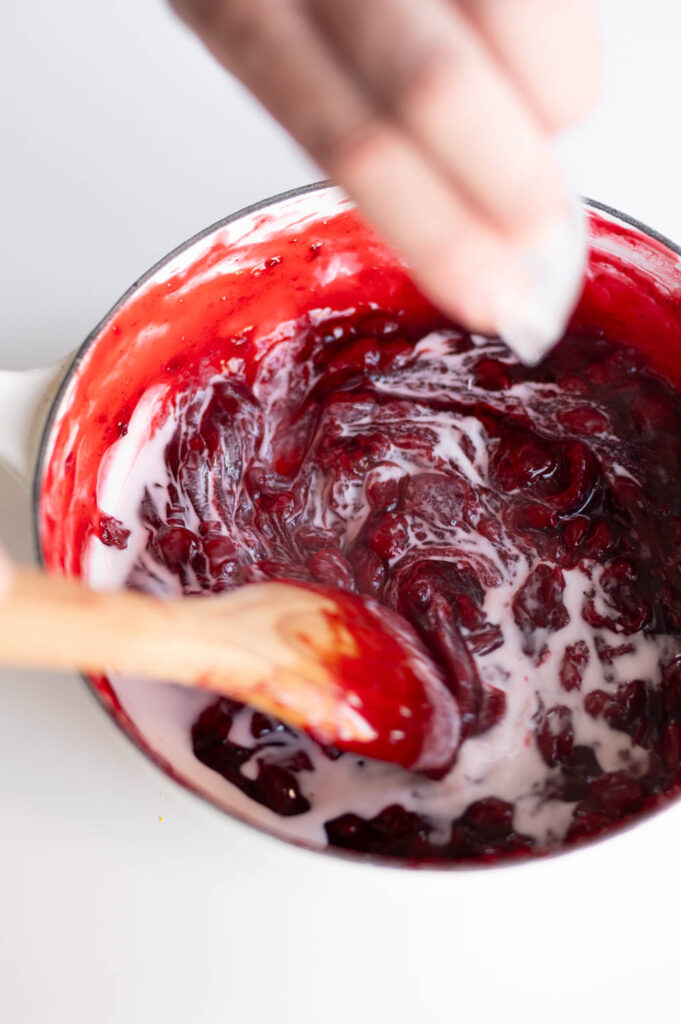
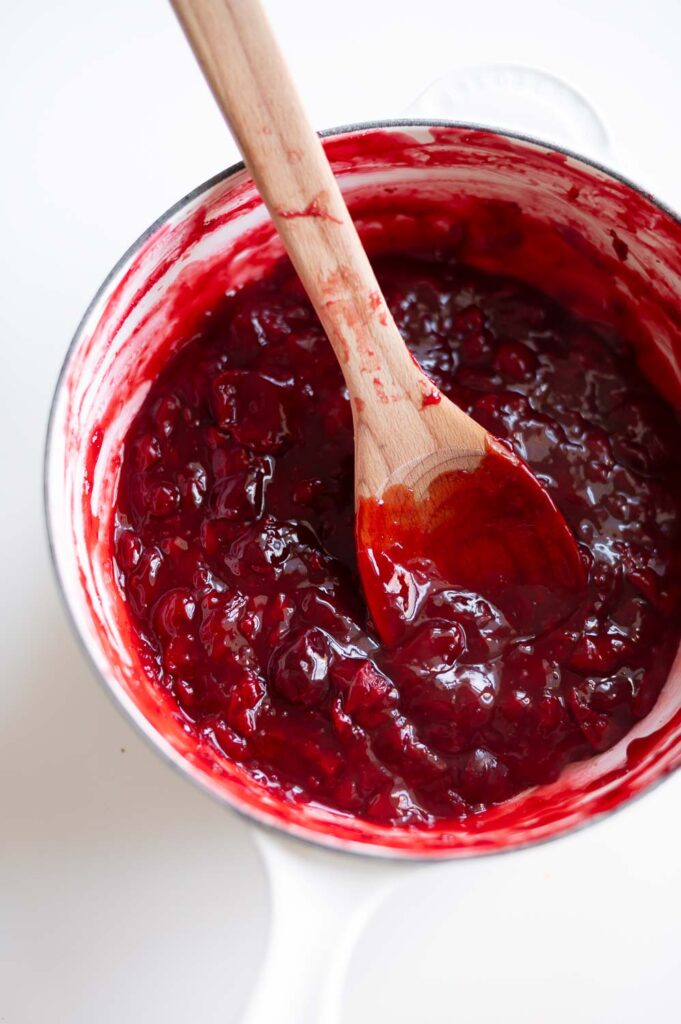
Stir it for about 30 seconds to ensure the slurry is well incorporated into the filling and then remove your saucepan from the heat and let it cool down completely.
The cornstarch is going to help thicken up our filling even more so that it doesn’t run out of our hand pies and down onto our shirt as we eat them.
How To Assemble Your Easy Cherry Hand Pies
While your upgraded cherry pie filling is cooling, it’s time to start working on putting our cherry hand pies together!
Step 1. Unroll Your Pie Dough & Cut Out 7 Circles From Each Crust With A 3″ Biscuit Cutter
If you don’t have a fancy 3″ biscuit cutter for this step, don’t worry, literally any round object in your kitchen that is approximately 3″ in diameter will work. I personally used a cup I found that was about 3″ wide.
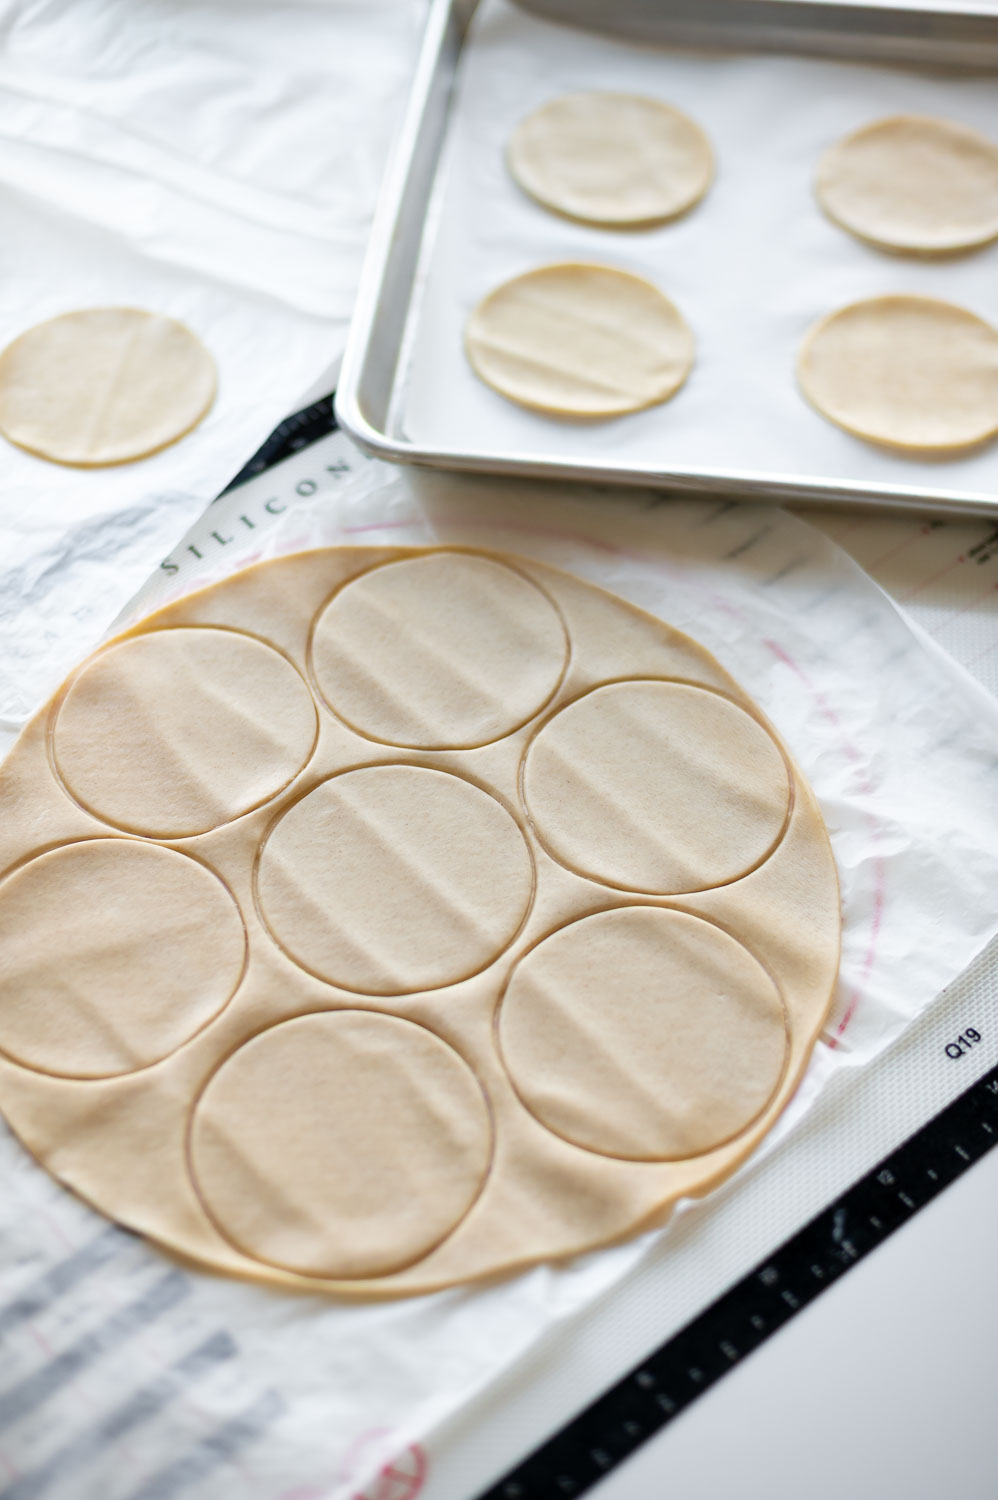

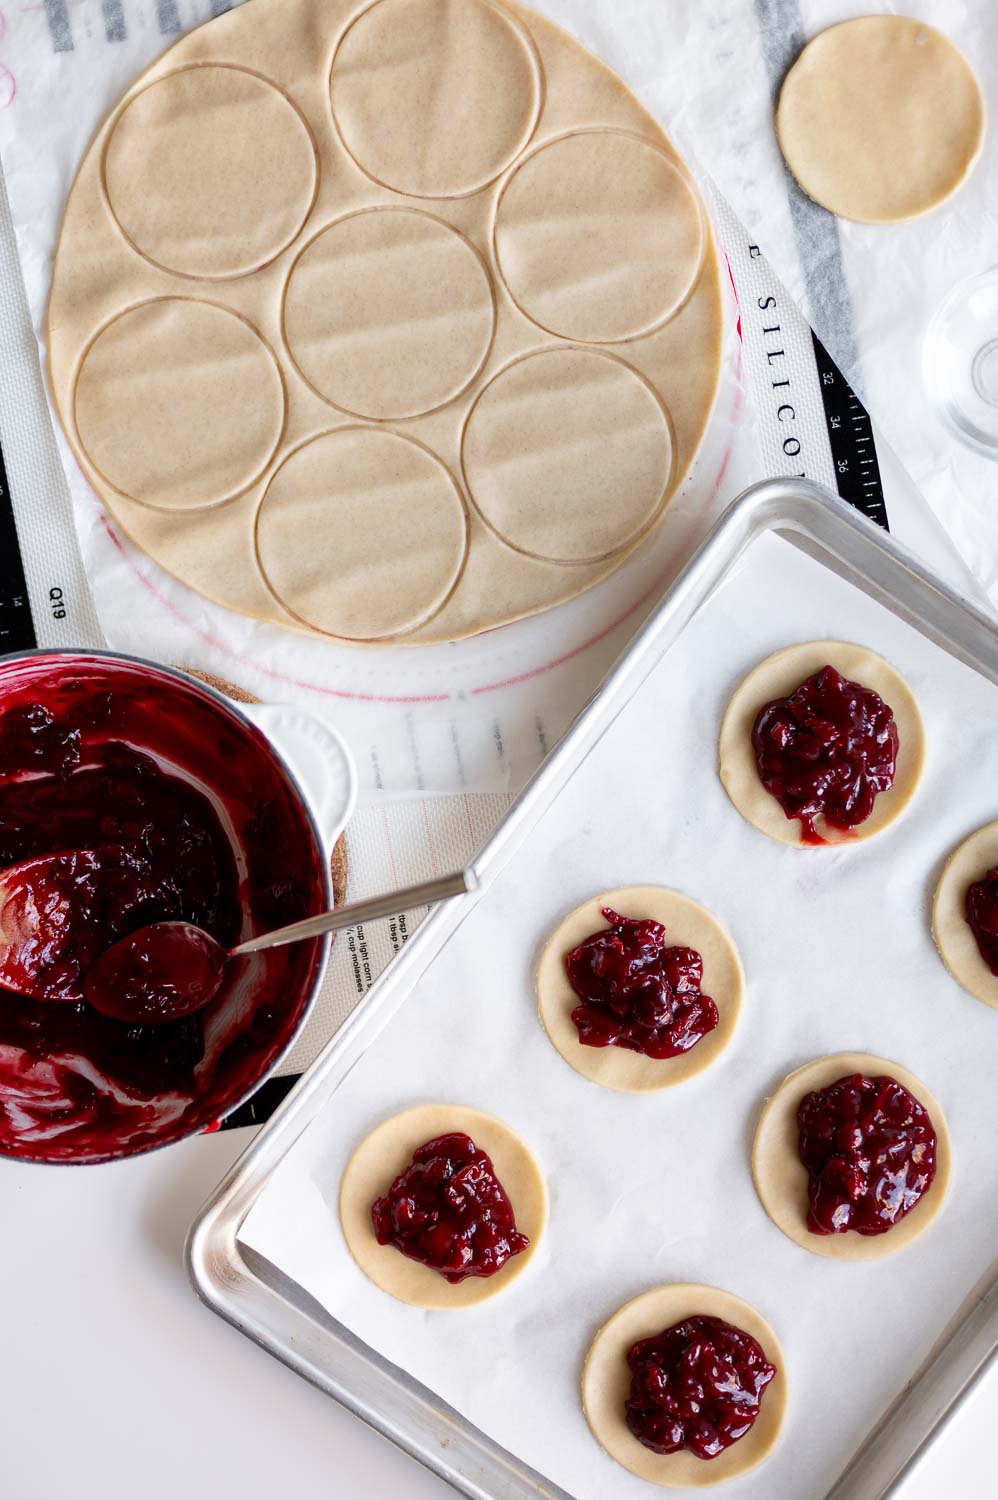
Using a 3″ circle cutter resulted in 7 rounds per pie crust for me. I then worked the leftover dough together into a ball, rolled it out on my parchment paper with a rolling pin, and had enough extra to cut out 4 more circles for a total of 18 rounds (or 9 complete cherry hand pies).
Step 2. Place 6 Rounds Onto A Baking Sheet Lined With Parchment Paper & Add A Dollop Of Pie Filling On Top Of Each Round
After you’re done cutting out your dough, transfer 6 of them to a baking sheet lined with parchment paper. Then you’ll spoon out about 1-2 tablespoons of pie filling into the center of each round.
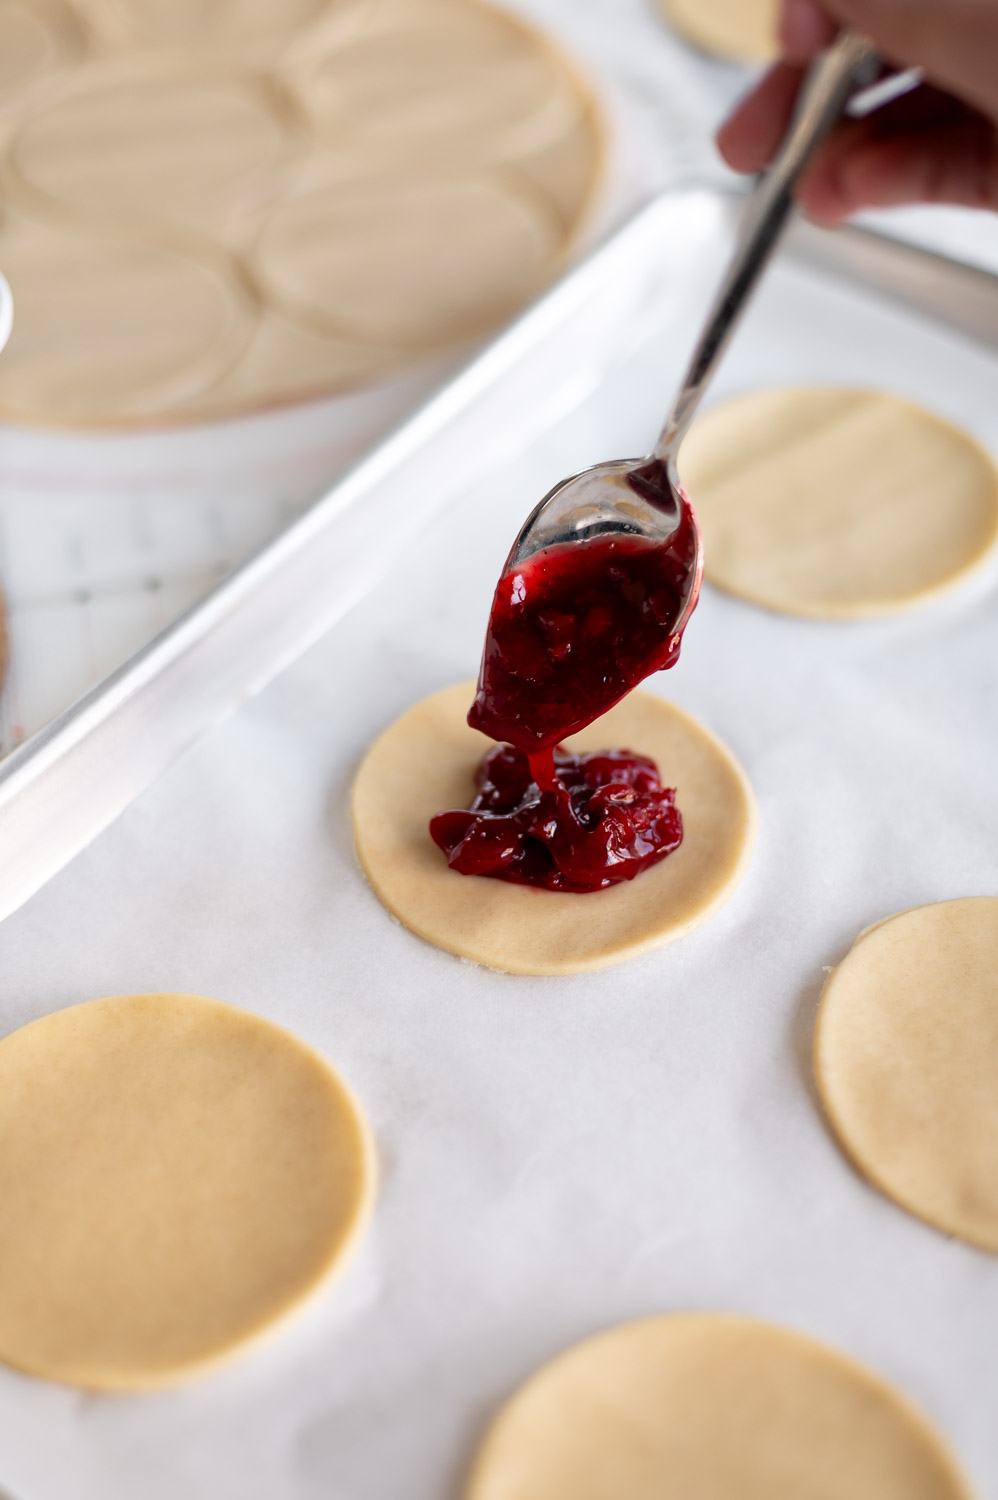
(You want to make sure you leave about a finger’s width of space between the pie filling and the edge of the round so you have enough space to connect the tops in the next step.)
Step 3. Wet The Edge Of Each Round With Water
Now go grab a little cup of water and wet down all the edges of all your pastry rounds. You can use a small pastry brush for this or just use your finger like I did.
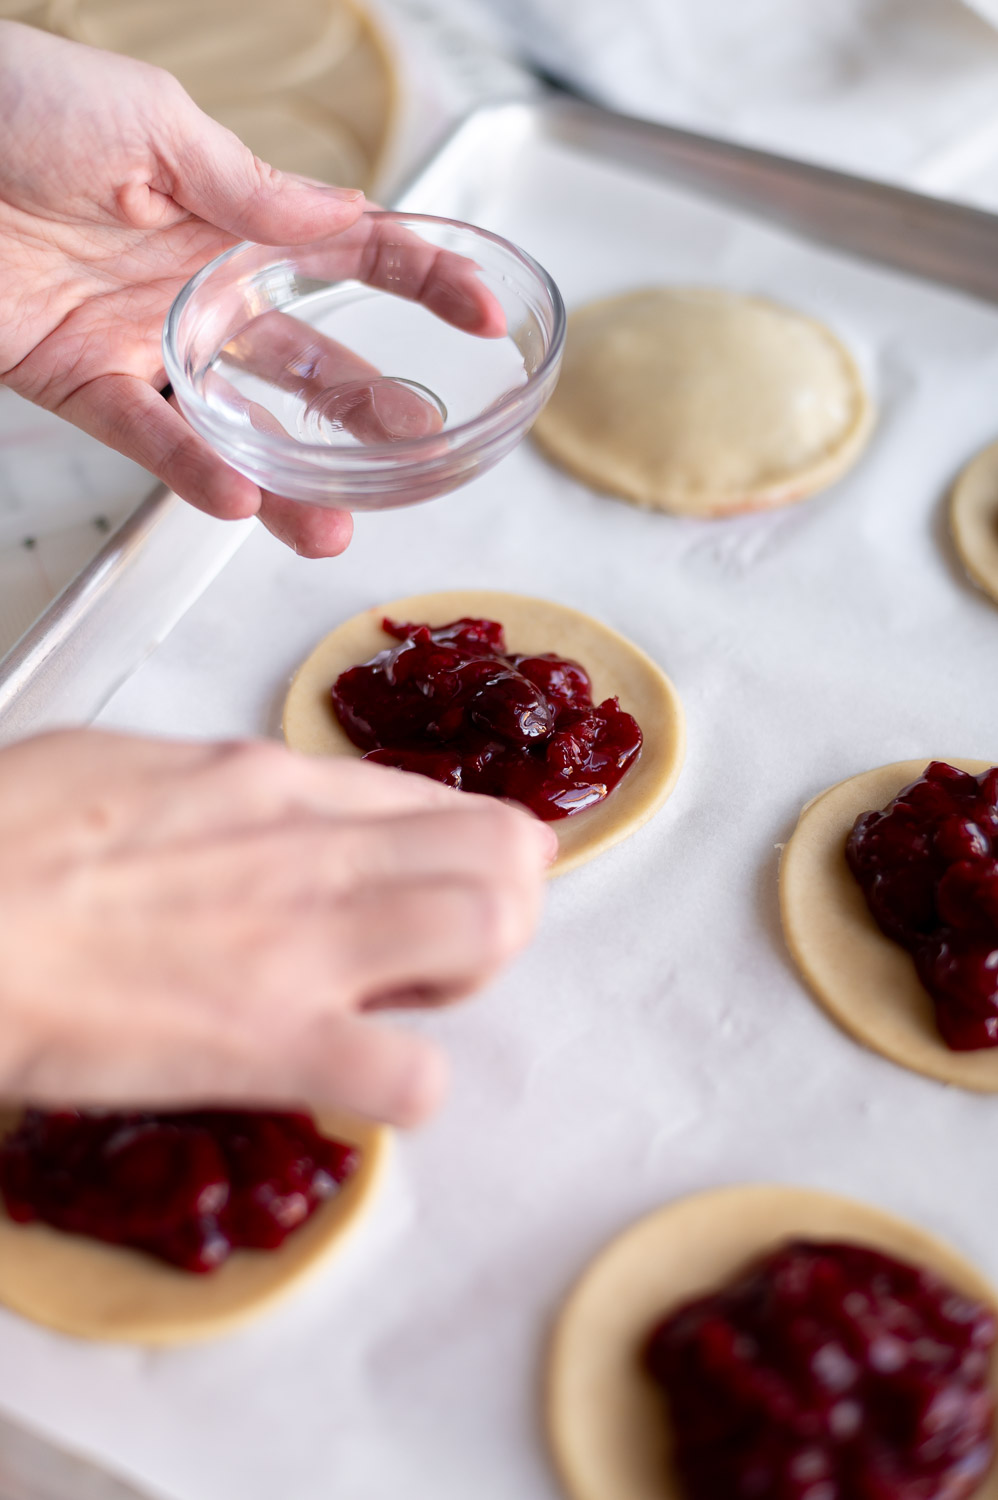
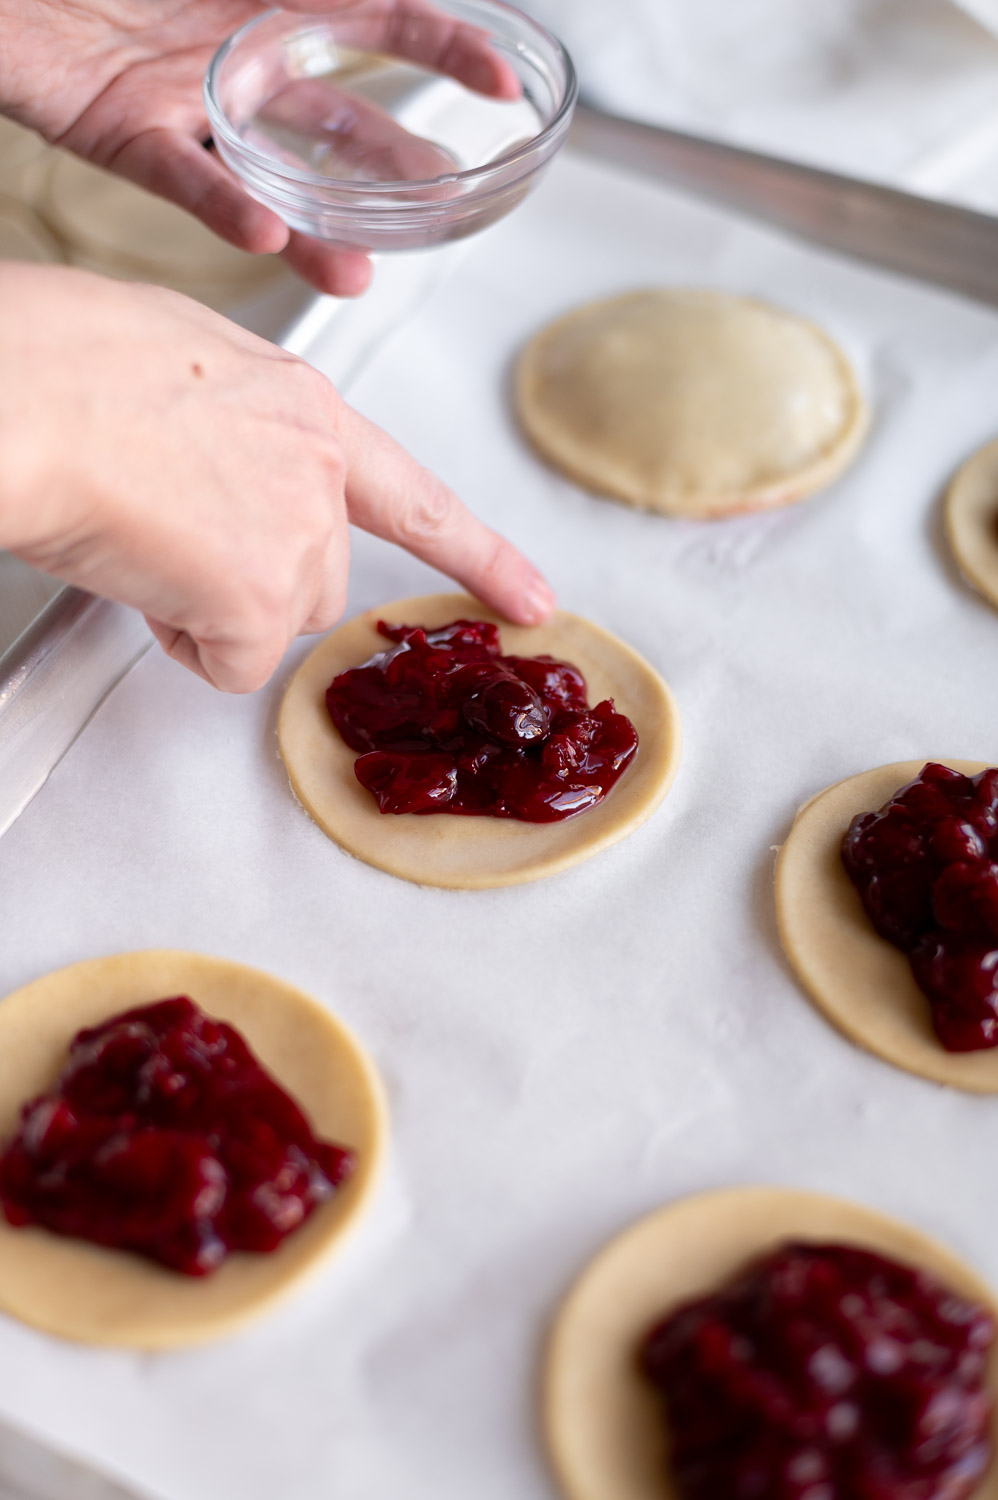
This step is going to help make sure the tops of our hand pies can properly seal to the bottom of our hand pies so that the filling doesn’t leak out during the baking process.
Step 4. Place A Second Round On Top Of Each Pie & Seal The Edges Together
Next you are going to place the tops on all your hand pies. Carefully setting them on top so that the top and bottom edges of the rounds are aligned as closely as possible.
Press down all along the edge where you place the water to help seal the two layers together.
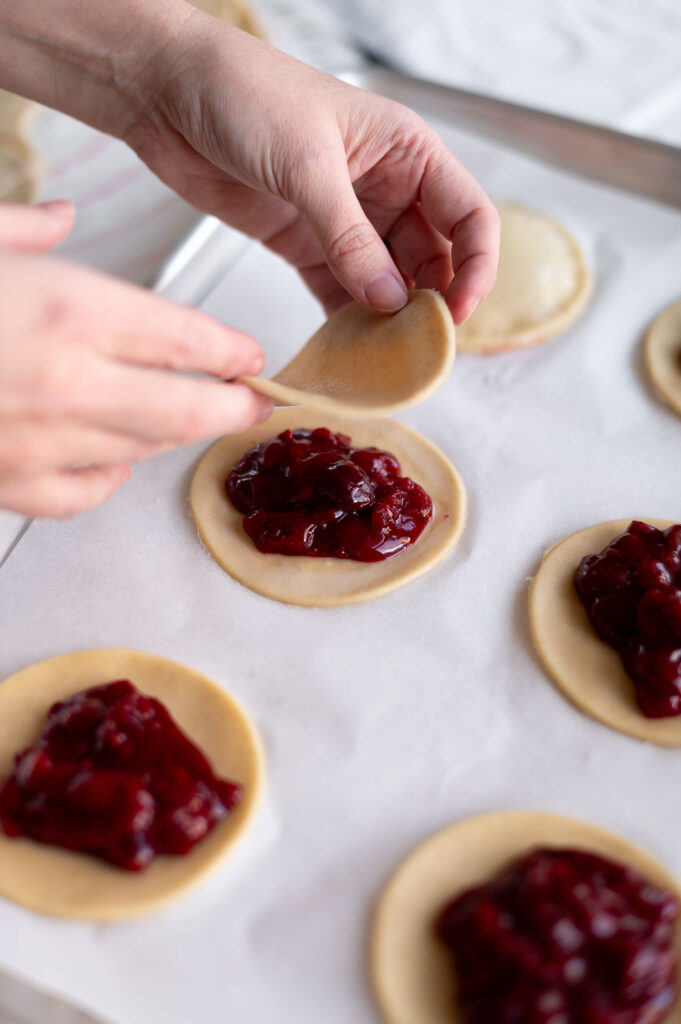
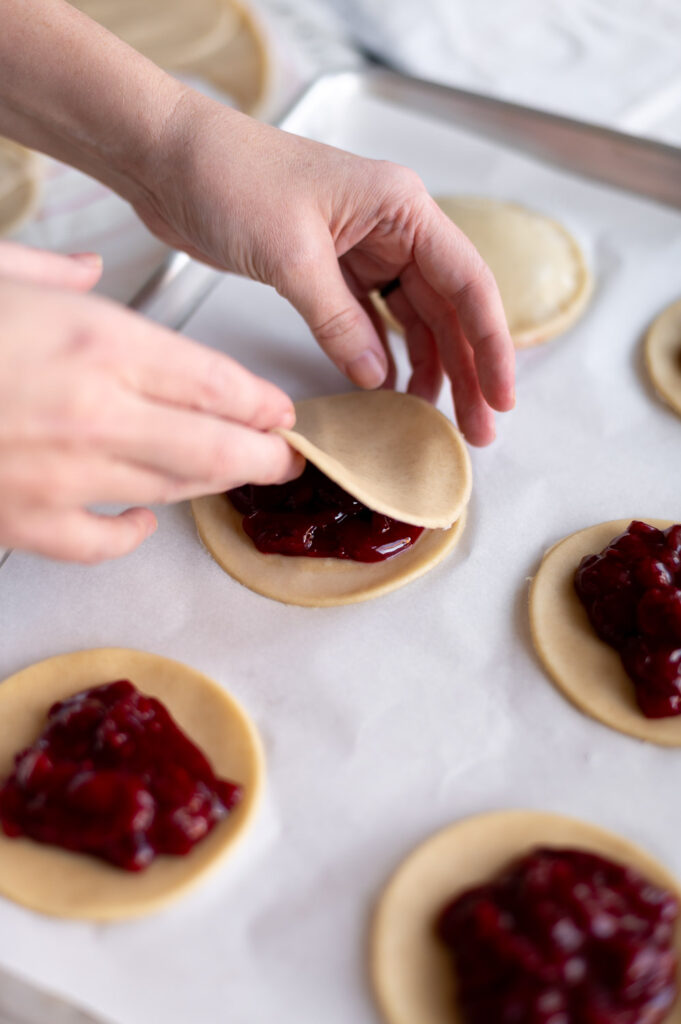
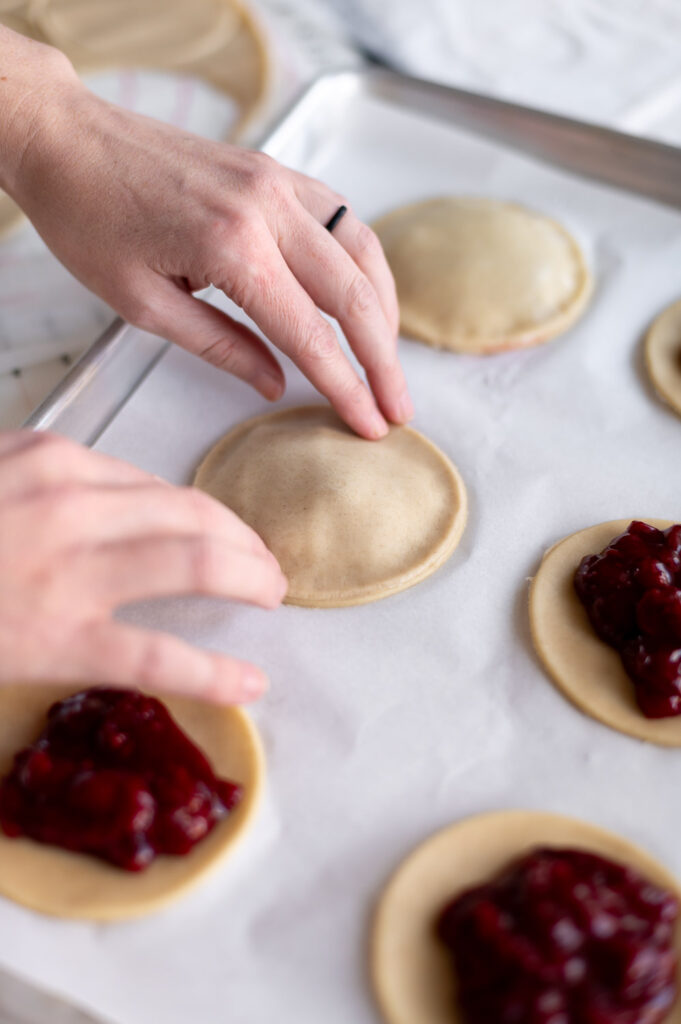
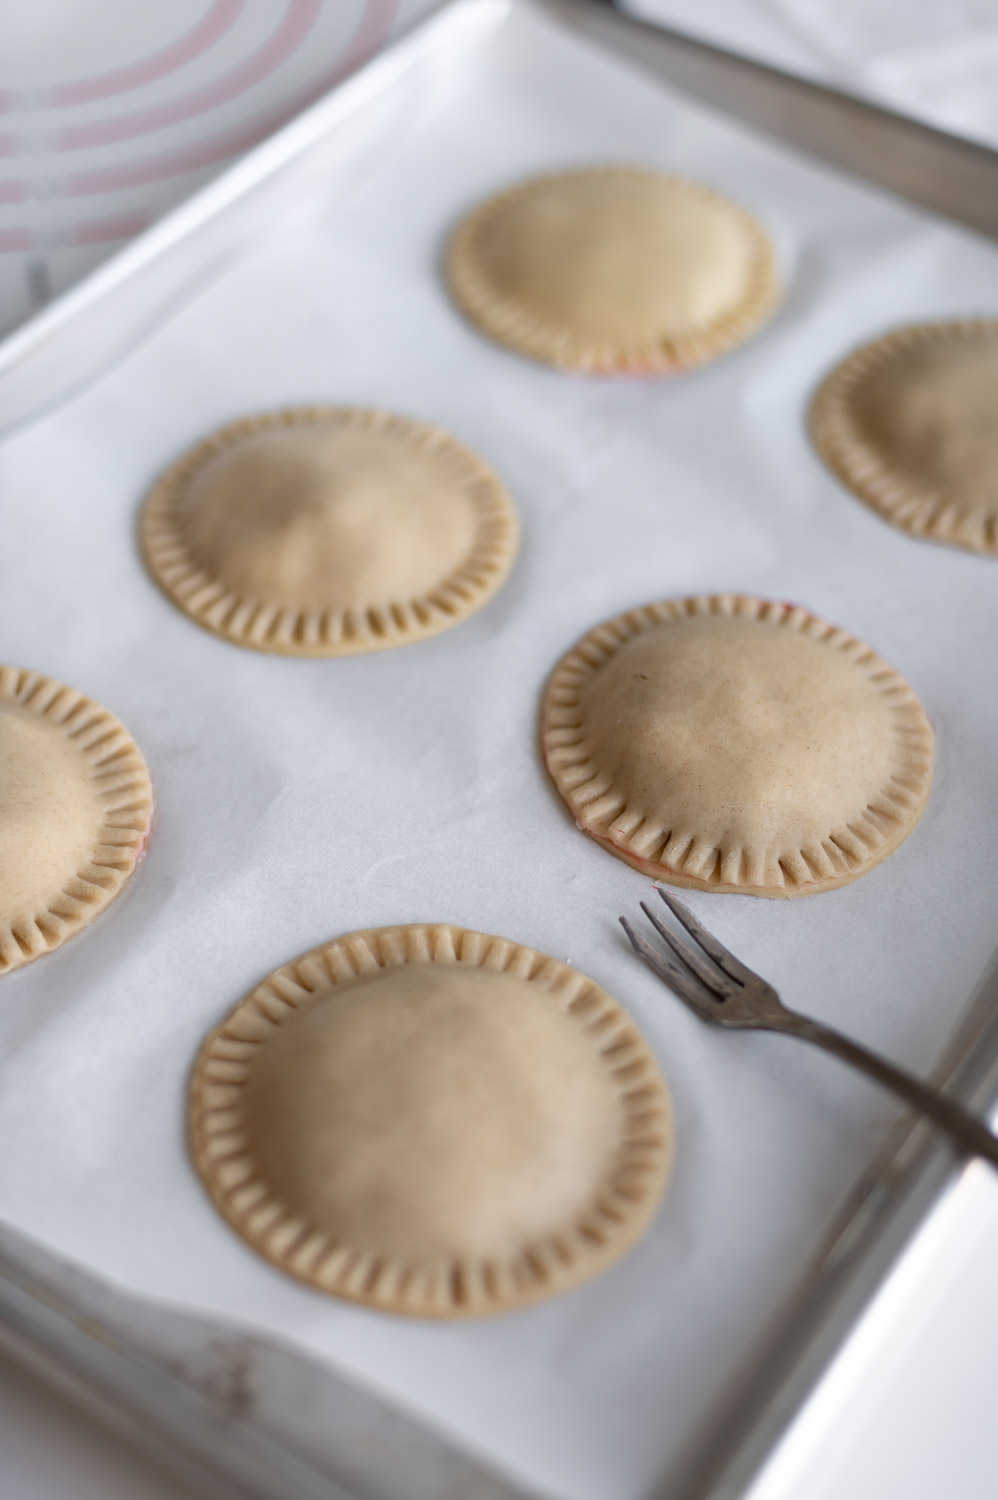
Once all the tops are on, you can seal the edges further by crimping them with a fork. Pressing the tines into the edges of the dough all the way around the circumference of your hand pie.
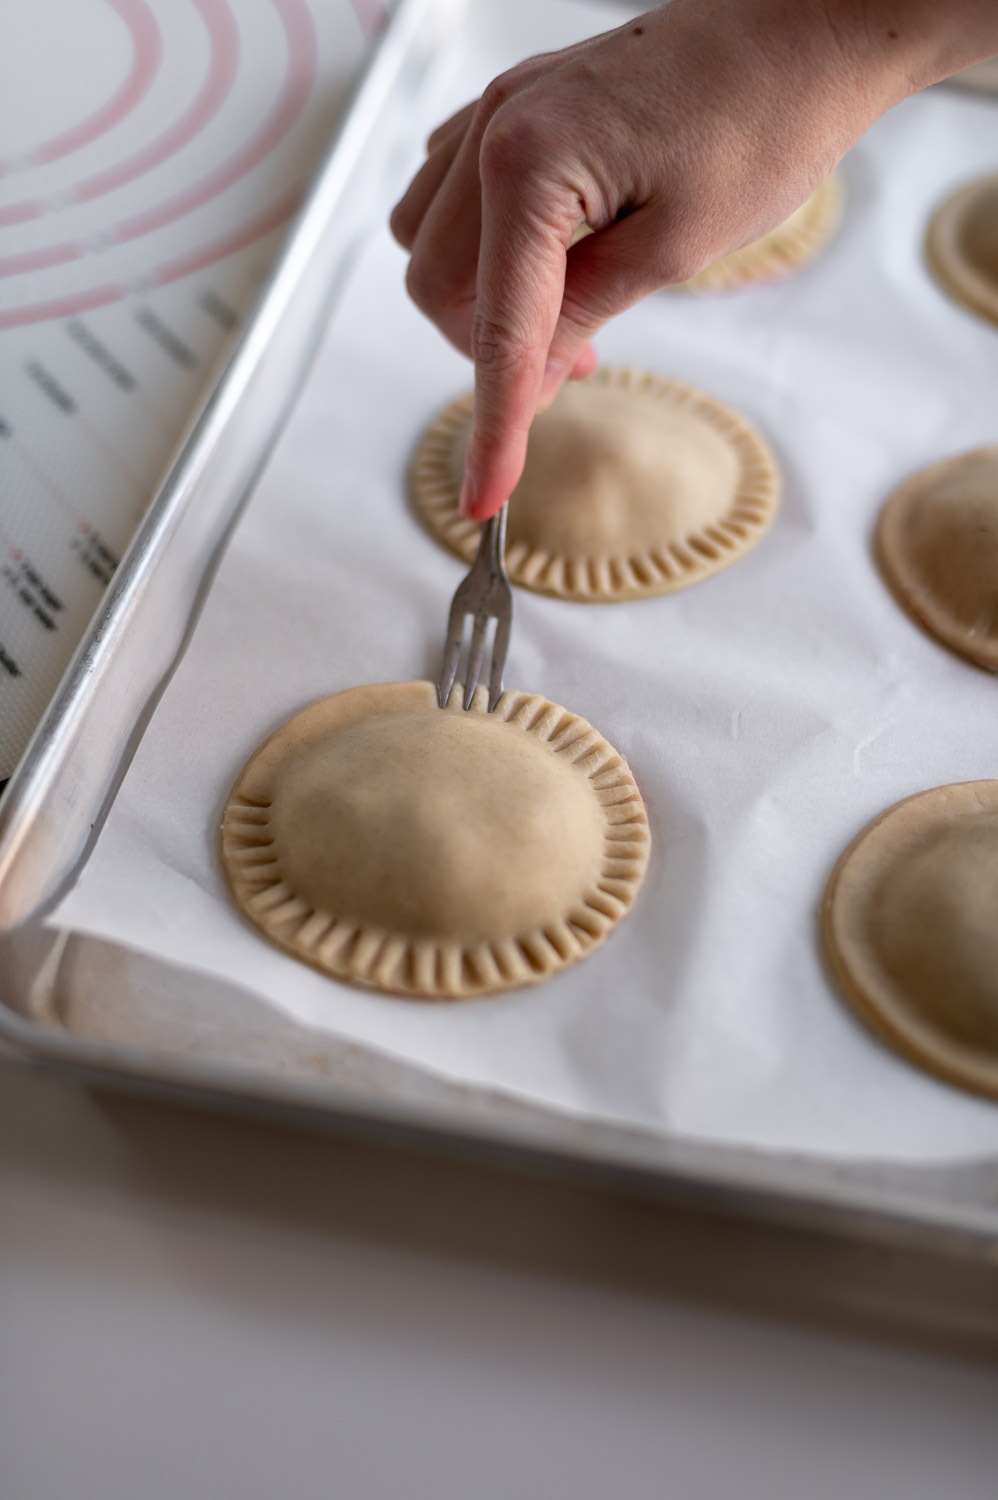
Step 5. Cut Vent Holes On Top Of Each Hand Pie
When we place our hand pies in the oven, the filling is going to create steam. That steam needs some way to escape from inside of our pie so it doesn’t explode out the seams.
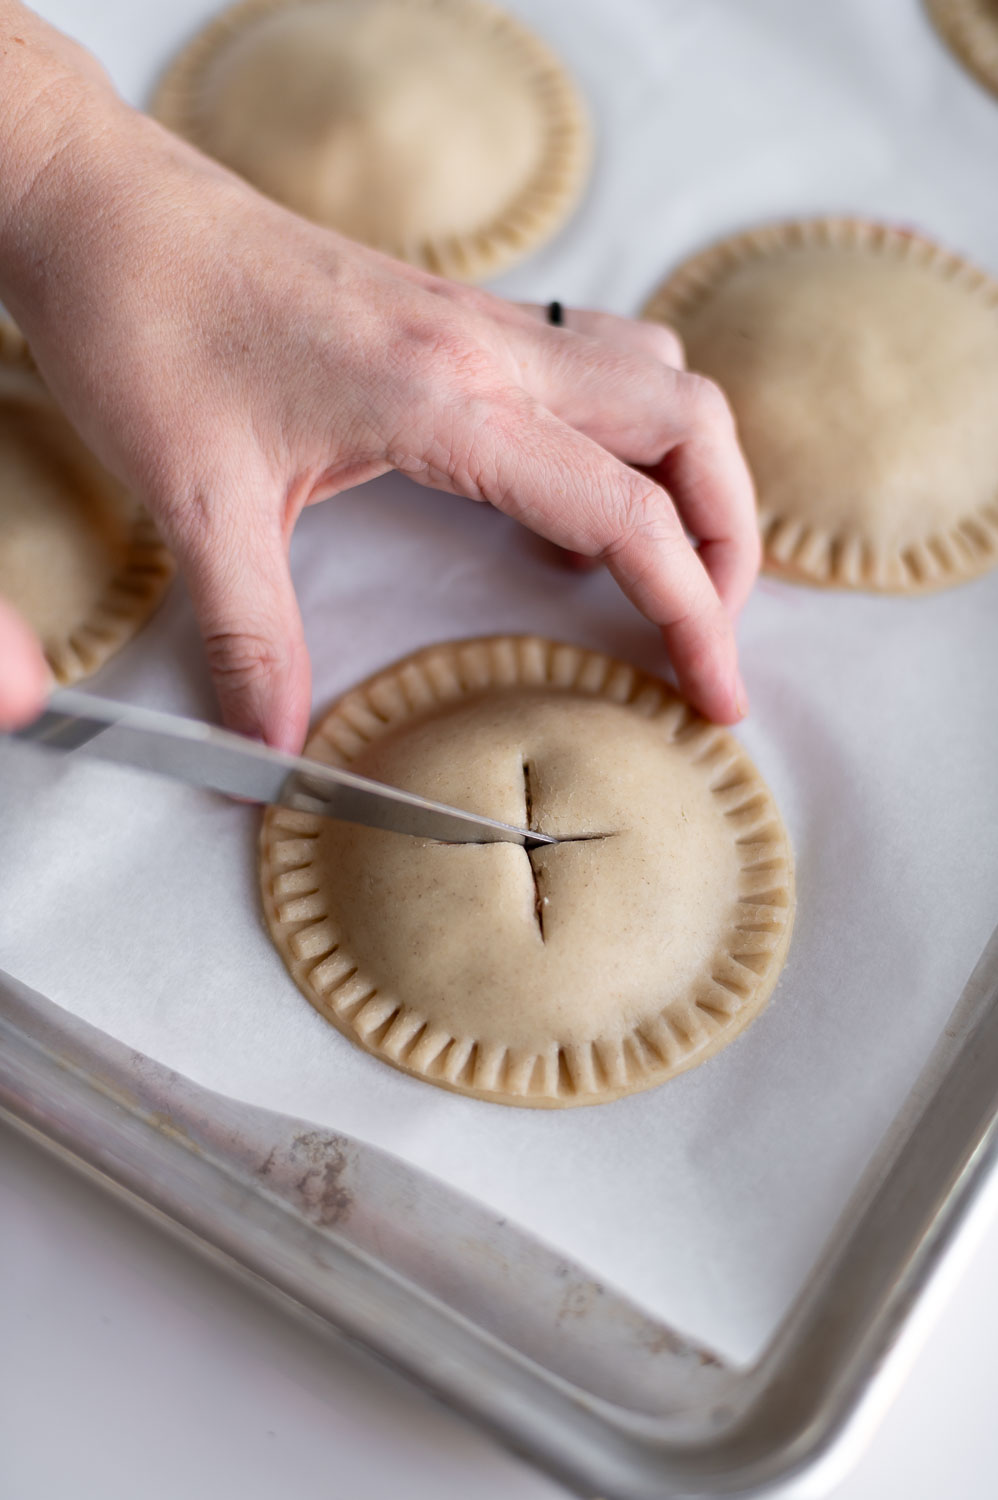
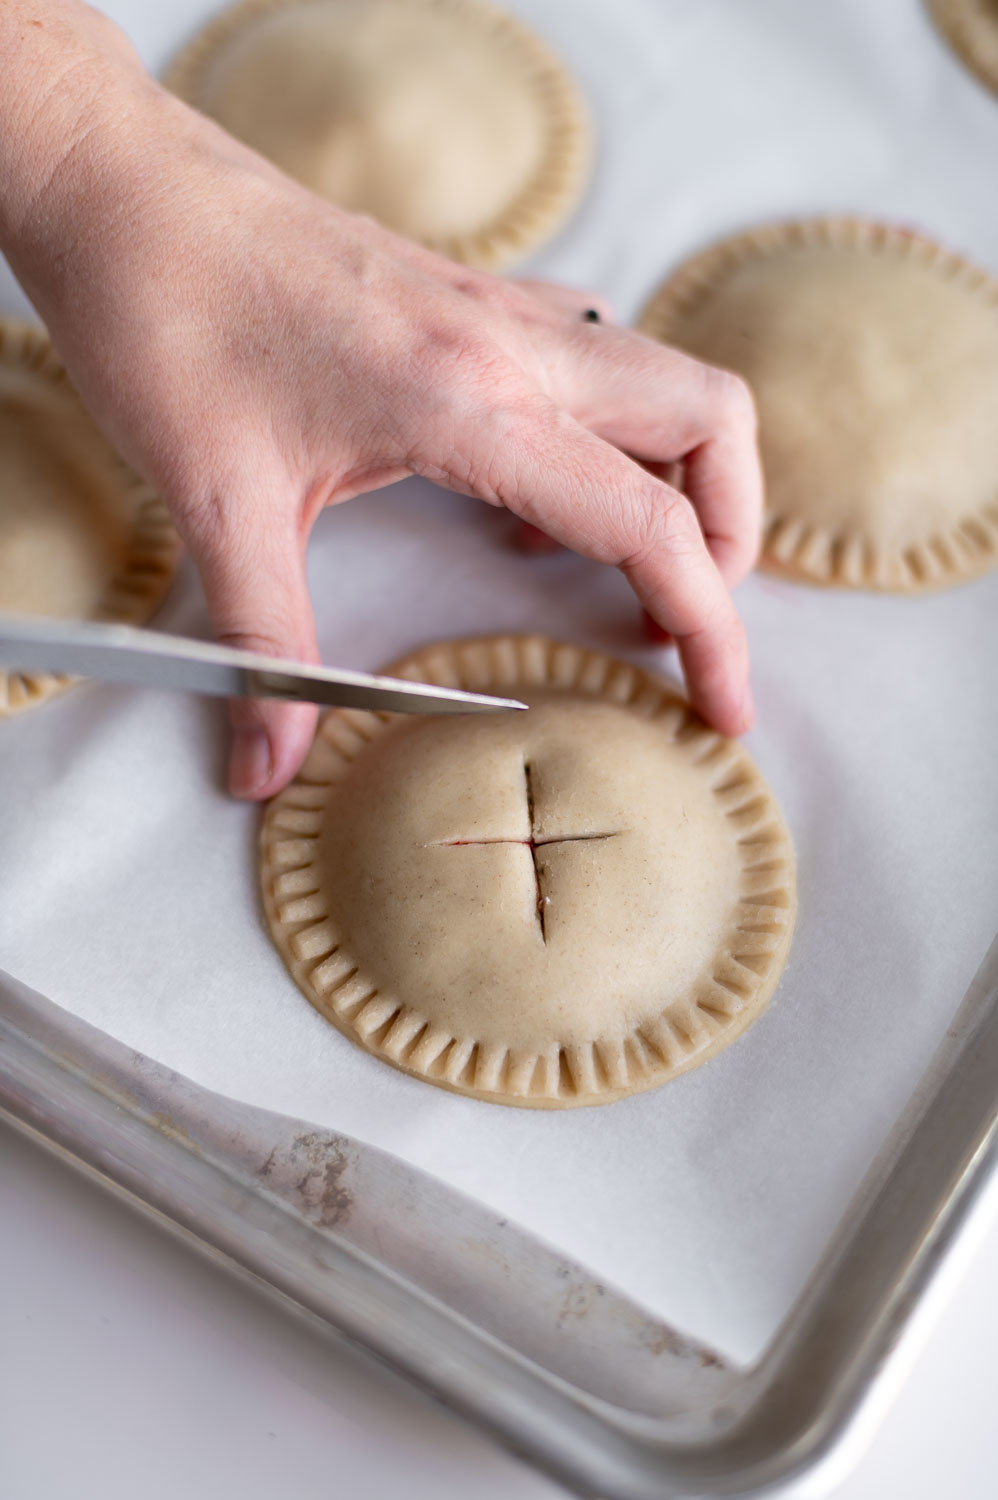
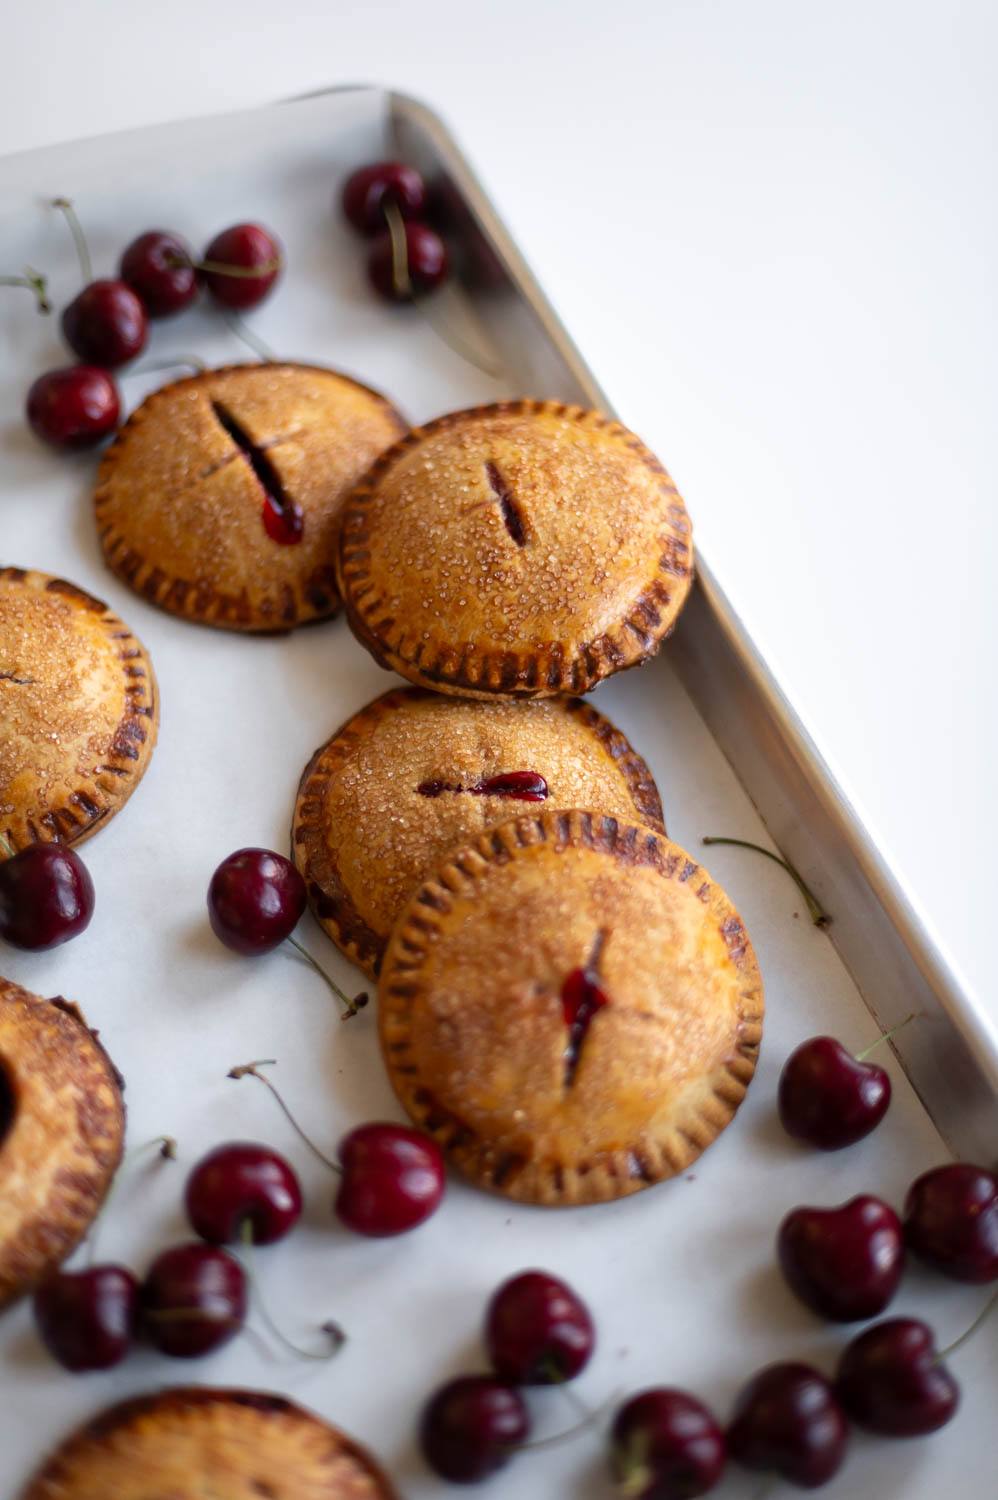
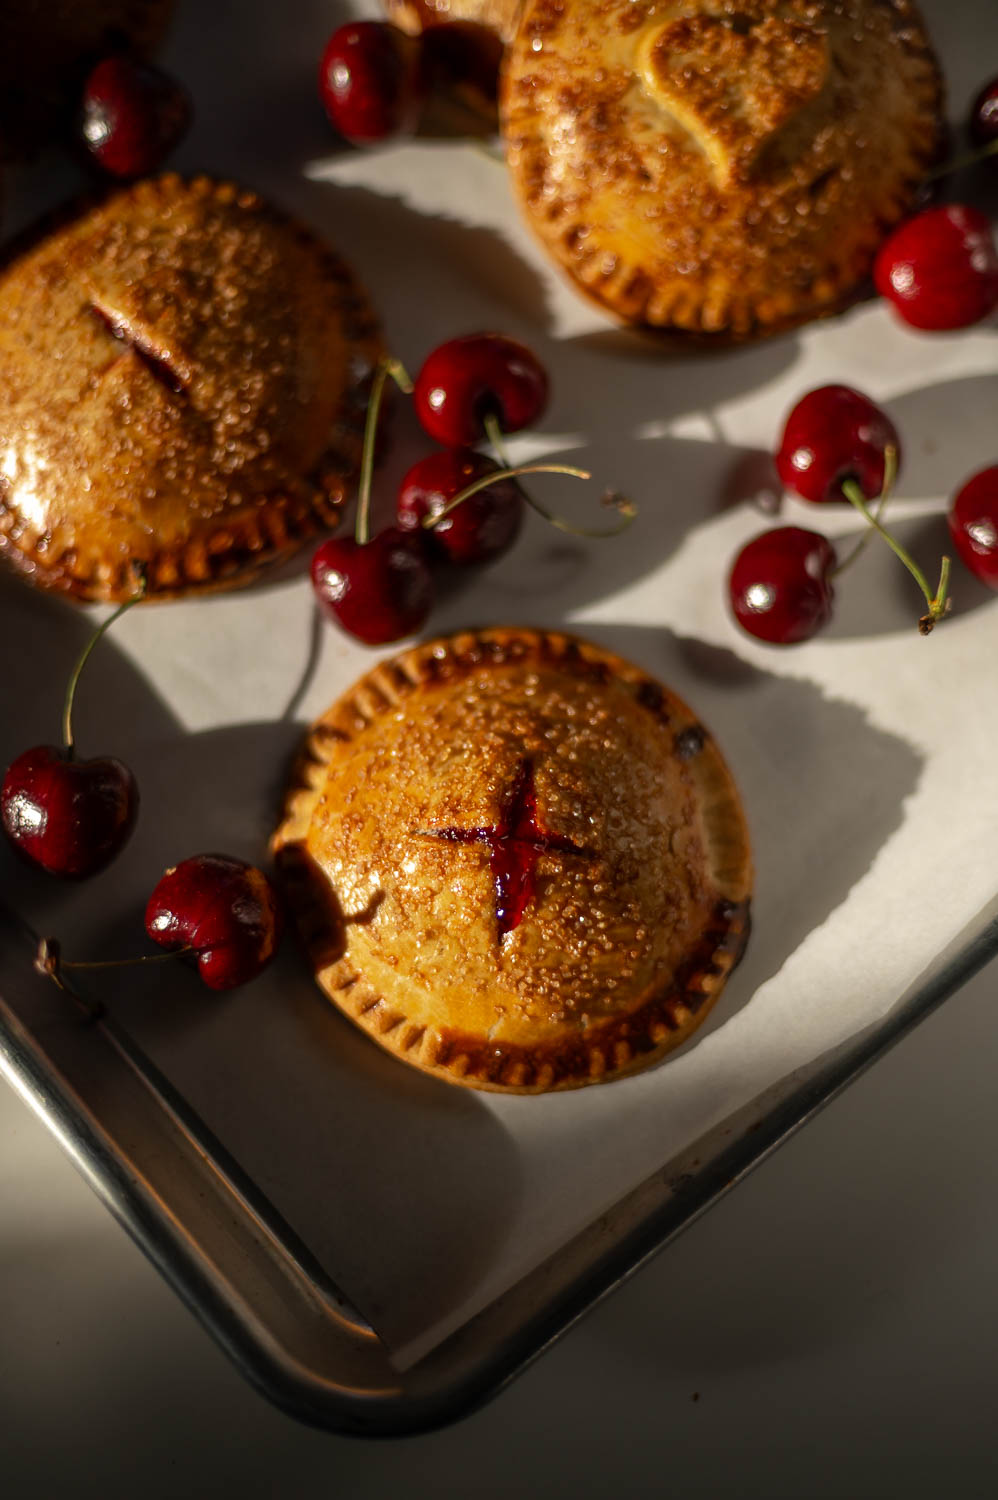
To combat this, we need to cut some small vent holes on the top of our pies, you can do this in any pattern you wish, but I went for a traditional X shape on the top of mine this time.
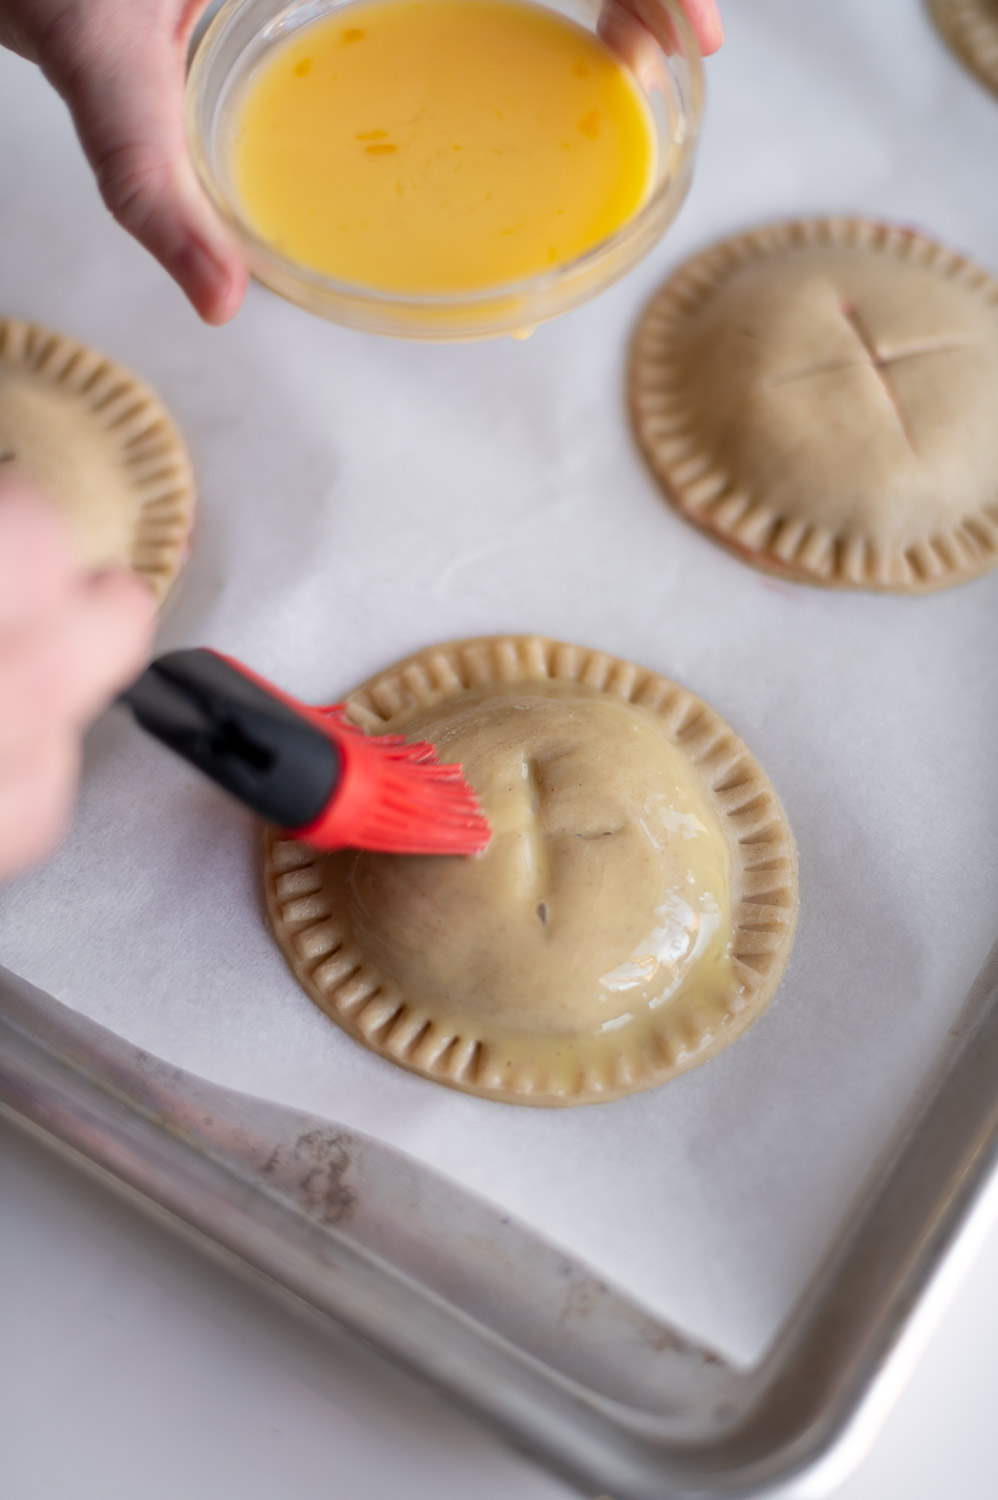
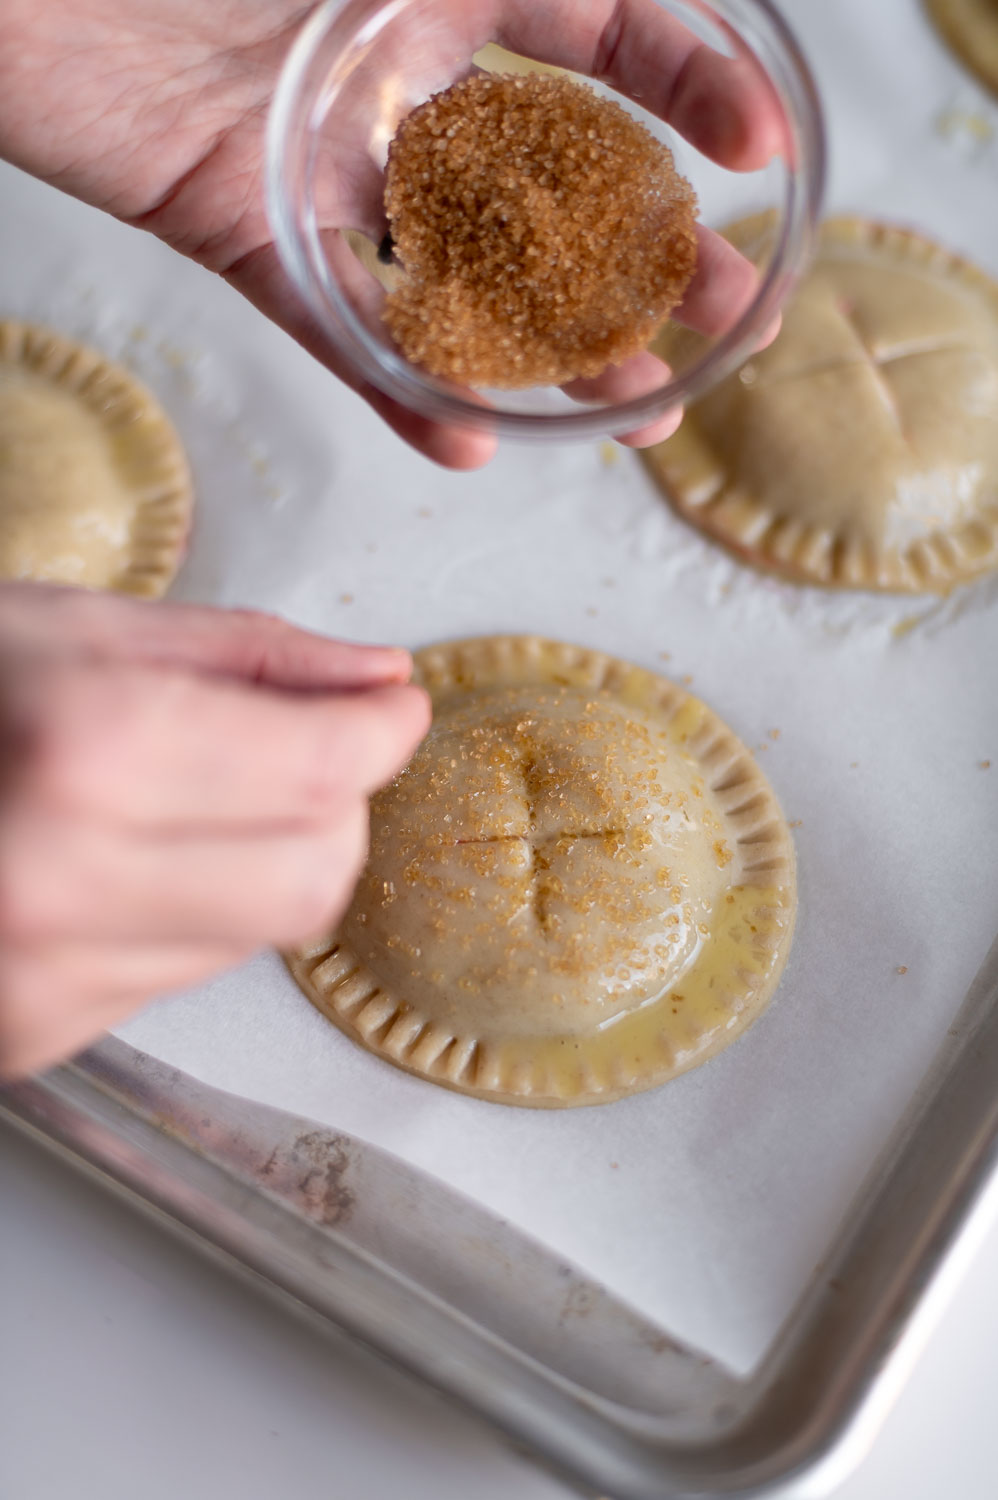
Step 6. Brush The Tops Of Your Pies With An Egg Wash & Top With Turbinado Sugar
Finally we’re going to whisk our egg together with 1 tablespoon of milk and then brush that mixture onto the tops of our hand pies. Then we’ll finish them by topping each with some coarse sugar.
Step 7. Place Your Pies In The Freezer For 10-15 Minutes
This step helps the pies better hold their shape in the oven, improves flakiness and lift and helps to reduce filling blowouts.
Step 8. Bake In The Oven At 400 Degrees For 15 Minutes (Or Till Golden Brown)
After your pies have chilled in the freezer for at least 10-15 minutes, it’s time to pop them in the oven! (I found it helped achieve a more even bake if I rotated my pan halfway through the cook time.).
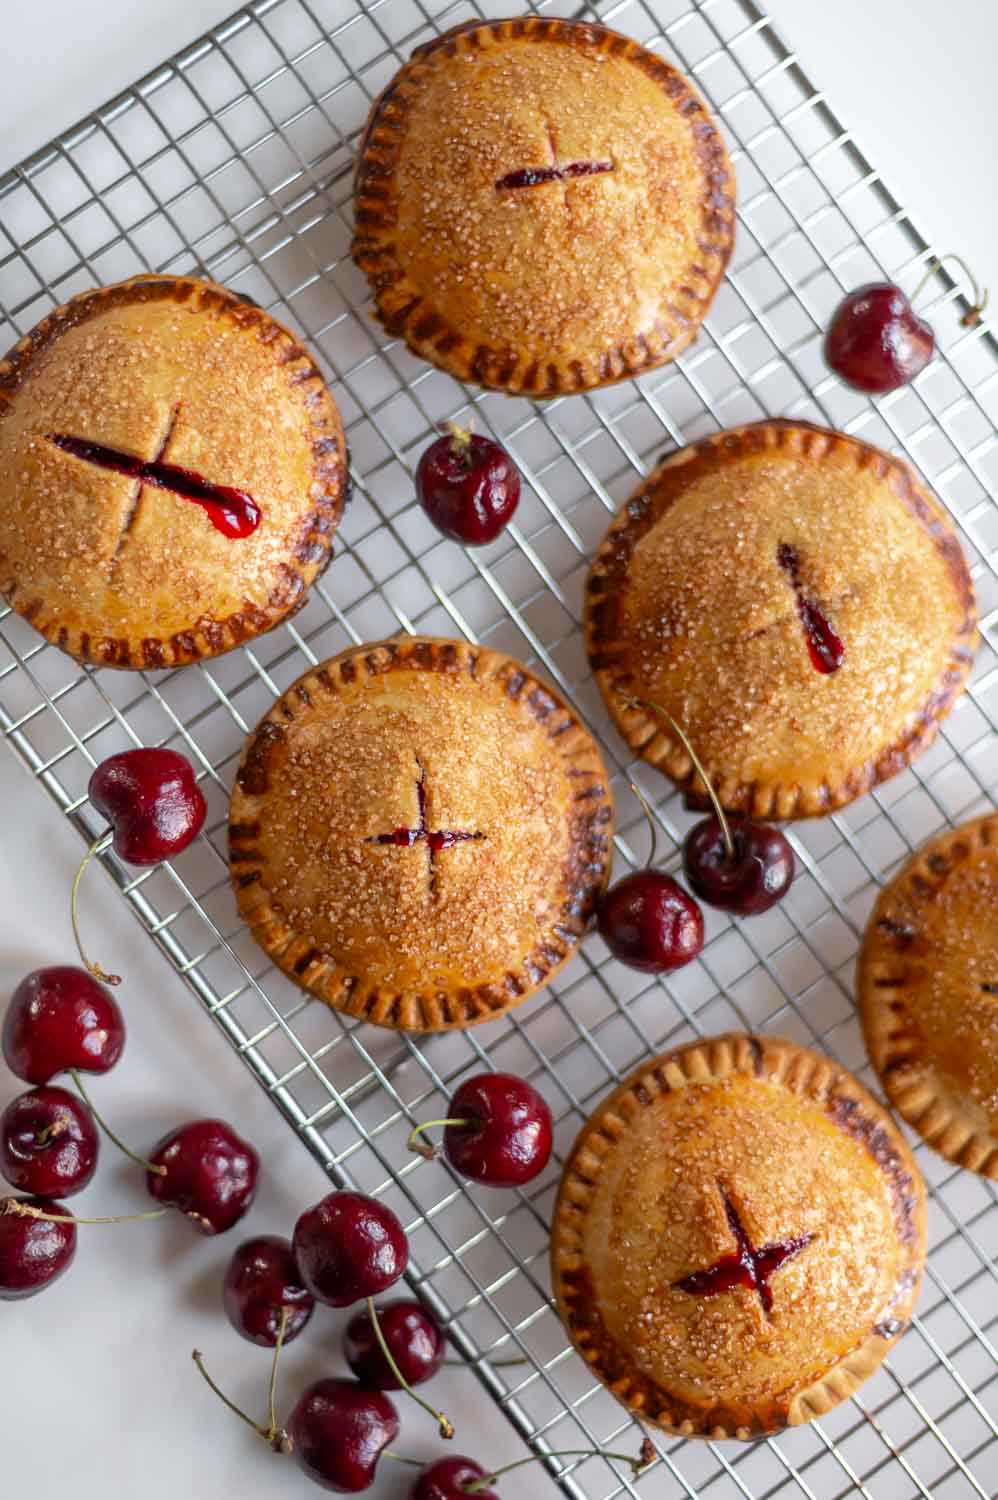
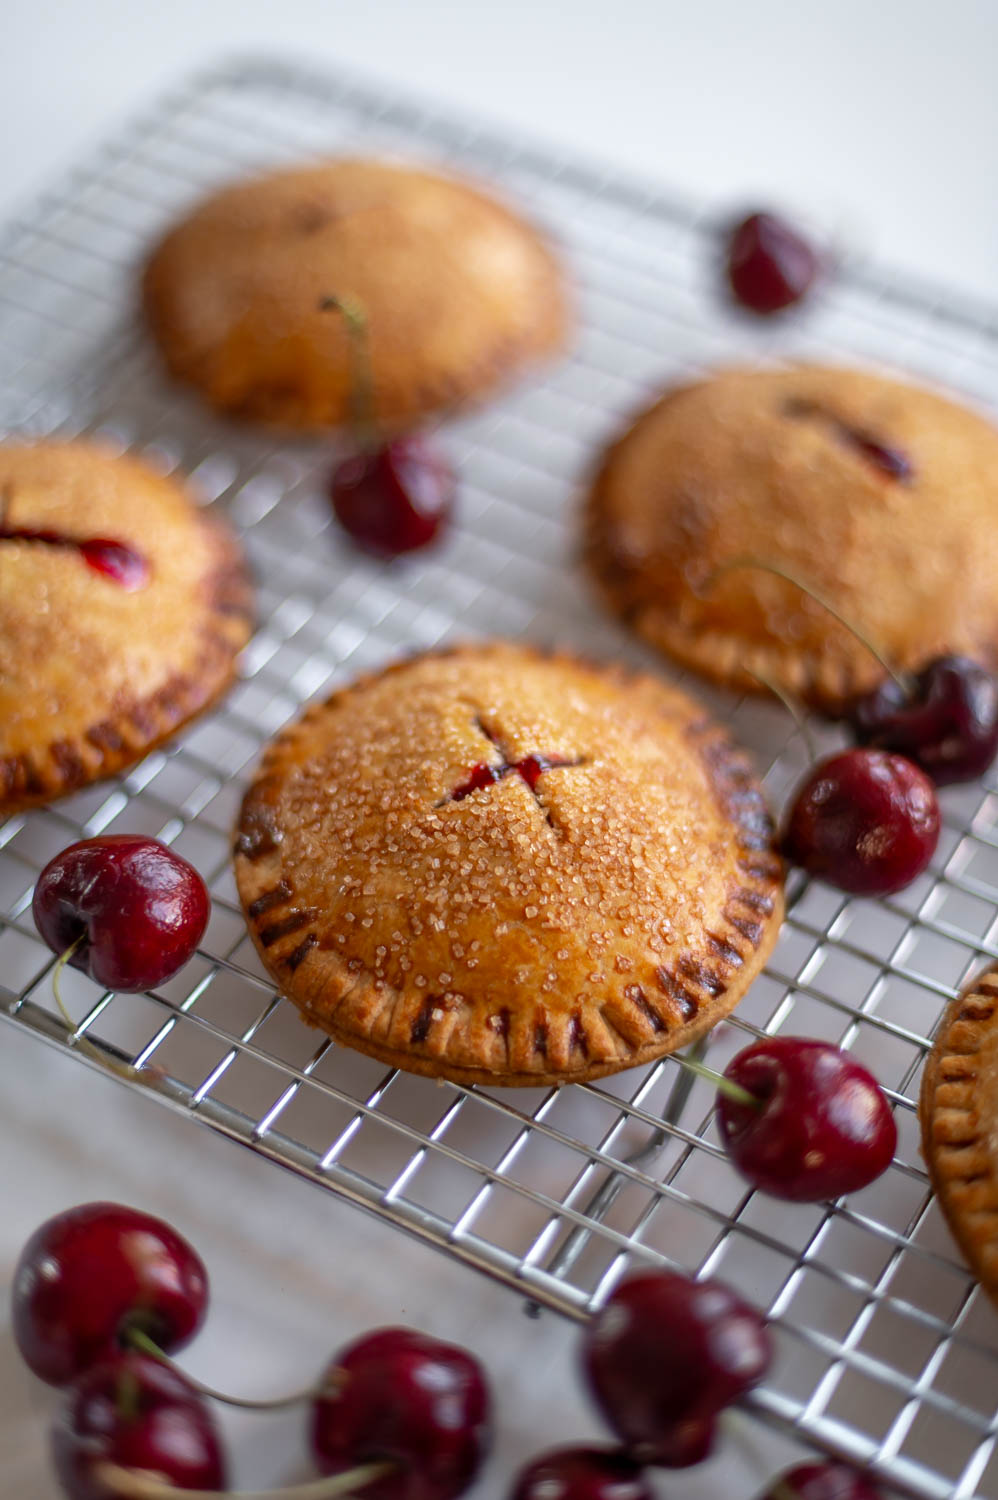
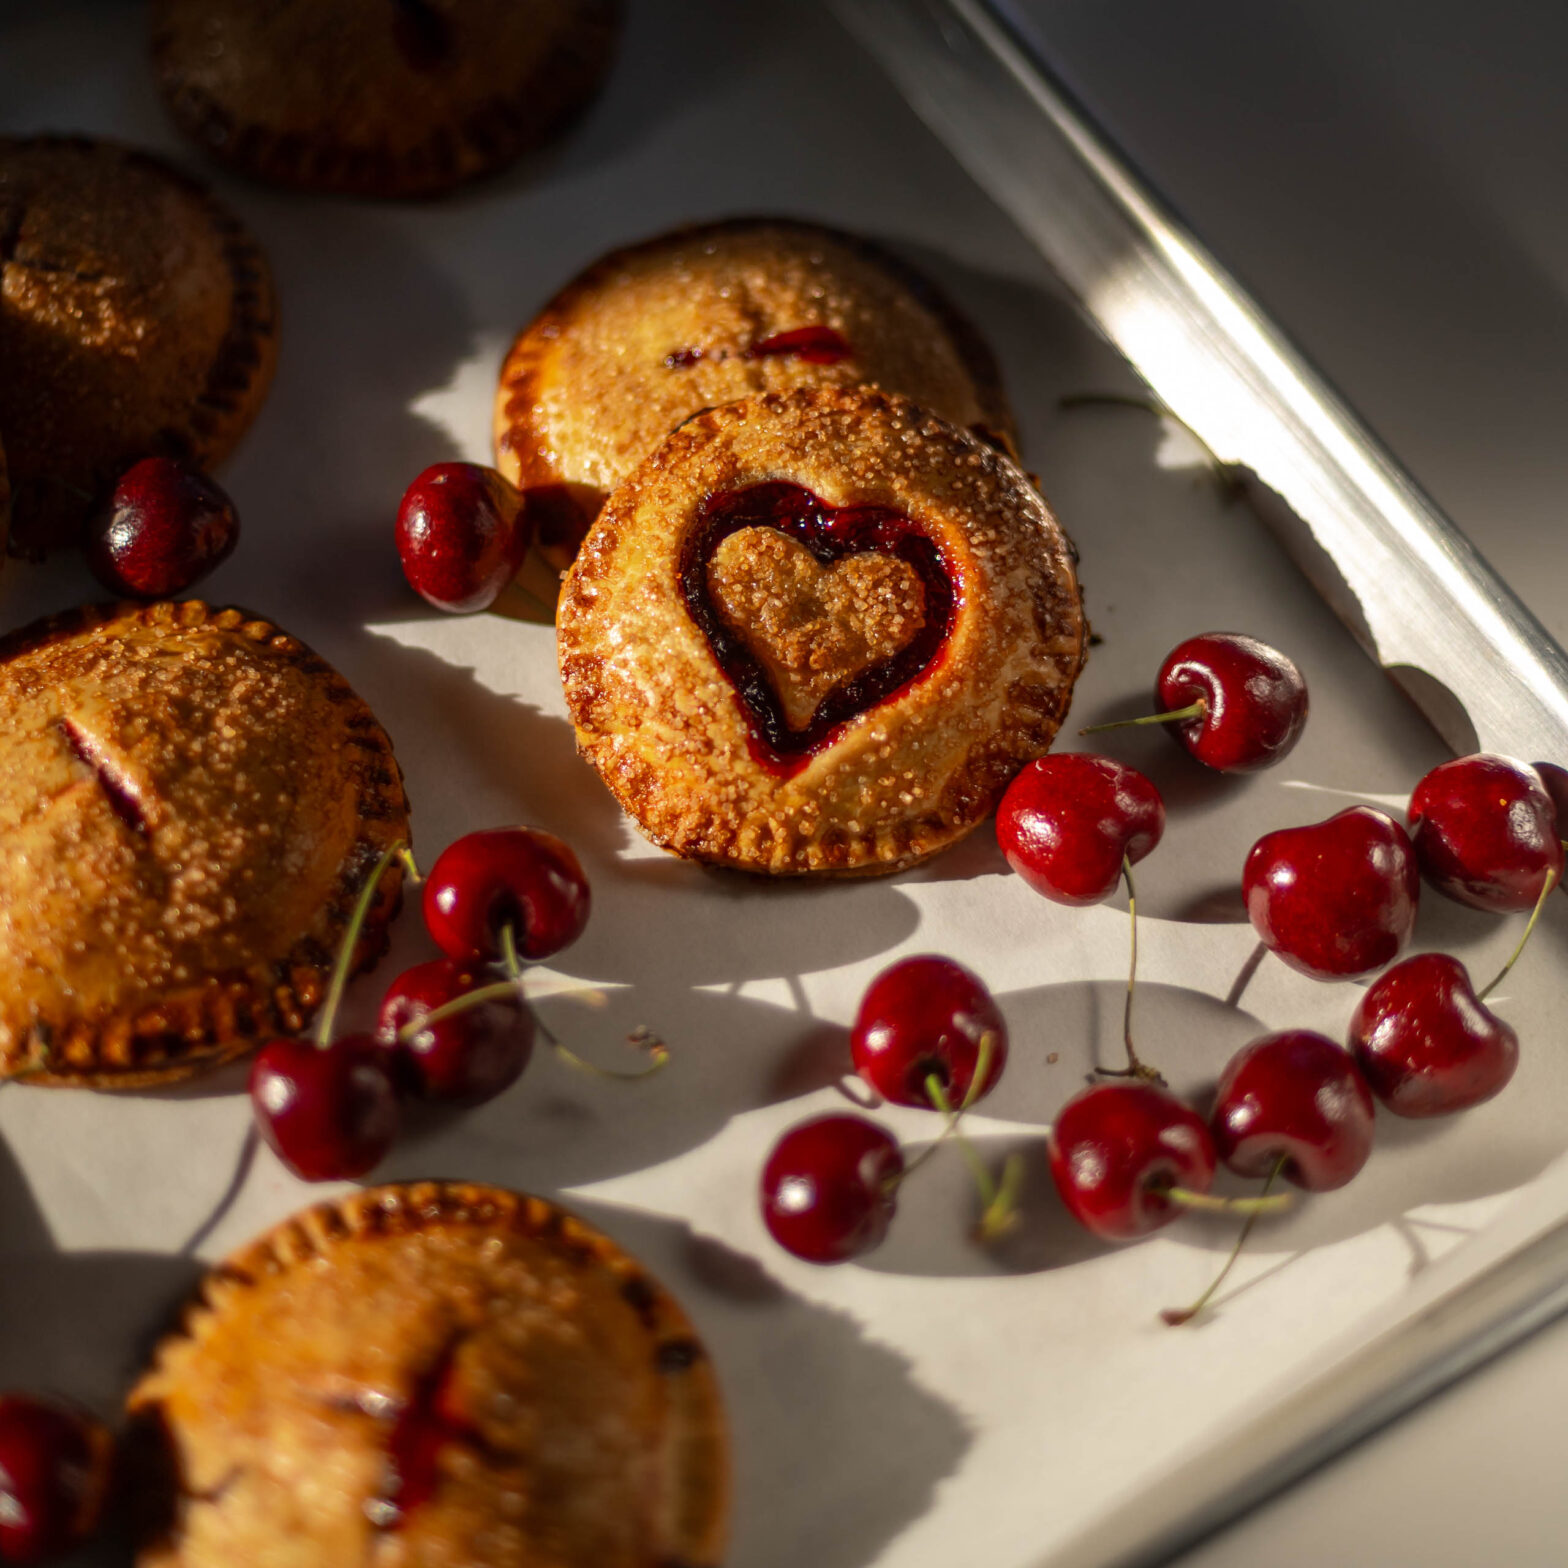
I’m obsessed with how these turned out! Not only are they adorable, quick and easy to make and taste delicious, but they are just the perfect dessert for handing out as gifts for Valentine’s day, packing along for a picnic or serving at a summer bar-b-q even!
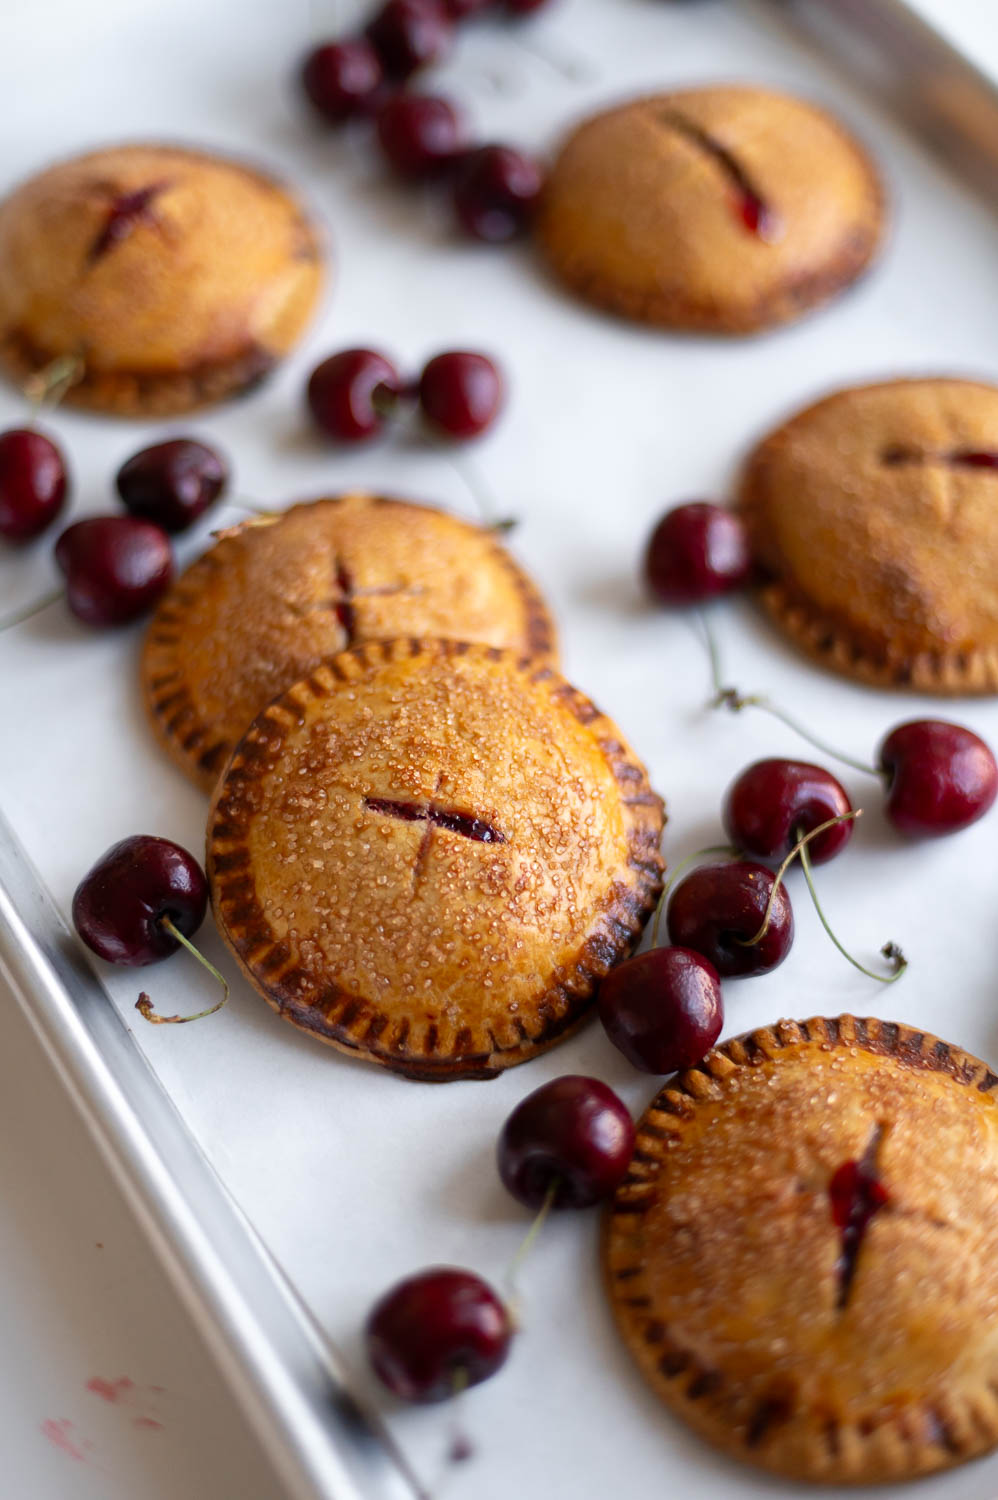
I mean who wouldn’t want to be handed one of these little cuties at a party? I know I’d take this over a slice of cake any day!
Valentine’s Day Cherry Hand Pies Variation
At the time of writing this blog post, Valentine’s Day is just around the corner, so I couldn’t help but also create some Valentine’s Day inspired cherry hand pies as well using a small heart cookie cutter I have to give as gifts with my Cherry Valentine’s Day Cards! I did this two ways:
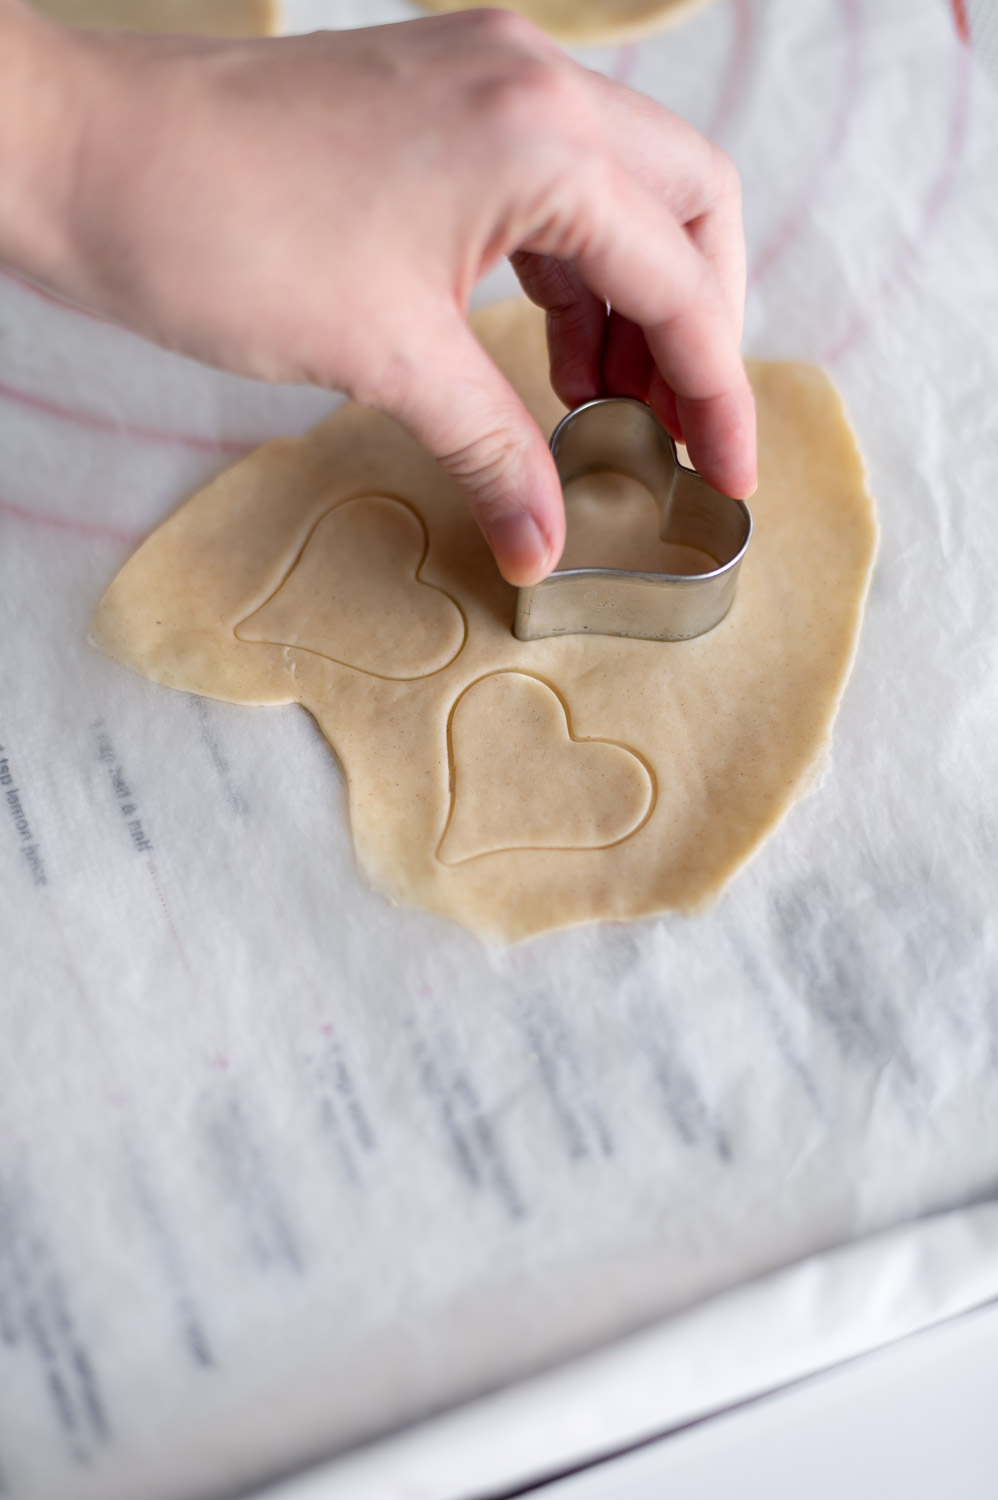
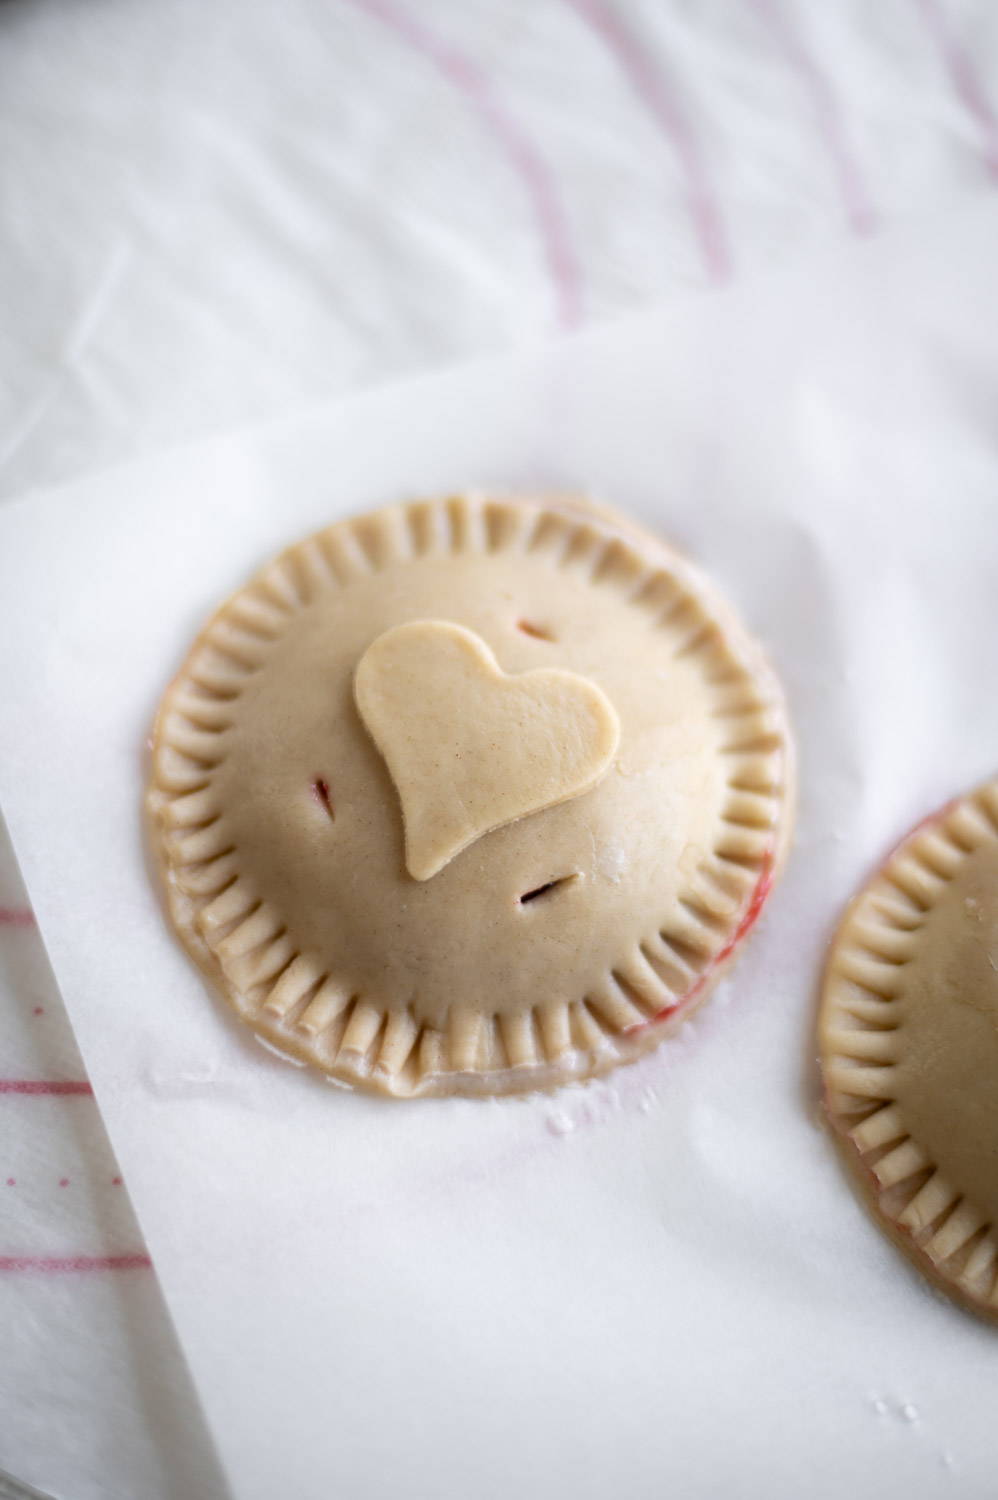
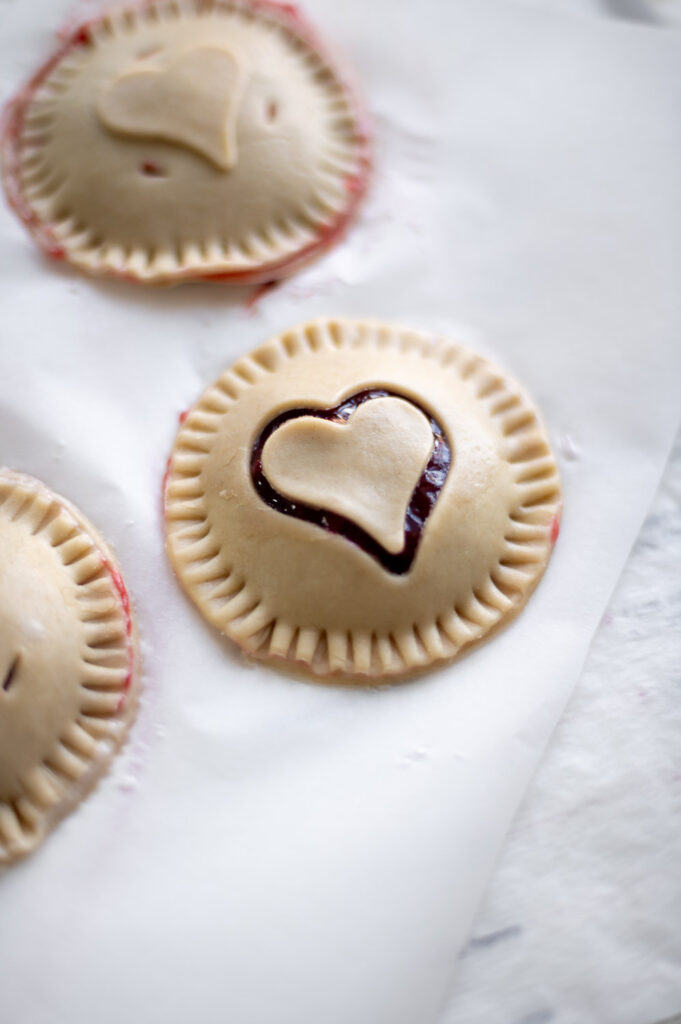
The first (and easiest) way was to roll out some of my scrap pie dough, cut out a few heart shapes and then use a little water to “glue” those onto the tops of my pies. I then cut three small vent holes on the top of the pie around the heart.
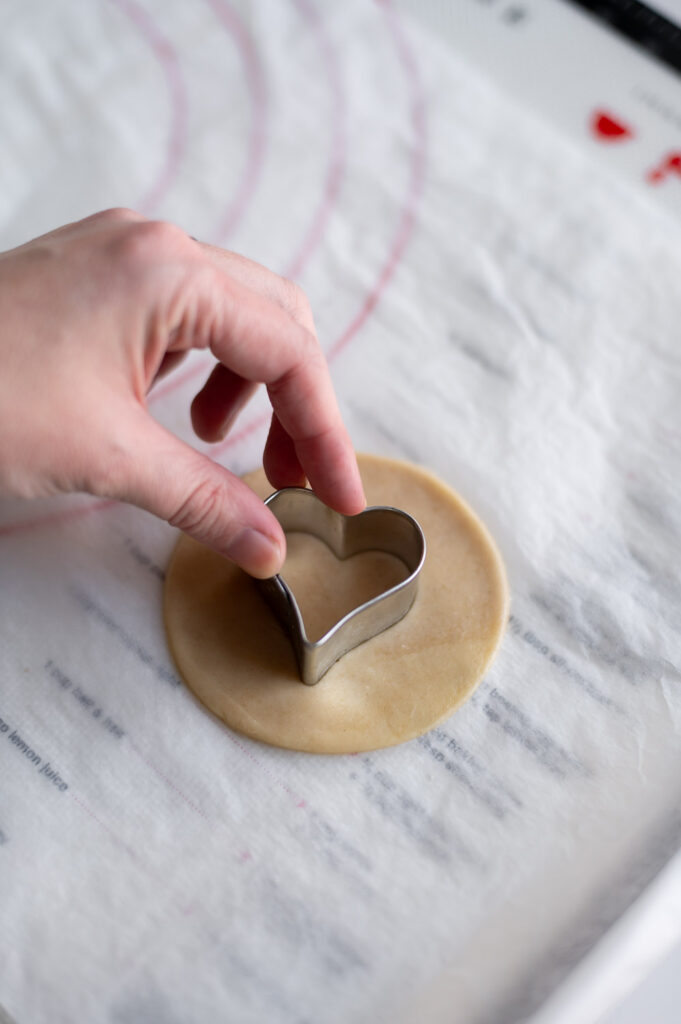
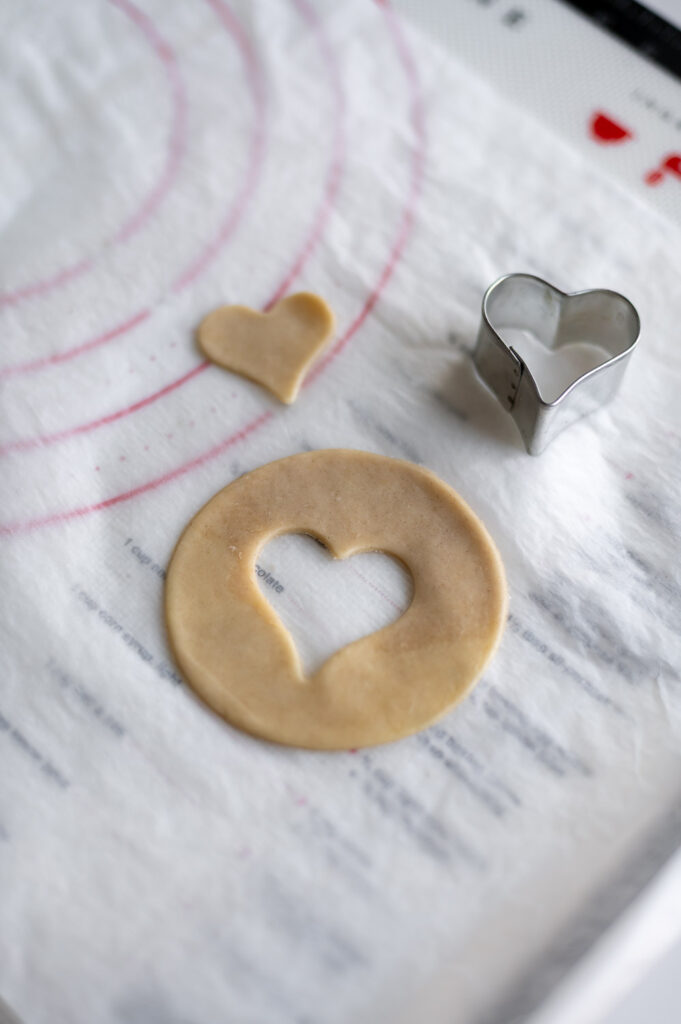
For the second way (which was a bit tricker) I used the cookie cutter to cut out a heart shape from the lid of my pie BEFORE placing it on top. (Hold onto the heart you remove)
You’ll then place the lid on top the pie, the process of which will stretch the heart out a bit. (That’s ok you want that!) You will then take the heart you cut out of the lid and just set it back inside the center of the heart on top of your pie! I wasn’t sure how this one would turn out but it ended up being my favorite!
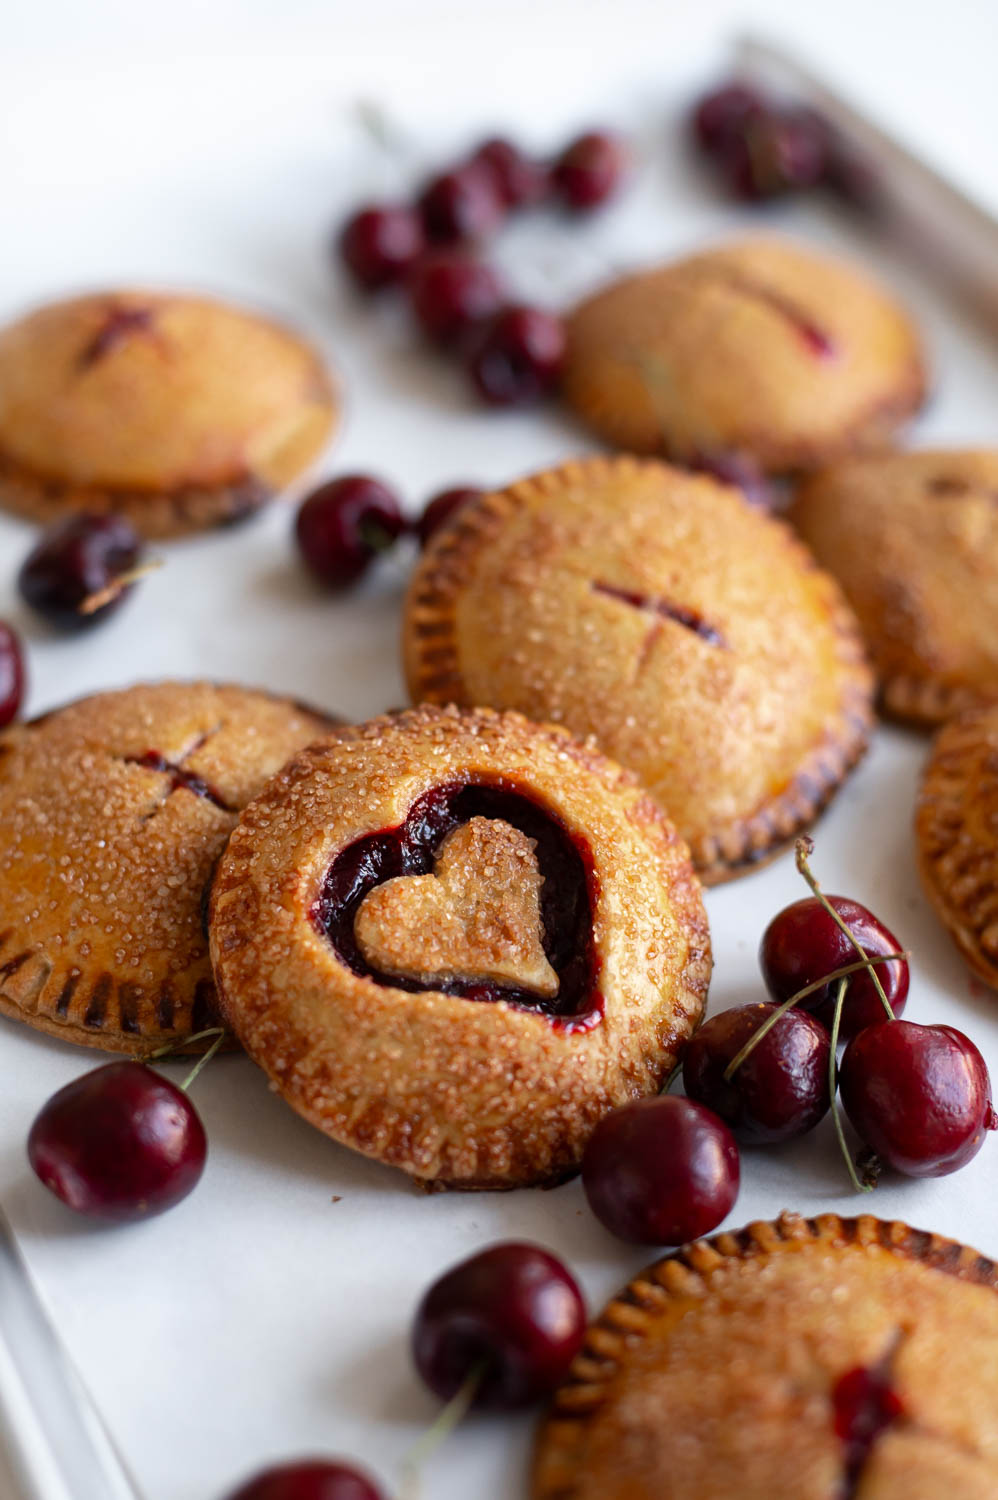
And here’s how they looked after baking! I LOVE how they turned out!
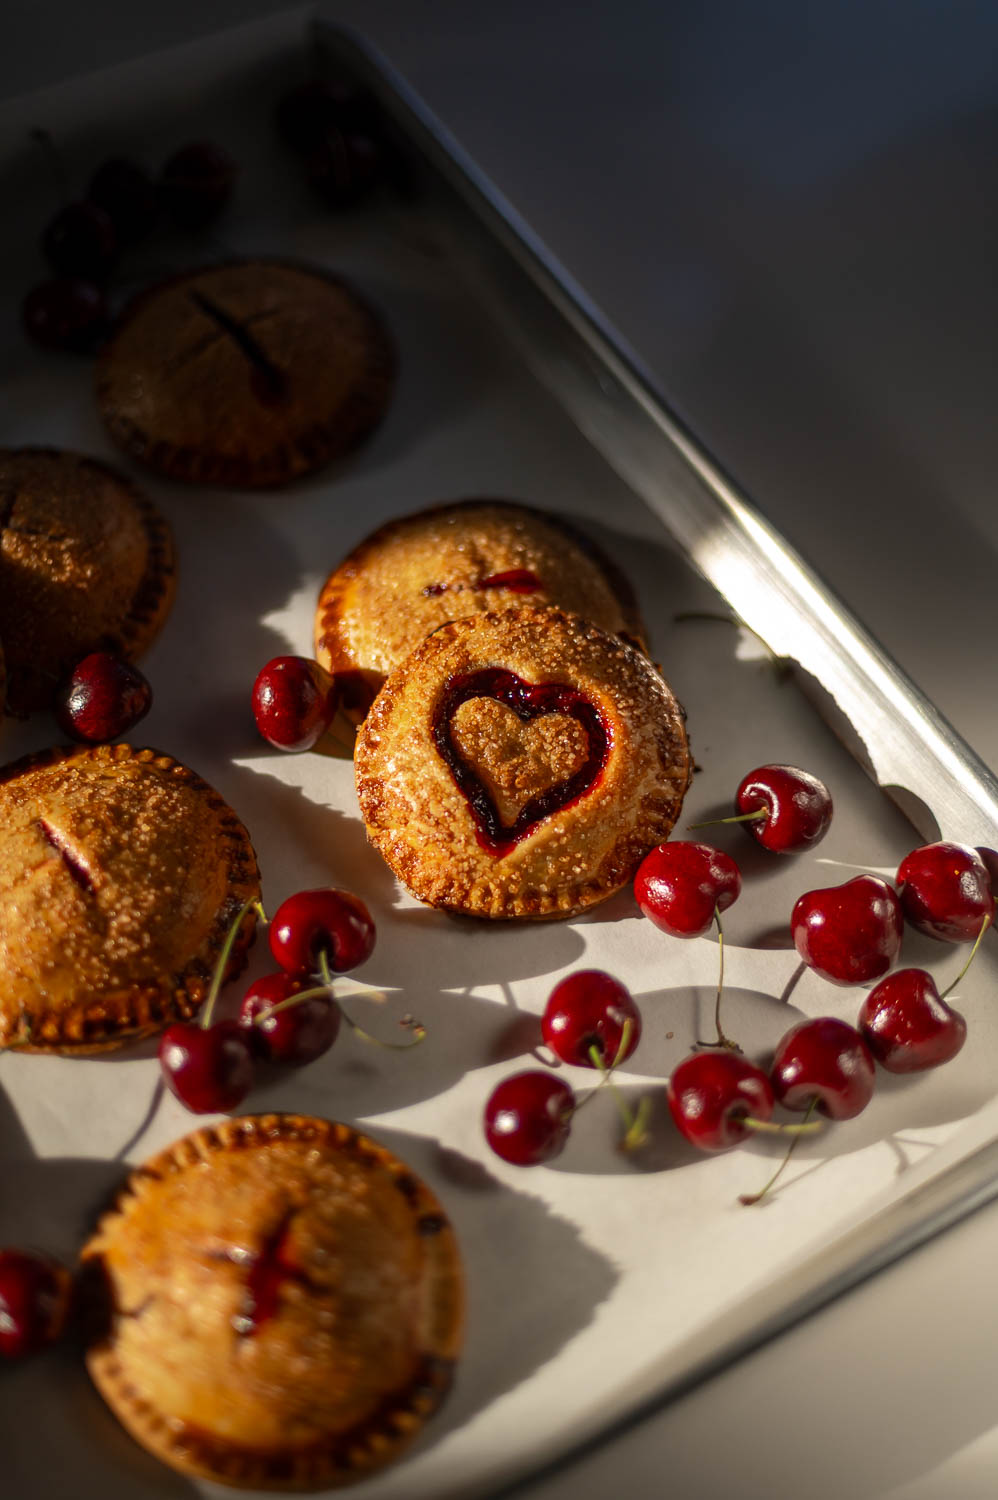
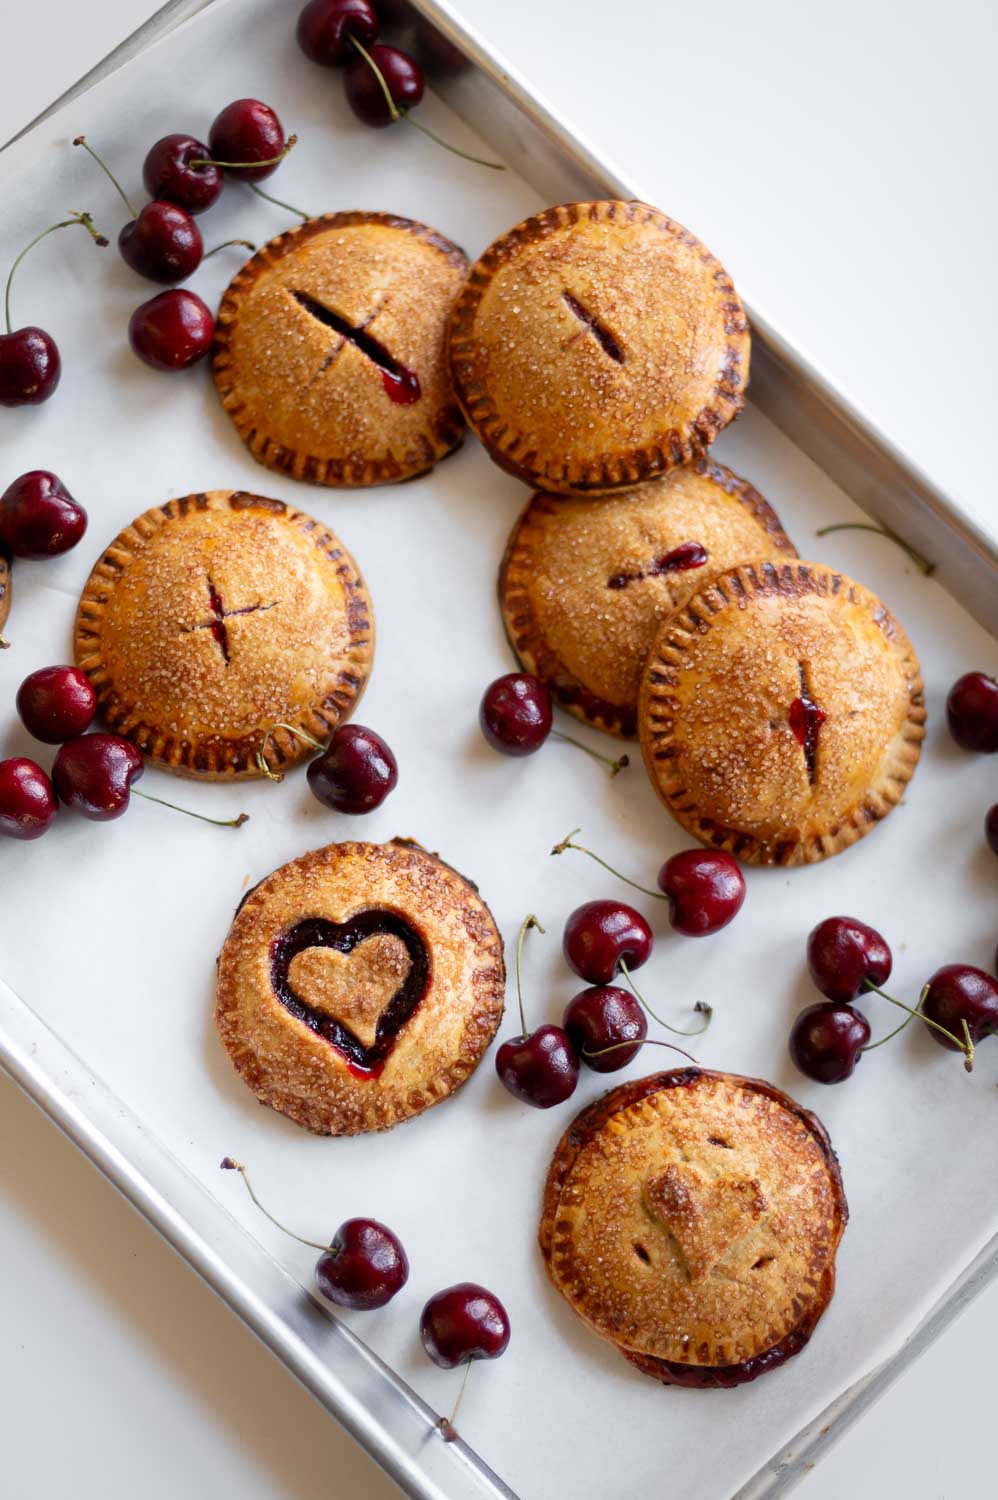
I mean could these be any cuter? I think not. They really are the perfect little Valentine’s Day treat.
Cherry Hand Pie FAQ
Here are the answers to some of the questions I get asked the most for this recipe!
Can You Freeze Cherry Hand Pies?
Whether you want to make these in advance of a party, cook them one at a time for a little single after dinner dessert, or just don’t want to cook the full batch right away, you can actually freeze your unbaked hand pies and save them to bake later!
To freeze the pies, you’ll simply follow all the directions I’ve listed above minus the egg wash, you’ll want to save that for just prior to baking.
Place the assembled pies (minus the egg wash) on a parchment lined baking sheet and then set the entire baking sheet in the freezer until the hand pies are frozen solid. This will likely take anywhere from 1-2 hrs.
Once your pies are frozen all the way through you can pop them off the baking sheet and into a freezer zip-top bag to bake later!
Be aware that when baking from frozen, you’ll need to add a bit of extra cook time and increase your bake from 15 minutes to around 20-25 minutes.
Do I Have To Use Cherry Filling?
And if you just don’t like cherries, never fear, you can use any pie filling your heart desires for your hand pies! From blueberry, to peach to apple, strawberry or mixed berry, you can make these easy walking hand pies out of any filling your heart desires.
I personally want to try my hand at creating strawberry rhubarb ones next!
What If I Want To Make Everything From Scratch?
I love that for you! If you want to skip the premade crust and canned filling all together, I love this homemade pie crust and this homemade cherry pie filling.
What If I Don’t Like Cardamom?
If you don’t love cardamom, feel free to swap that spice out for cinnamon and a little clove or allspice instead!
Want to add a bit more complexity of flavor? Try adding a bit of red wine or bourbon to the pie filling before simmering it!
What If I Don’t Want To Modify The Filling?
If you want to make these hand pies even EASIER, you can feel free to skip the pie filling upgrades and just use canned pie filling straight out of the can as is! It might be a bit runnier but it will still taste delicious.
How Do I Keep My Hand Pies From Leaking Filling Out The Edges?
There are a few things that will help ensure you get a good seal on the edges of your hand pies so the filling doesn’t leak out on you:
- Be sure you aren’t overfilling your hand pie, you are going to need at least a finger’s width of space around the edge for the seal, so you need to portion your filling out accordingly.
- Make sure you’re wetting the inside edge of your hand pie down with water or some egg wash prior to placing the lid on top to help “glue” the top and bottom of the hand pie together.
- When placing your lid on top, you’ll need to slightly stretch the dough a bit so it is large enough to cover your filling AND still reach all the edges of the bottom of your pie crust.
- After placing your lid on top, ensure you firmly press down all along the seams to help glue the edges together
- Go back with a fork to crimp the edge and further seal the edges.
- Finally don’t forget to FREEZE your hand pies for about 10-15 minutes before baking! This helps so much to prevent leaks!
Final Thoughts
I’ve had the idea for these semi-homemade cherry hand pies floating around in my brain for over a year now, and I had too much fun getting to finally make them with my 2yr old this year! My mind is already dreaming up all the ways I could serve these as Valentine’s day gifts or at summer picnics or even with some mulled spices at Christmas time! Let me know if you give this recipe a try and how you’re using them in your life!
Don’t Forget To Pin This Post & Subscribe!
Want to keep getting more DIY home decor inspiration, thrifting tips & tricks, free art downloads, reading recommendations, and home renovation tutorials? Then don’t forget to pin this post for later so you can follow me on Pinterest and then subscribe to my blog so you can get links to my newest content as soon as it hits the blog!